


Hardware components | ||||||
 |
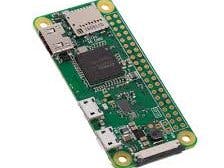
| × | 1 | |||
| × | 1 | ||||
| × | 1 | ||||
| × | 1 | ||||
Software apps and online services | ||||||
| ||||||
| ||||||
Hand tools and fabrication machines | ||||||
 |
| |||||
This project attempts to produce a wireless sensor node that reads water, air temperature, and barometric pressure then display results on mobile platforms.
This must have its own power supply, have a user friendly interface, and strong build to withstand outside elements and heavy use.
To start off with you will have to get the latest version of the Raspian OS which can be forund here
.
Using win32 Disk imager to write the OS on the sd card( SD card 8gb class 10 or higher is prefered.).
Once this has been done you will now have to configure it to connect to you wireless network. I am setting this up as a headless unit as i do not have the option to connect keyboard and mouse.
With the memory card still in you PC navigate to the drive that your SD is in, in my case \G\boot.
Using your prefered text editor create a file called wpa_supplicant.conf.
In the enter the following,
network={
   ssid="YOURWIFINETWORKNAME"
   psk="YOURSECUREPASSWORD"
   scan_ssid=1
}
and then save it to the SD card.
Next open the file called config.txt and add the following to the bottom of the file and save.
# Enable UART
enable_uart=1
The next thing we have to do is enable SSH to the pi. This is a simple task and all you have to do is create an empty text file called ssh.txt
Next safely remove your SD card from your pc and insert it into your Pi Zero. Now we have to find the ip address of the pi that the router has given to it.
Log on to your router and search for connected devices and the ip address should be there.
Once we are armed the Pi's ip address on your LAN we are going to connect to it via putty.
You can download putty from here if you haven't got it already.
Once downloaded open up the application and you should end up with something like this
Once your here in the Host Name (ip address ) field enter your Pi's ip address and hit enter
if it is the first time you have connected to this Pi you will see a dialog box like this
Click yes and the following will appear
When prompted login as pi and the standard password on a fresh install of raspian is raspberry. I would advise that you change this at a later stage for security reasons.
Once you've logged on you will be presented with the SSH terminal like this.
That is the first stage completed now all we have to install Flask.
All the docs for Flask can be found here.


Comments