


Hardware components | ||||||
 |
| × | 1 | |||
| × | 1 | ||||
| × | 1 | ||||
| × | 1 | ||||
 |
| × | 1 | |||
| × | 1 | ||||
Software apps and online services | ||||||
 |
| |||||
 |
| |||||
 |
| |||||
 |
| |||||
Easy
Build Time:Beginner: 3-4 hrsExperienced: 1-2 hrs
Build list items:Hardware:
Various Wiring:
Soldering Equipment
ResourcesRaspberry Pi
- `sudo apt-get install python3-pip`
Servo Hat
UV Light Sensor
What did you make using nio?Using the nio Platform and less than $40 worth of materials, I made automated blinds. This system combines real-time sensor data from a UV sensor to control a servo attached to the blinds. The resulting system creates blinds that open and close themselves depending on the amount of light available outside.
The nio Blind-o-maticTyler explaining how he uses the nio Platform to make automatic blinds!
Why would you use nio to create this project?With nio, the logic for this system is extremely simple to set up. Using modular blocks, multiple devices and sensors can connect and communicate with each other. The most difficult part was setting up the hardware. nio allows the intelligence behind the system to be set up, tested, changed, and shared seamlessly.
ReadUV ServiceThe services in this system are fairly simple. ReadUV contains 3 blocks, an IdentityIntervalSimulator which drives the service, a custom block for pulling data from the AdafruitSI1145 UV sensor, and a Publisher. This service is small and simple for good reason. The data gathered from this sensor can be useful for more than motor control. Sending the data gathered here through a Publisher block keeps the service modular and allows for the data to be used for other purposes by future services.
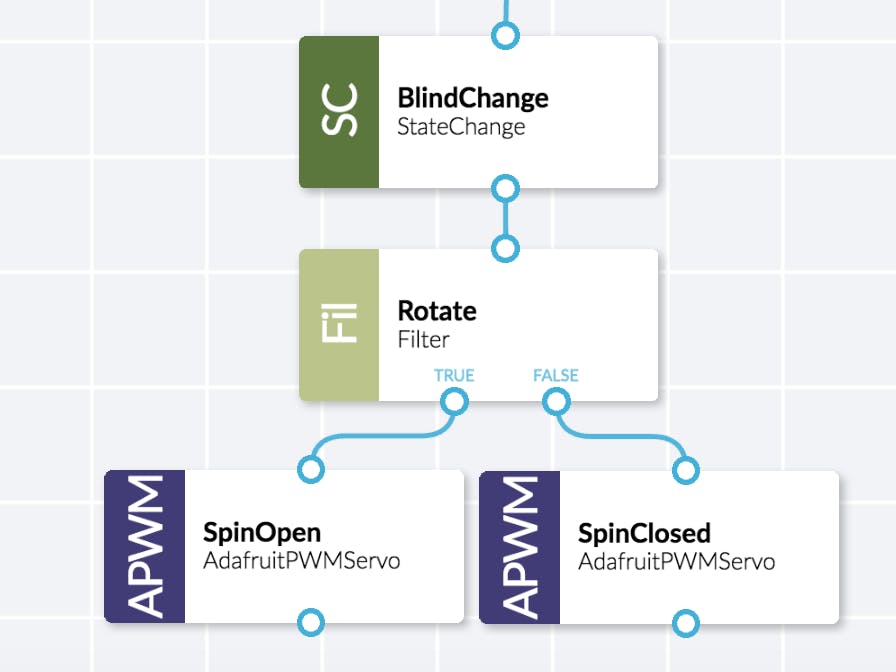
The MoveServo service implements the logic for opening and closing the blinds. The data gathered from the Subscriber block goes through a ConditionalModifier. This takes the `uv_index` attribute of each signal coming into it and determines if it is a value where I consider the blinds to be “open” or “close”. This goes into the most important block of this service, the StateChange block. In this block, a signal is only passed through if it is a different value that its previous state; in this case changing between “open” and “close”. The changed state value from this block will then flow through a Filter which controls which direction the servo motor moves. One block will rotate the servo to open the blinds and the other will rotate to close them.
One issue that I ran into on this build was overworking the hardware that I was using. I effectively burnt out an Adafruit PWM Servo hat bypassing the block way too many signals. nio is capable of processing a huge number of signals but hardware is not. Be careful with the signal intervals of driver blocks. Generating a signal every 3 seconds to control the motor is fine but a signal every 100 microseconds will burn out the control board.
This system can be used to integrate with different types of blind control systems. The version here is used to open and close through a pulley string. Blinds that rely on a spinning rod can be automated using a DC motor with a timeout rather than a servo.
Don’t be afraid of custom blocks. If a device you want to integrate into nio comes with a simple to use script/library, don’t hesitate to create your own block. The following comparison shows how a simple python script used to control the Adafruit PWM Servo Hat, could be translated into a modular, configurable block.
Simple python script
Configurable block translation
While the simple script is more approachable, the block script really doesn’t require too much additional code. Every block must import the Block base and Properties from the nio framework. Each block is a class of Block type. Typical methods of blocks are __init__ which runs once an instance of the block is created, start which runs once on block start, and process_signals which runs for every signal that is passed into the block. Enough logic can be created with only these three methods to create a block that controls a servo motor in under 25 lines of code.
Have questions on how to build it? Watch the step by step tutorial below:Tyler Lugger
 Drew Noolas


_3u05Tpwasz.png?auto=compress%2Cformat&w=40&h=40&fit=fillmax&bg=fff&dpr=2)
Comments