


Hardware components | ||||||
_ztBMuBhMHo.jpg?auto=compress%2Cformat&w=48&h=48&fit=fill&bg=ffffff) |
| × | 1 | |||
 |
| × | 1 | |||
 |
| × | 1 | |||
Software apps and online services | ||||||
 |
| |||||
 |
| |||||
About the problem:
Before I get into the specifics, let’s take a moment to consider the key questions and caveats involved in a project like this:
How can I create a weather station that it is neither valuable nor attractive to a thief?
How can I keep hardware costs and development time to the minimum?
How can I measure and access weather data in real time and display it in a useful way?
Required measurements: wind and wind gusts, wind direction, rain, atmospheric pressure, temperature, humidity
Connect station to Internet
Store and retrieve local weather data
Communicate between weather station and server
How can I reduce maintenance to (almost) zero?
Manage hanging of software
Manage loss of connectivity
Manage loss of energy supply
Objective/Aim
The goal of this project is to make a temperature/humidity monitor that wirelessly logs the temperature and humidity to a remote server. We will use an blynk board (or clone), a DHT11, an ESP8266, and ThingSpeak.com for this project. This is a great project to start using the ESP8266 for some basic data logging so let's get started!
The ESP8266 based wifi breakout boards are becoming more popular with Makers due to a low cost and a powerful, programmable microcontroller on-board.
The cost is a magnitude lower than solutions including blynk+Wifi Shield or and blynk board
To quote Make publisher Brian Jepson:
“This is inexpensive enough to be very much in the territory of ‘thousands of sensors-launched-out-of-a-cannon’-cheap.”
Couple the ESP8266 with one of the inexpensive DHT series digital temperature and humidity sensors and we have a project that may literally be deployed anywhere to broadcast sensor data.
The broadcasting used in this tutorial is using the ESP8266 webserver code and respond to web requests (like in a browser or a web client) to return temperature and humidity data (in a REST type format).
This project demonstrates the programming of the ESP8266 ESP-01 module with the blynk board and interfacing with a DHT temperature/humidity sensor. Using other sensors and their corresponding libraries, other electronics may be interfaced with the ESP8266 and monitored via wifi.
.
TECHNICAL DETAILS
This project is presented on a breadboard as it best demonstrates the connections and how the digital pins might connect to other types of sensors. A final project may only have power, a regulator, the ESP-01, and a sensor, which could fit in a very small container.
For this project I used an blynk clone but any blynk board or clone will work.
blynk board
USB A to B cable and 5V USB power supply
ESP8266 wireless transceiver. I used the Esp-01 but any version should work, just make sure you know the pins.
DHT11 temperature/humidity sensor, I used a DHT11 but a DHT22 would also work
Breadboard
Jumper wires
Resistors
Create a ThingSpeak Channel
In order to log your temperature and humidity measurements online you need to have a website or webservice that can accept GET http commands. In this Instructable I am using ThingSpeak but there are other, similar services out there so feel free to use something else to log your data.
If you use ThingSpeak you will need to make a channel with two fields, one for temperature and one for humidity. They have a number of options for displaying data in graphs so I encourage you to explore these options and see what you like best. I settled on two simple line graphs with a 10 point average to smooth out occasional blips in the data. ThingSpeak will give you a Key for your channel that you will need to put into the code so that your channel will accept your data.
WIRING
First we should cover some basics of the ESP8266 and the DHT11. Then we will move on to wiring them to the blynk.
The image above shows the front of the ESP8266 with the 8 broken out pins labeled. The ESP8266 runs at 3.3 V so make sure you connect the Vcc pin to the 3.3 V pin on the blynk. This also means that you will need to use a logic level shifter or make a voltage divider for the serial connection from the blynk board to the ESP8266 or you risk ruining it. If you don't want to buy a logic level shifter then you will need to make a voltage divider which you can do using two resistors. Sparkfun has a great tutorial on this so you can see how they build theirs and calculate which value resistors you will need to use. I used a 220 Ohm resistor and a 470 Ohm resistor for mine which got me close enough to 3.3 V. Since the ESP8266 outputs 3.3 V and the blynk boards can take that voltage there is no need to do anything to the serial line from the ESP8266 to the blynk.
The DHT11 spec is only +/- 5% humidity and 2 degrees Celsius so it is not a super accurate sensor. It's also only good for temperatures above freezing. The DHT22 is a bit more accurate so if that's important to you opt for it instead. Both sensors work with voltages between 3.3 - 5 V. The signal pin will need to be connected to a pull-up resistor, which I used a 4.7 kohm resistor for.
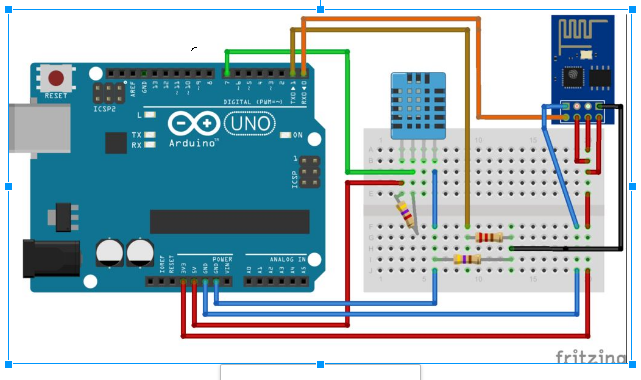
The Fritzing diagram above shows the wiring. For ease of use all connections to 5 V or 3.3 V are red and all connections to ground are blue. The wiring connections are as follows:
Uno | ESP8266
RXD | TXD
TXD | RXD (through voltage divider)
3.3 V | Vcc, CH_PD, Reset
GND | GND
Uno | DHT11
5 V | Vcc
GND | GND
D7 | Signal (connect to Vcc via pull-up resistor)
FINAL TESTING
With terminal app check output from ESP and you will see your IP address after reset and then value of temperature every upload period...
You can see your data in thingspeak like mine:
https://thingspeak.com/channels/98397
INNOVATIVENESS AND USEFULLNESS:
1.The ESP8266 module is an extremely cost effective board with a huge, and ever growing, community.
2.Highly economical (costs around only Rs. 500 to build)
3.Easy to operate and maintain
4.The ESP8266 module has a powerful enough on-board processing and storage capability that allows it to be integrated with the sensors and other application specific devices through its GPIOs with minimal development up-front and minimal loading during runtime.
5.Real-time data collection and storage
6.MATLAB analytics and visualizations
7.Alerts
8.Scheduling
9.Device communication
10.Open API
11.Geolocation data
12.Available on GitHub

Comments