

Hardware components | ||||||
 |
| × | 1 | |||
 |
| × | 1 | |||
 |
| × | 1 | |||
 |
| × | 1 | |||
 |
| × | 1 | |||
Hello everybody, I am Shafin, a member of Aiversity. I am going to share how to build a water level sensor with an Oled display for water tanks with a Raspberry pi. The OLED display will show the percentage of the bucket filled with water.
For the whole project, visit: http://aiversity.com/water-level-monitor-with-oled-display-using-raspberry-pi/Extra MaterialsWater Jug
Bucket
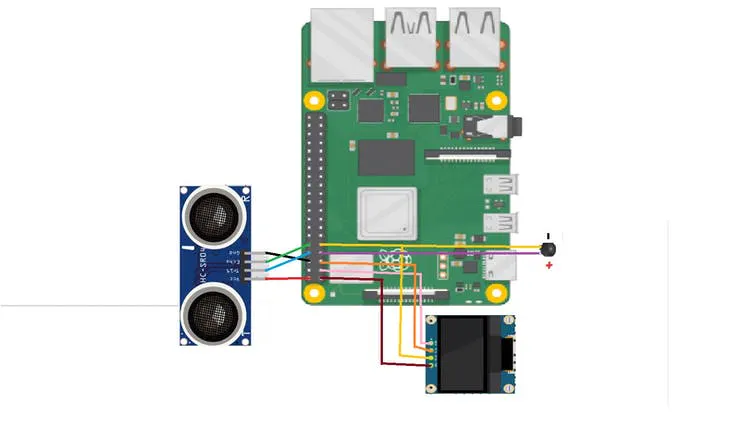
ConnectionsNow let’s talk about the connections of the raspberry pi, ultrasonic sensor, OLED display, and the buzzer.
Please follow the circuit diagram given below
Connections:
Ultrasonic sensor Vcc to 5v of Raspberry Pi
Ultrasonic sensor Gnd to Gnd of Raspberry Pi
Trigger to GPIO 14
Echo to GPIO 15
Buzzer + to GPIO 4
Buzzer – to Gnd
SDA of Oled display to Gpio 2 of Raspberry Pi
SCL of Oled display to Gpio 3 of Raspberry Pi
Vcc of Oled display to 3.3v of Raspberry Pi
GND of Oled display to Gnd of Raspberry Pi
Structure· Attach a scale to the bucket.
· Next attach the buzzer and ultrasonic sensor to the scale
Now you know the connections and the structure, let’s build the code.
1. Open the Thonny Python IDE
2. Download the Github code below or from the end of the page:
. Run the code
You will have to add your distance from the ultrasonic sensor to the base of the bucket on the line :
Line 25. dist_from_base = #Write the distance from the sensor to the base of the bucket
TestingTesting
Fill water in the bucket. When the distance of the ultrasonic sensor from the water is around 4 centimeters, the buzzer will beep, alerting the bucket is almost full and the OLED display will show the percentage of the bucket filled.
If you have any queries, please ask at Shafinkothia@gmail.com
To know more, visit Aiversity.com


Comments