


Hardware components | ||||||
_ztBMuBhMHo.jpg?auto=compress%2Cformat&w=48&h=48&fit=fill&bg=ffffff) |
| × | 1 | |||
| × | 1 | ||||
 |
| × | 1 | |||
 |
| × | 1 | |||
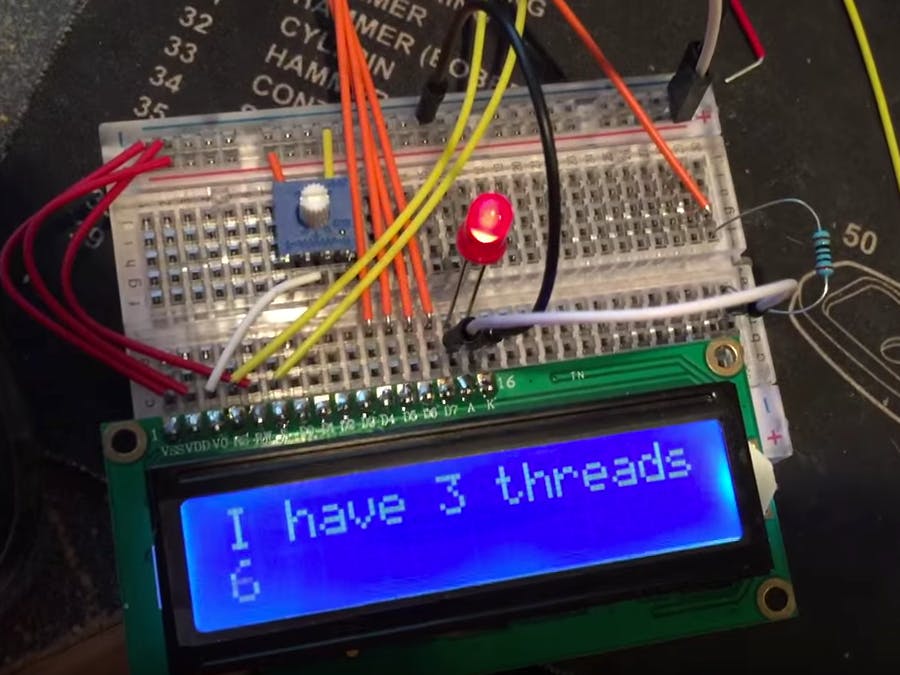
This video depicts something you may have wanted to do during your budding prototyping career, coaxing a single-core arduino to do 3 things at once. In this case, we're:
- Pulsing the backlight at a constant rate without interruption
- Incrementing an integer every second and writing it to the display without interruption
- Rotating a few messages every few seconds and writing them to the display without interruption
Protothreading is a way of performing what would normally be a multitasking operation on (doing two or more things at once or at different intervals) on an Arduino. In other words, it's "multithreaded"! But hold on there Sparky, the Arduino is a single-core chip with procedural code, so true multithreading is impossible. Why though? How is protothreading any different?
"Real" Multithreading vs ProtothreadingTo understand protothreading properly, we first need to understand why it's NOT really multithreading.
Remember back in the day when Intel was selling us this new "Hyperthreading" thing on Pentium processors? No? You weren't born yet? Well time for a history lesson then, son! Hyperthreading is a technology Intel employs to make a single core on a processor "act" like it's two cores, or two cores "act" like they're 4 cores, etc. But why, and how is that relevant to Arduino? The answer is cycles.
Both Microcontrollers and CPUs do work in "cycles". How fast they do them (how many in a second) is the clock rate. You've seen a CPU's Ghz rating, and you probably know it relates to how fast it is. The more Ghz, the better, right? but why? Because that's the number of cycles per second a processor can achieve (without overheating and catching on fire - really!).
If you're a datasheet nerd, you might know that the Arduino Uno's microprocessor chip, the Atmel ATMega328P, runs at 16Mhz out of the box. It's capable of 20Mhz, but is dialed back so it won't mess up things like writing data to memory (or, you know, catch fire). 16Mhz means every second, your Arduino is processing 16,000,000 cycles, aka doing 16 million pieces of work. Now, these are NOT lines of code - that'd be blazingly fast and Arduino is relatively slow. These are processor instructions such as moving data in and out of registers. Going lower level than this overview get's fairly technical so I'll leave that as an exercise to the reader, but that's the gist :)
So, if we can only go so fast on a core before the best chip available catches fire, are we stuck at that speed forever? Is that the fastest we can do work? As it turns out, no! Enter multicore CPUs, and multithreading. On a computer CPU, multithreaded applications are two separate processes that work in parallel to one another on different cores of a CPU. These processes interact to get work done together, but don't necessarily split the work evenly as you might assume. There is typically a main process / "thread" that functions as a manager of the other threads, and then one or more worker threads it manages, which each might do specific tasks. A good example is Chrome. Chrome is the manager of all your web page tabs (threads), but because chrome is multithreaded, each tab is its' own little program. That means not only can it run faster if you have several cores to distribute each tab across, it also has other benefits like not crashing the entire browser when one tab crashes. This is the first reason Protothreading is not multithreading - we only have one core to work with on an MCU, so traditional multithreading is straight up impossible. We need to manage work on only a single core, but still do multiple things at once. We need protothreading.
Ok, how is Protothreading different then?Protothreading is very simillar to that Hyperthreading thing I mentioned, to an extent. Hyperthreading would emulate a second core and literally divide the work one core is doing by pretending to be two virtual cores. This worked because they really existed on the same core and thus shared the same resource space. Since the arduino MCU doesn't support hyperthreading, we're not able to do that here. Protothreading is similar, except that in place of CPU cycles and instructions, we can break work down by the 'loops' or 'lines' of code being executed by our sketch. As you might imagine, if we're doing more stuff, loops would take longer, so each project will have vastly different 'loops per second'. There are different implementations of protothreading, and the one I use here is admittedly probably shoddy, but it works. Basically, each loop we don't have other work to do, we do some less-demanding or less-frequent work in the main loop (or nothing at all). When we're not busy, we're checking to see if it's time to do one of those other pieces of work yet. If so, we branch off and go do it. It's important to note that actions that are "blocking", meaning they must complete all at once without interruption and thus tie up the MCU for a period of time (such as reading data off an SD card and a few other tasks) will still block other protothreads from occurring "on time", but for simple things like two loops going at once performing quick actions like variable changes or changing output values, it will work superbly. This is more or less what we'll be doing here. Some MCUs support a real-time operating system (RTOS) that can provide more hyperthreading-like multitasking abilities which can help mitigate problems caused by "blocking" tasks.
Let's get started.We first figure out what tasks we need to perform. In my case, I picked (a) fade the backlight of my LCD panel in and out for a neat "pulsing" effect, while (b) counting up a number on a much slower, (and possibly non-divisible) interval, and (c) rotating some string messages at a yet much slower interval. Some guidelines to follow to make sure this process works smoothly are to rate your functions from the least-blocking to the most-blocking. Actions (let's call them "functions" from this point on) that take longer, like reading data or have other long delays, and functions with larger intervals between when they fire are the most-blocking functions. Functions which fire very frequently, if not every loop, and don't take long to complete are the least-blocking functions. The very least blocking function is what you should use as your primary "thread". Can you guess which it is above?
That's right, it's "a", pulsing the backlight in and out. This will be at a regular and very fast interval, perpetual with no delays inbetween fires other than getting the work done, and the work itself is very fast. The perfect manager thread.
We will use this thread (and any loops within it) to check if the other threads need to do any work. It's probably best to read through the code at this point - it is heavily documented. See the main loop toward the bottom. You can see me checking if threads need any work where I call numberThread.check()
and textThread.check()
.
I need to do this within any loops in the main thread as well, as they will block until completion if I don't. I set the interval at which the threads need to fire when I initialize them during init or the setup portion of the code. If it's time for these threads to fire, .check() will see that and perform their work before continuing the main thread.
That's really it in a nutshell, the rest of it you can probably figure out yourself by stepping through the code. Let me end by saying while I may sound like it, I'm NOT a protothreading pro by any means, this is just a simple example I hacked up. If you have any tips or if I was wrong about anything, I encourage feedback and corrections! Thanks :)


Comments