


Hardware components | ||||||
_ztBMuBhMHo.jpg?auto=compress%2Cformat&w=48&h=48&fit=fill&bg=ffffff) |
| × | 1 | |||
 |
| × | 5 | |||
 |
| × | 5 | |||
 |
| × | 5 | |||
 |
| × | 2 | |||
 |
| × | 1 | |||
 |
| × | 1 | |||
| × | 1 | ||||
 |
| × | 1 | |||
| × | 1 | ||||
Software apps and online services | ||||||
 |
| |||||
Coronavirus disease (COVID-19) is an infectious disease caused by the severe acute respiratory syndrome coronavirus 2 (SARS-Cov-2). COVID-19 has affected nearly 8.26 million people and has claimed the lives of 446, 135 people from all over the world. This disease affects different people in different ways. Some people may develop mild to moderate illness and recover without special treatment or hospitalization, while some may develop severe illness and even die. The incubation period of this virus is, on average, 5-6 days but it could also be up to 2 weeks. During this period, the person may not experience any symptoms but could still be contagious. The person will be a virus carrier and easily spread it when he/ she does not take any precautionary measures.
Coronavirus has spread rapidly and many countries have been affected by this pandemic. While some countries are recovering, other countries are still in lockdown and some are suffering from the second wave of coronavirus.
How does coronavirus spread?According to the World Health Organization, WHO, coronavirus is mainly transmitted through droplets generated when an infected person coughs, sneezes, or exhales. These droplets are too heavy to hang in air, so they quickly fall on the surfaces below.
A person could contract this disease if he/ she breathes in the virus while an infected person/ virus carrier within close proximity sneezes or coughs, or by touching a contaminated surface and then his/ her eyes, nose or mouth.
How can the spread of coronavirus be controlled?As you may have read in the above section about how the virus spreads, you would be now aware of two main factors: standing in close proximity with an infected person and touching a contaminated surface.
We can curb the spread of coronavirus by taking these two important factors in account.
It is important to avoid standing in close proximity with other people because they could sometimes be a virus carrier. As I have already explained, the person could be contagious before they develop any symptoms. To prevent standing in close proximity, we are advised to practice social distancing and to prevent touching a contaminated surface and then our eyes, nose or mouth, we must wash our hands properly for at least 20 seconds. WHO has advised us to use soap as it is a self-cleansing product and more effective at killing the virus. Soap is available at many places where hand sanitizer or liquid soap is not, and is also cheaper than the other two products.
Sometimes we could touch the faucet after we wash our hands and the faucet could be contaminated. To prevent this from happening, we can use a touchless faucet ( https://www.hackster.io/rajajothir/automatic-faucet-touchless-using-arduino-for-covid-19-369b18 ).
What is Social distancing?According to Johns Hopkins Medicine, social distancing is deliberately increasing the physical space between people to avoid spreading illness. Standing at least six feet (1.8 meters) away from other people lessens your chances of catching COVID-19.
Social distancing must be practiced in public places and when standing in queues. During this pandemic, many countries put lockdown in effect and this is an example of severe social distancing. Severe social distancing measures are taken to curb the spread of a disease and avoid overburdening healthcare systems.
You cannot practice social distancing in crowded places and WHO has advised people to stay away from crowded places to prevent contracting COVID-19. When social distancing cannot be followed, people are supposed to wear face masks and cover their nose and mouth.
Sometimes, people do not practice social distancing when standing in queues and that made me to come up with this innovative idea.
Aim/ Objective of this projectIn my project, I have introduced an innovative way of practicing social distancing with an automatic door control system. This is a prototype but it could also be used in real life situations; it would be helpful in many public places and in reducing the spread of coronavirus. It costed only around $10 (excluding the microcontroller board) to build this prototype.
In this project, people are supposed to stand in the appropriate positions which are at least 1 meter away from each other. This distance can be changed according to your preferences but it has to be more than 1 meter.
If the person does not stand in the proper place, the person will be notified and he/ she can follow social distancing properly. I have used an LCD display module to display the number of people standing in the queue and the occupied slots. If a slot is not occupied, that slot number will not be displayed in the LCD. An alarm system could also be added to this project to set off an alarm when the appropriate slot is not occupied and the person could then occupy the slot after looking at the LCD.
Before entering the queue or the premises, the people must be encouraged to wash hands or use hand sanitizers. This project of mine ( https://www.hackster.io/rajajothir/touchless-faucet-with-door-control-system-for-covid-19-7de89a ) could be useful in this case.
I have used an automatic door control system in this project, so that people do not have to touch the surface of the door handle or the door to enter the building. In real life situations, the servo motor which I have used in this prototype, can be replaced with a solid state relay module. The solid state relay module can be used to operate the motors controlling the automatic sliding doors in malls, supermarkets, offices, hospitals and other public places.
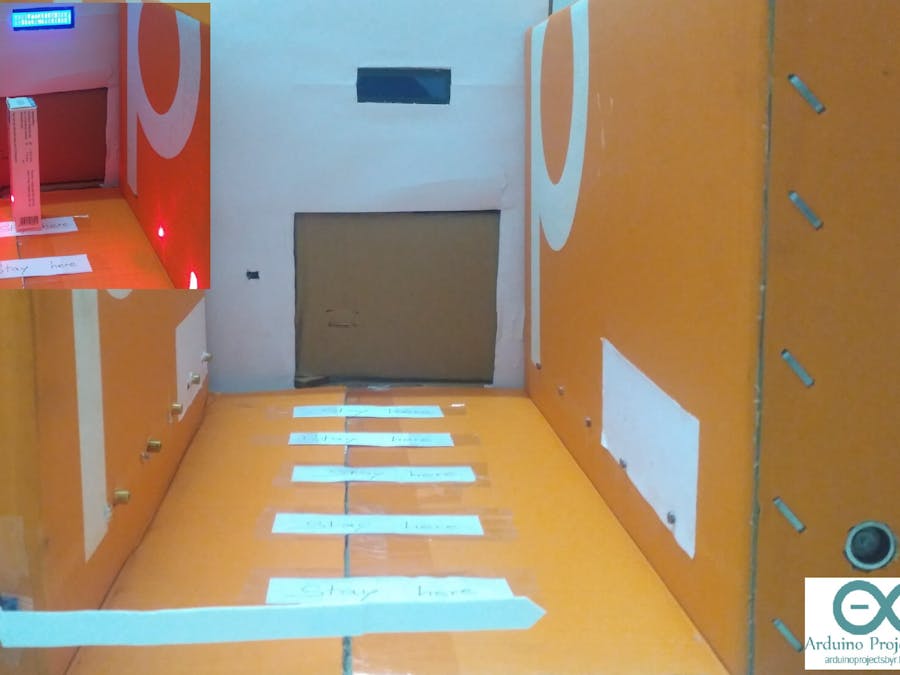
How this project worksI designed the number of slots as five in this prototype, which means only five people can stand in the queue. The distance between the slots are modelled as 1 metre in my prototype.
I have used 5 laser diodes and photoresistors. The laser diodes are placed right in front of the photoresistors such that the laser diode will shine directly on the LDR surface when it is switched on.
The person must stand in the appropriate position and block the laser beam. If the laser beam is blocked then the slot will be occupied and the respective slot number will be displayed in the LCD display module above. If the person moves away from this position, the light will be shone on the surface again and the slot will no longer be occupied.
Code explanationYou can easily deduce the codes by reading this section carefully. For this project, you will be needing the LiquidCrystal_I2C, Servo, and Wire libraries. The Servo and Wire libraries are inbuilt but the LiquidCrystal_I2C library needs to be downloaded/ installed. You can download the library from this github repo.
#include <Wire.h>
#include <LiquidCrystal_I2C.h>
#include <Servo.h>
You would also need the I2C scanner to get the I2C address of your device. You can get the codes for the I2C scanner from this Arduino site or by scrolling down to the code section. My IIC interfaced Liquid Crystal Display module's I2C address is 0x27.
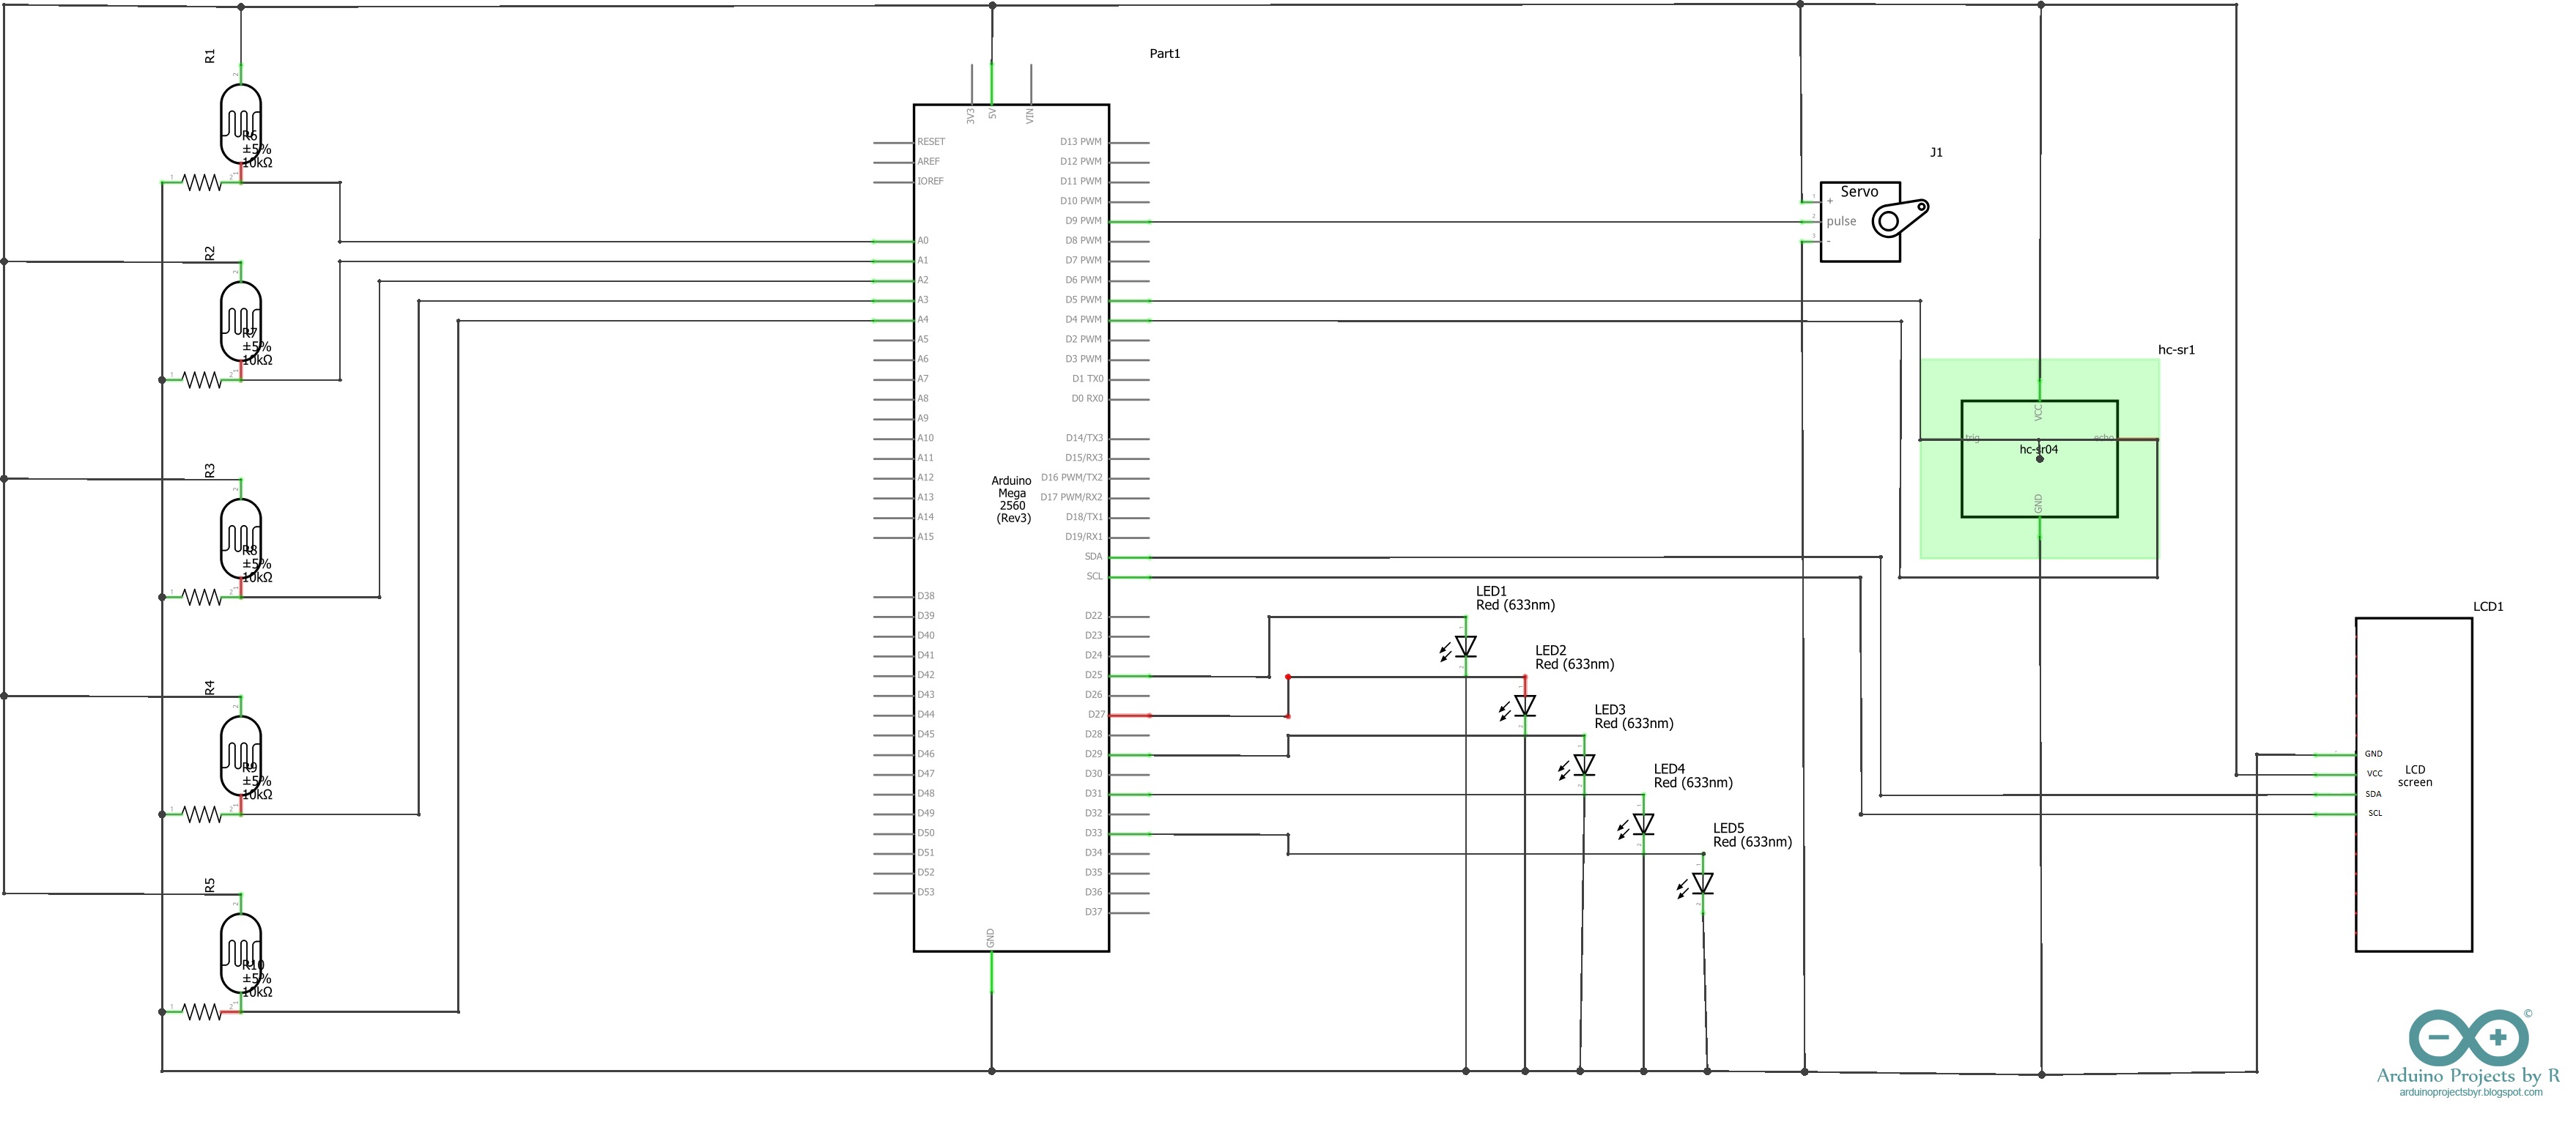
Create two array functions named LDR and Laser, respectively. Add the respective pin values in the arrays. Create a LiquidCrystal_I2C object interface by using the LiquidCrystal_I2C function. Name your object as lcd and the parameters will be your device's I2C address, number of columns and number of rows. Define the trig and echo pins and create two servo objects using the Servo syntax. Name one servo object as Barrier and the other as Door, as one servo motor will control the barrier on the outside and the other one will be controlling the door on the inside of the premises.
Create a variable for your IR sensor and another variable to store the output of the sensor. Create variables named count and distance. The count variable will be used to calculate the number of people standing in the queue while the distance variable will be used to used to store the distance calculated. Create a variable named duration using the 'long' datatype.
int LDR[]={A0,A1,A2,A3,A4};
int LED[]={25,27,29,31,33};
LiquidCrystal_I2C lcd(0x27, 16, 2);
#define trig 5
#define echo 4
long duration;
int distance;
Servo Barrier;
Servo Door;
int count;
int sensor = 6;
int state;
Within void setup( ), call pinMode( ) to configure the pins stored in the Laser and Trig pin as OUTPUT. The pins stored in the LDR array, the Echo pin and sensor should be configured as as INPUT. Use the attach ( ) function with the respective servo objects as syntax to declare that that barrier is connected to D9 and door is connected to D10. Set the initial position of the servos to 0 using the write( ) function and their respective object names as the syntax.
void setup() {
// put your setup code here, to run once.
lcd.begin();
lcd.setCursor(4,0);
lcd.print("Welcome!");
for (int i=0; i<5; i++){
pinMode(LDR[i], INPUT);
}
for (int i=0; i<5; i++){
pinMode(LED[i], OUTPUT);
}
pinMode(trig, OUTPUT); // Set the trigger pin as OUTPUT
pinMode(echo, INPUT); // Set the echo pin as INPUT
pinMode(sensor, INPUT);
servo.attach(9);
servo1.attach(10);
Serial.begin(9600); // Set baud rate as 9600
servo.write(0);
servo1.write(0);
}
Within void loop ( ), create variables to store LDR values. There are different types of LDRs, so make sure to measure the values produced by each LDRs when the laser diode is shone on them and when it's not. The code to test your LDRs is posted in the code section below.
Set the trig pin LOW for 5 microseconds before setting it HIGH. Set it LOW after 10 microseconds. Calculate the duration using the pulseIn function and store the value in the 'duration' variable. The pulseIn function will calculate the time taken for the ultrasonic pulse emitted by the trig pin to reach the echo pin. The echo pin will be HIGH when it receives the ultrasonic pulse. To learn about how the ultrasonic sensor module works, please visit this website.
Divide the duration by 2 and multiply it by the standard speed of sound in air. The duration will be in microseconds and the speed of air will be in metres per second. You have to convert the duration to seconds to obtain the distance in metres. We will be needing the distance in centimetres for this project so you have to convert the metres to centimetres.
// 1 microsecond = 1e-6 seconds
// 1 metre = 100 centimetres
// To get the distance in cm --- > 1e-6 * 100 = 1e-4
Divide the result by 10, 000 (1e4) to calculate the distance in cm. Store this value in distance variable.
digitalWrite(trig, LOW);
delayMicroseconds(5);
digitalWrite(trig, HIGH);
delayMicroseconds(10);
digitalWrite(trig, LOW);
duration = pulseIn(echo, HIGH); // Calculate time taken (in microseconds) for the
pulse emitted by the trigger pin to reach the echo pin.
distance = (duration/2) * (331.3/10000); // Calculate the distance from the sensor to the obstacle in cm, using the speed of sound in air(m/s) and the time taken (stored  in duration variable)
If the distance ( from the ultrasonic sensor module) is within 0 and 10 cm, the value stored in the count variable must increase by 1, and the servo motor must turn 100 degrees before turning back to 0 after 5 seconds. If value stored in the count variable is 5, then the servo motor must not turn and there should be no change in the count variable.
The IR tracking sensor sends a LOW signal to the microcontroller if an object is detected within 2 cm away from the IR sensor. So, the output value of the IR tracking sensor is LOW, the value stored in the count variable must decrease by 1 and the servo motor must turn 70 degrees. The servo motor will be connected to the door in such a way that if the servo motor rotates, the door will be pulled open. After 5 seconds, the door must be closed again.
The LCD display module must display the number of people standing in the queue and the slots which are occupied. For example, if the number of people standing in the queue is 1 and no slots are occupied, then it means that the person is not standing in the correct position and therefore not following the social distancing rules properly.


Comments