


Hardware components | ||||||
 |
| × | 1 | |||
 |
| × | 1 | |||
 |
| × | 1 | |||
 |
| × | 1 | |||
Software apps and online services | ||||||
 |
| |||||
 |
| |||||
The ESP8266 Core and Wi-Fi module (xChip CW01) allows users to send data from XinaBox’s modular xChips to the cloud. This data can be monitored remotely in Ubidots, where users can take advantage of their range of IoT tools.
The xChip SW01 Advanced Weather Sensor (Bosch BME280) measures temperature, humidity and atmospheric pressure, from which altitude, cloud base and dew point can also be calculated.
In this tutorial we use HTTP protocol to send sensor data to Ubidots. This could also be done using MQTT protocol.
By the end of this guide, you will able to monitor and measure weather conditions at your XinaBox device from anywhere remotely using Ubidots.
Requirements- 1x CW01 - WiFi core (ESP8266/ESP-12F)
- 1x SW01 - Advanced Weather Sensor (BME280)
- 1x IP01 - USB Programming Interface (FT232R)
- 1x XC10 - 10-Pack xBUS Connectors
- Arduino IDE
- Ubidots account
1. Hardware Setup
2. Setting up the Arduino IDE
3. Understanding the code
4. Login to Ubidots
5. Create Dashboards in Ubidots
6. Summary
Step 1. Hardware SetupConnect CW01, SW01 and IP01 together using the XC10 xBUS connectors. You may connect it as shown in the diagram below. Please see this guide on how to assemble xChips generally.
Then, connect your device and PC through the IP01’s USB. For this, you will need to use the xFlasher software to flash the code once ready. See this guide on using the xFlasher.
Step 2. Setting up the Arduino IDE1. Install Arduino IDE 1.8.8
2. Install these libraries to Arduino: ESP8266 Arduino, Ubidots ESP8266, xCore, xSW01.
NOTE: If you are not familiar with how to Install libraries, please refer to the link: Installing Arduino libraries
3. With the ESP8266 platform installed, select the ESP8266 device you are working with. In the case, we are working with a “CW01(ESP12F module)”. To select your board from the Arduino IDE, select Tools > Board “NodeMCU 1.0(ESP12E module)”.
NOTE: ESP12F and ESP12E are interchangeable for this purpose.
Step 3. Understanding the codeIncluding libraries:
#include "UbidotsMicroESP8266.h"
#include <xSW01.h>
#include <xCore.h>
Enter your Wi-Fi and Ubidots Credentials:
#define TOKEN  "Your-Token"  // Put here your Ubidots TOKEN
#define WIFISSID "Your-SSID" // Put here your Wi-Fi SSID
#define PASSWORD "password-of-ssid" // Put here your Wi-Fi password
Your unique Ubidots TOKEN is obtained from your Ubidots account. Refer to the following link to learn where to find your Ubidots TOKEN.
One time setup, see the comments for self-explanation:
void setup() {
  //Debugging at 115200 using serial monitor
  Serial.begin(115200);
  //Connect to the Access Point
  client.wifiConnection(WIFISSID, PASSWORD);
  // I2C communication begins
  Wire.begin();
  // Start the  SW01 Sensor
  SW01.begin();
  //Introducing some delay, 2-3 seconds
  delay(DELAY_TIME);
}
Loop the operation, to keep it running and updating continuously:
void loop() {
  // Create a variable to store the data read from SW01
  float tempC,humidity,pressure,alt;
  //Creating device variables
  tempC = 0;
  humidity = 0;
  pressure = 0;
  alt = 0;

  // Poll Sensor for collect data
  SW01.poll();
  //Saving data to device variables
  tempC = SW01.getTempC(); // Temperature in Celsius
  Serial.println("Temperature: ");
  Serial.print(tempC);
  Serial.println(" *C");
  Serial.println();
  humidity = SW01.getHumidity();
  Serial.println("Humidity: ");
  Serial.print(humidity);
  Serial.println(" %");
  Serial.println();
  pressure = SW01.getPressure();
  Serial.println("Pressure: ");
  Serial.print(pressure);
  Serial.println(" Pa");
  Serial.println();
  alt = SW01.getAltitude(101325);
  Serial.println("Altitude: ");
  Serial.print(alt);
  Serial.println(" m");
  Serial.println();
  //Create ubidots variables
  client.add("Temperature (*C)",tempC);
  delay(500);
  client.add("Humidity (%)",humidity);
  delay(500);
  client.add("Pressure (Pa)",pressure);
  delay(500);
  client.add("Altitude (m)",alt);
  //Send all the dots
  client.sendAll(true);
  // delay between sensor reads to stabilize
  delay(DELAY_TIME);
}
The complete code:
#include "UbidotsMicroESP8266.h"
#include <xSW01.h>
#include <xCore.h>

#define TOKEN  "Your-Token"  // Put here your Ubidots TOKEN
#define WIFISSID "Your-SSID" // Put here your Wi-Fi SSID
#define PASSWORD "password-of-ssid" // Put here your Wi-Fi password

Ubidots client(TOKEN);

const int DELAY_TIME = 2000;
xSW01 SW01; //Creating object of SW01 sensor

void setup() {
Serial.begin(115200);
client.wifiConnection(WIFISSID, PASSWORD);

  Wire.begin();
  // Start the  SW01 Sensor
  SW01.begin();

  delay(DELAY_TIME);
}
oid loop() {
  // Create a variable to store the data read from SW01
  float tempC,humidity,pressure,alt;

  tempC = 0;
  humidity = 0;
  pressure = 0;
  alt = 0;

  // Poll Sensor for collect data
  SW01.poll();

  //Saving data to variables memory
  tempC = SW01.getTempC(); // Temperature in Celsius
  Serial.println("Temperature: ");
  Serial.print(tempC);
  Serial.println(" *C");
  Serial.println();

  humidity = SW01.getHumidity();
  Serial.println("Humidity: ");
  Serial.print(humidity);
  Serial.println(" %");
  Serial.println();

  pressure = SW01.getPressure();
  Serial.println("Pressure: ");
  Serial.print(pressure);
  Serial.println(" Pa");
  Serial.println();

  alt = SW01.getAltitude(101325);
  Serial.println("Altitude: ");
  Serial.print(alt);
  Serial.println(" m");
  Serial.println();

  //Create ubidots variables
  client.add("Temperature (*C)",tempC);
  delay(500);
  client.add("Humidity (%)",humidity);
  delay(500);
  client.add("Pressure (Pa)",pressure);
  delay(500);
  client.add("Altitude (m)",alt);

  //Send all the dots
  client.sendAll(true);

  // delay between sensor reads to stabilize
  delay(DELAY_TIME);
}
1. Open your Ubidots account. You will see a device named “ESP8266” with 4 variables (see image below).
- Device visualization
- Variables visualization
If you want to change the name of device, use the code:
client.setDataSourceName("New_name");
Dashboards (static and dynamic) are user interfaces to organize and present a device's data and the insights derived from the data. Dashboards contain widgets that display the data as charts, indicators, controls, tables, graphs, and other size, shapes, and forms.
To create a new Dashboard in your Ubidots account, refer to the following Ubidots tutorial to learn how to do it.
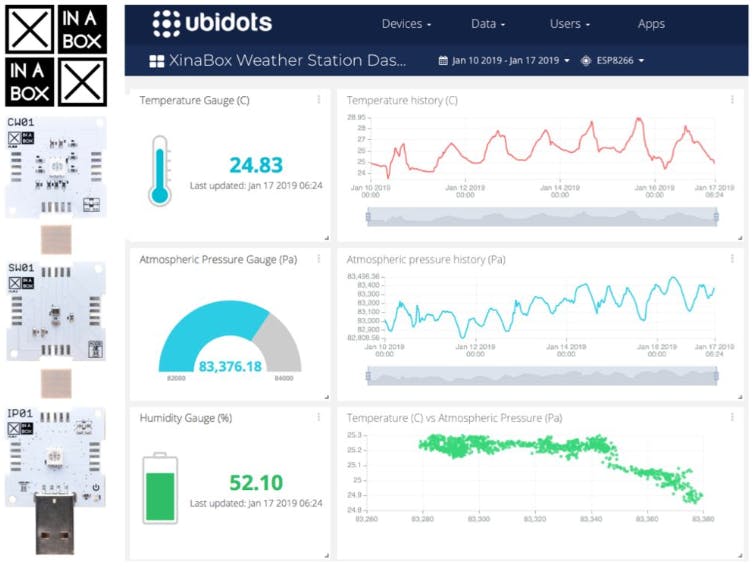
Just as a reference, once your Ubidots Dashboard is created you should have something similar to the image below:
PRO TIP: There are also a range of graphing and reporting tools. If you want to learn more about this, we recommend you check this guide.
In this tutorial, we have shown how to code and connect an XinaBox Weather station to Ubidots. This enables remote monitoring and can be completed within 10-15 minutes.
Other readers have also found useful...


Comments