


Hardware components | ||||||
 |
| × | 1 | |||
Software apps and online services | ||||||
 |
| |||||
Hand tools and fabrication machines | ||||||
 |
| |||||
Never4Get is a project for the Iotopia contest.
Our project consists of a program and a device. The program knows wich course you will have the next day. You have for example the subject English and your book is still in your locker, you will be notified that evening.
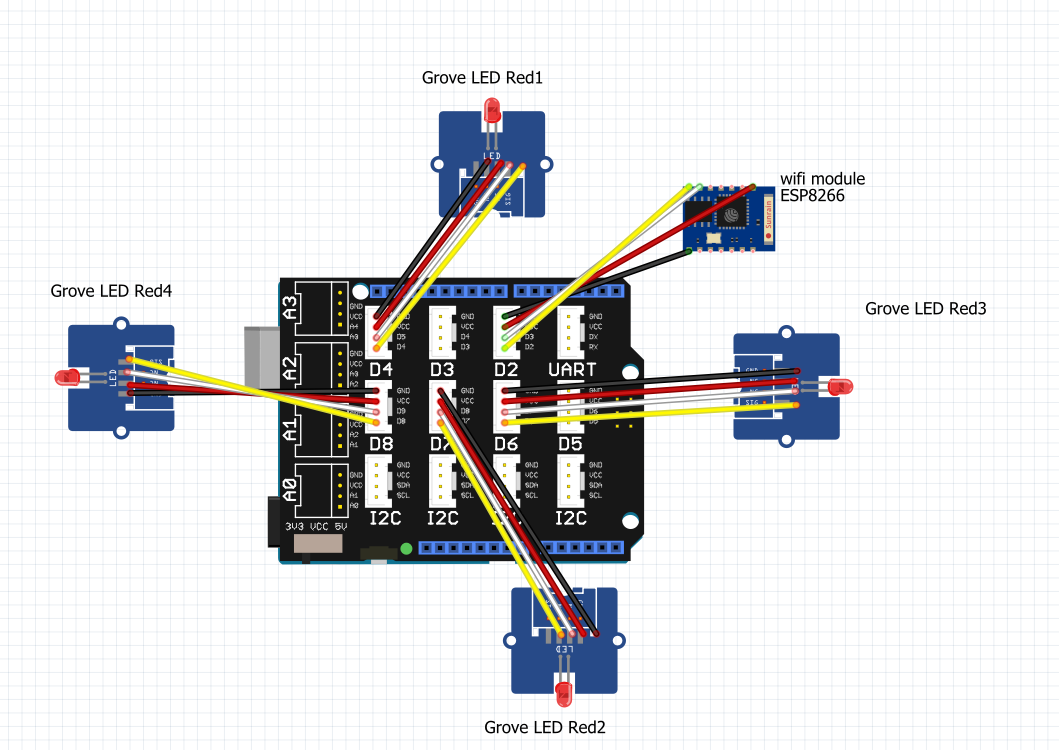
The device will scan a sticker on your books containing an RFID-chip so it can tell the program which book is still in your locker. In our prototype this scanner is replaced by multiple (virtual) pushbuttons. We made a shelf for every book in your locker so when a button is pushed it will know that, for example your mathematics book is in your locker.
We came up with our idea during an English course when a lot of students forgot their books and had to attend detention.
We made a blog so people could follow the journey of realising our idea.
_Y06GQeo9Ml.PNG)
/*
   Copyright 2014-2017 AllThingsTalk

   Licensed under the Apache License, Version 2.0 (the "License");
   you may not use this file except in compliance with the License.
   You may obtain a copy of the License at

       http://www.apache.org/licenses/LICENSE-2.0

   Unless required by applicable law or agreed to in writing, software
   distributed under the License is distributed on an "AS IS" BASIS,
   WITHOUT WARRANTIES OR CONDITIONS OF ANY KIND, either express or implied.
*/

#include <SoftwareSerial.h>
#include "ATT_IOT_FONA.h"
#include "ATT_MQTT.h"

#include "ATT_IOT_GPRS.h"
#include <SPI.h>                //required to have support for signed/unsigned long type.

/*
  AllThingsTalk Makers Arduino Example

  ### Instructions

  1. Setup the Arduino hardware
    - Grove kit shield
    - Potentiometer to A1
    - Led light to D4
  2. Add 'att_arduino_sim800' library to your Arduino Environment. [Try this guide](http://arduino.cc/en/Guide/Libraries)
  3. Fill in the missing strings (deviceId, clientId, clientKey) and optionally change/add the sensor & actuator names, ids, descriptions, types
     For extra actuators, make certain to extend the callback code at the end of the sketch.
  4. Upload the sketch

  ### Troubleshooting

  1. 'Device' type is reported to be missing.
  - Make sure to properly add the arduino/libraries/att_arduino_sim800/ library
  2. No data is showing up in the cloudapp
  - Make certain that the data type you used to create the asset is the expected data type. Ex, when you define the asset as 'integer', don't send strings or boolean values.
*/

#define deviceId "UAlAgzUP3NLShlCDD9wkilLc"
#define clientId "never4get_4wsashOz"
#define clientKey "rbSqfmbt"

#define FONA_APN       "web.pro.be"
#define FONA_USERNAME  ""
#define FONA_PASSWORD  ""

#define FONA_RX 2
#define FONA_TX 3
#define FONA_RST 5
SoftwareSerial fonaSS = SoftwareSerial(FONA_TX, FONA_RX);


ATTDevice Device(deviceId, clientId, clientKey);            	//create the object that provides the connection to the cloud to manager the device.
#define httpServer "api.AllThingsTalk.io"                  		// HTTP API Server host
#define mqttServer httpServer                               	// MQTT Server Address

//CAREFULL: don't use the same pins as used by the modem or things will start to crash
int knobPin = 1;      // Analog 1 is the input pin + identifies the asset on the cloud platform
int ledPin = 4;                                             	// Pin 4 is the LED output pin + identifies the asset on the cloud platform
int ledPin2 = 8; // LED2
int ledPin3 = 7; // LED3
int ledPin4 = 6; // LED4

//required for the device
void callback(const char* topic, const char* payload, unsigned int length);
// Setup the FONA MQTT class by passing in the FONA class and MQTT server and login details.


void setup()
{
    pinMode(ledPin, OUTPUT);                               // initialize the digital pin as an output.
    pinMode(ledPin2, OUTPUT); //LED2
    pinMode(ledPin3, OUTPUT); //LED3
    pinMode(ledPin4, OUTPUT); //LED4
    fonaSS.begin(19200); 									              	// if you're using software serial
    Serial.begin(57600);                                  // init serial link for debugging

	while(!Serial && millis() < 2000);                   		// Make sure you see all output on the monitor. After 2 sec, it will skip this step, so that the board can also work without being connected to a pc

    while (! Device.InitGPRS(fonaSS, FONA_RST, F(FONA_APN), F(FONA_USERNAME), F(FONA_PASSWORD))) {
        Serial.println("Retrying FONA");
    }
    Serial.println(F("Connected to Cellular!"));
    delay(2000);                                        		// wait a few seconds to stabilize connection

    while(!Device.Connect(httpServer))            				// connect the device with the IOT platform.
        Serial.println("retrying");
    Device.AddAsset(knobPin, "knob", "rotary switch",false, "{\"type\": \"integer\", \"minimum\": 0, \"maximum\": 1023}");
    Device.AddAsset(ledPin, "led", "light emitting diode", true, "boolean");
    Device.AddAsset(ledPin2, "led2", "light emitting diode 2", true, "boolean"); // Asset LED2
    Device.AddAsset(ledPin3, "led3", "light emitting diode 3", true, "boolean"); // Asset LED3
    Device.AddAsset(ledPin4, "led4", "light emitting diode 4", true, "boolean"); // Asset LED4
    while(!Device.Subscribe(callback, mqttServer, 1883))                          // make certain that we can receive message from the iot platform (activate mqtt)
        Serial.println("retrying");
}

unsigned long time;                                         	//only send every x amount of time.
unsigned int prevVal =0;
void loop()
{
  unsigned long curTime = millis();
  if (curTime > (time + 3000))                              	// publish reading every 3 seconds to sensor knobPin
  {
    unsigned int knobRead = analogRead(knobPin);           		// read from sensor (knob) (laten we staan uit basis voorbeeld)
    if(prevVal != knobRead){
      Device.Send(String(knobRead), knobPin);
      prevVal = knobRead;
    }
    time = curTime;
  }
  Device.Process();
}


// Callback function: handles messages that were sent from the iot platform to this device.
void callback(const char* topic, const char* payload, unsigned int length)
{
	String msgString(payload);                            	//convert to string object, so we can easily compare and modify the string.
	int* idOut = NULL;
	idOut = &ledPin;

	int pinNr = Device.GetPinNr(topic, strlen(topic));

	Serial.print("Payload: ");                          	//show some debugging.
    Serial.println(msgString);
    Serial.print("topic: ");
    Serial.println(topic);
    Serial.print("pin: ");
    Serial.println(pinNr);

    if (pinNr == ledPin)       								//check for which asset we received an actuator so that we can perform the correct actuation.
    {
        msgString.toLowerCase();                            //to make certain that our comparison later on works ok (it could be that a 'True' or 'False' was sent)
        if (msgString == "false") {
            digitalWrite(ledPin, LOW);                      //change the led
            idOut = &ledPin;
        }
        else if (msgString == "true") {
            digitalWrite(ledPin, HIGH);
            idOut = &ledPin;
        }
    }


    if (pinNr == ledPin2)                       //check for which asset we received an actuator so that we can perform the correct actuation.
    {
        msgString.toLowerCase();                            //to make certain that our comparison later on works ok (it could be that a 'True' or 'False' was sent)
        if (msgString == "false") {
            digitalWrite(ledPin2, LOW);                      //change the led
            idOut = &ledPin2;
        }
        else if (msgString == "true") {
            digitalWrite(ledPin2, HIGH);
            idOut = &ledPin2;
        }
    }

if (pinNr == ledPin3)                       //check for which asset we received an actuator so that we can perform the correct actuation.
    {
        msgString.toLowerCase();                            //to make certain that our comparison later on works ok (it could be that a 'True' or 'False' was sent)
        if (msgString == "false") {
            digitalWrite(ledPin3, LOW);                      //change the led
            idOut = &ledPin3;
        }
        else if (msgString == "true") {
            digitalWrite(ledPin3, HIGH);
            idOut = &ledPin3;
        }
    }

if (pinNr == ledPin4)                       //check for which asset we received an actuator so that we can perform the correct actuation.
    {
        msgString.toLowerCase();                            //to make certain that our comparison later on works ok (it could be that a 'True' or 'False' was sent)
        if (msgString == "false") {
            digitalWrite(ledPin4, LOW);                      //change the led
            idOut = &ledPin4;
        }
        else if (msgString == "true") {
            digitalWrite(ledPin4, HIGH);
            idOut = &ledPin4;
        }
    }

	if(idOut != NULL)                                     	//also let the iot platform know that the operation was succesful: give it some feedback. This also allows the iot to update the GUI's correctly & run scenarios.
		Device.Send(msgString, *idOut);
}


_Y06GQeo9Ml.PNG)
Comments