


Participants in this workshop will get hands on experience using the TI MSP432 LaunchPad and the SimpleLink CC2650MODA Bluetooth® low energy Module BoosterPack™, an Internet-of-Things solution. Additional lab exercises can utilize BoosterPack hardware like the Sensors BoosterPack or Educational BoosterPack. The Sensors BoosterPack and Educational BoosterPack MKII provides several sensors that can be read by the LaunchPad and the data can be wirelessly transmitted over BLE. Using Energia, TI's equivalent to simple Arduino-style scripting code, you'll come away with a full lab set up as well as teaching materials. This is a great low cost way to introduce the excitement of electronics and integrating wireless connectivity with IoT examples. Because the TI LaunchPad is open source and modular hardware, we can also add BoosterPack modules to augment our circuits. In our case we are going to add BLE to give our circuits a lot more capability by interacting with cloud services. If you don't have access to a CC2650MODA BLE BoosterPack, you will need it to do the key parts of the workshop.
PreworkBefore we begin, please ensure you:
1. Download and install the latest version of Energia. Energia can be downloaded from http://energia.nu/download/
a. Below the download links there are specific installation instructions for each operating system version. Please follow these instructions as you may also need to install drivers depending on your OS.
b. NOTE: In Windows, Energia must be installed to a path without spaces in order to function properly.
2. Have a smartphone or tablet handy with BLE turned on. Download the Evothings Viewer for iOS or Android. Download the LightBlue Explorer for iOS.
3. Create a myTI account at my.ti.com if you don't have one so you can access CCS Cloud. You can also use your TI account to order kits from the TI store, request samples of silicon devices, and access other features.
4. Respect this Hackster page by logging into your Hackster account and clicking the thumbs up "Respect Project" button at the top.
Lab 1 - CCS Cloud and MSP432 Out of Box experienceHardware Required- TI LaunchPad
To start off the workshop we will load up the out of box demo code from Code Composer Studio Cloud. CCS cloud is a full development environment that you can run directly from your browser (Chrome recommended). In the demo code we will control our on board RGB LED on the MSP432 LaunchPad through a Graphical User Interface (GUI) on the PC. CCS Cloud and CCS Desktop are good options for more serious development and are integrated with many resources and documentation from TI for both the hardware and software.
The objective of this first lab is to introduce you to the resources available on TI cloud tools and also help you install the MSP432 LaunchPad drivers via CCS Cloud. You can also manually install the drivers using the instructions on the Energia website or get the drivers when installing the desktop version of Code Composer Studio.
For compiling your code examples you have a choice to use the open source GCC compiler or the TI CCS Compiler which gives you a bit more optimization.
1. Go to dev.ti.com. Click the CCS Cloud box listed under the Applications tab.
2. If you don't have a myTI account already, you can register for one and then sign in. If you do have one, go ahead and sign in and CCS Cloud will load your virtual workspace. Your work will be saved and you can access it whenever you log back in with your TI account. You can also download any of your work to your local machine or upload to GitHub.
3. You should get a work environment to pop up similar to the image below. If so we are doing well.
4. Now we need to get our demo code. We can find demo code in the TI Resource explorer. Next navigate back to dev.ti.com and click on the Resource Explorer box in the Applications tab. You should arrive to a page like this.
5. We can search for our board by part number by typing "MSP432" and it should come up for us. You can also use the left hand navigation and search by device family. Select MSP-EXP432P401R - Rev 2.x (Red) from the drop down menu.
6. Double check your Package Picker is selecting the latest MSP432 SDK. You can click on the package picker in the upper right square icon next to the home icon. Make sure "SimpleLinke MSP432 SDK" is selected on latest and the related plug-ins. Now you know if you'd like to go back to a previous version of the SDK you can use the Package Picker to customize the versioning.
7. Now in the left hand navigation under the "Software" folder click the "SimpleLink MSP432 SDK..." > "Examples" > "Development Tools" > "MSP-EXP432P401R - Rev 2.x" > "Demos" and click on the "Out of Box Experience" sub folder and the "no RTOS" folder. Then the "CCS Compiler" folder and click one more level to "outOfBox_MSP432P401R" to access the project files. On the right hand side on the top line above "main.c" there is a little cloud icon that says "Import to CCS Cloud" when you hover over it. Click that and it should open the project in your CCS Cloud workspace. As you can see you have many options to use different compilers and to utilize a Real Time Operating System or not.
8. Now in CCS Cloud, make sure you have the "OutOfBox_MSP432P401R" project folder selected on the left hand navigation. You can have main.c open in your program window. Now we are going to upload this to our LaunchPad board.
9. Connect your LaunchPad to the PC with the included USB cable.
10. To run our program on the hardware we are going to click the green play button that says "Run" at the top toolbar. CCS Cloud will now help you install a few items needed to communicate with and flash your TI LaunchPad.
11. You may get a Build dialog to pop up or text may pop up in your console as the code compiles. You should see "build finished" pop up and then a dialog box asking to install the browser extension and TI Cloud Agent. Proceed with the installation of both pieces.
12. After installing both pieces, CCS Cloud needs to restart inside the browser. You can click the refresh button and it should reload the page. Make sure that OutOfBox_MSP432P401R is selected in the left hand navigation as it may have changed on the refresh. You can now click run again.
13. If everything went smoothly you should get a new dialog box indicating it's installing target support for MSP432P401R.
14. Next you may get a dialog about error connecting to the target and a firmware upgrade is required. Proceed with the update. Make sure your LaunchPad is connected to the PC via the USB cable otherwise you may get a different error without the option to update the firmware. If you do, you can refresh the page and repeat the step with the LaunchPad connected.
15. If everything went well, now when you click run you should see the code run and flash to the LaunchPad. You can confirm that the code was written in your output console. Your red LED will be blinking.
16. The out of box demo has two parts. The first part is you can change the speed of the blinking by pressing Button 1 (the left button labeled SW1 or P1.1). You can change the color by pressing Button 2 (the right button labeled SW2 or P1.4). The second part of the demo uses the GUI to control the color. To access the GUI go back to Resource Explorer and open the Out of Box Experience GUI folder.
17. With the LaunchPad still connected to the PC, Click the Connect button. Select the default COM port and click open. You will see the color wheel and sliders which you can manipulate to change the color from the PC. You can also change the value for BPM to change the speed of the blink. Cool!
Make sure to close your connection when done, as we need to free up the serial port for later.
Lab 1b - CCS Cloud and MSP432 + CC2650MA exampleHardware Required- TI LaunchPad
- CC2650MA BLE BoosterPack
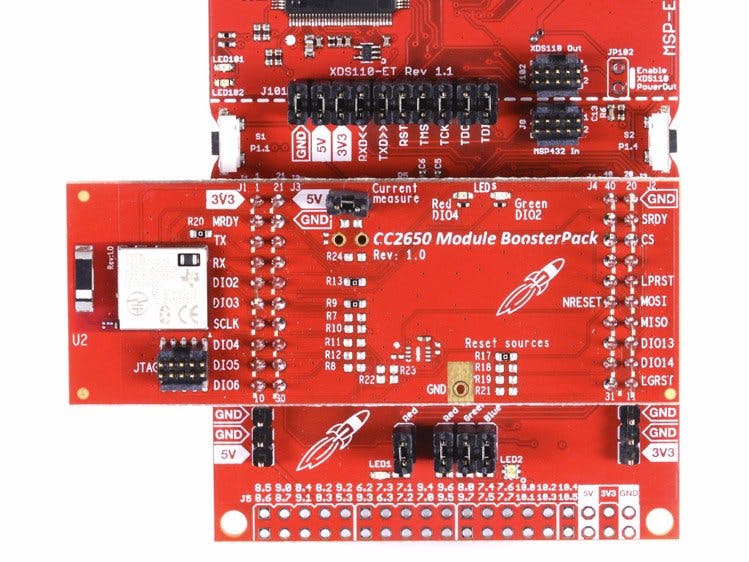
Now attach your BLE Boosterpack to the LaunchPad as shown.
1. We again want to find the demo code in the TI Resource explorer. Navigate back to dev.ti.com and click on the Resource Explorer box in the Applications tab.
Alternatively we can download the simplelink BLE examples from here: http://www.ti.com/tool/download/SIMPLELINK-SDK-BLUETOOTH-PLUGIN
2. We can search for our board by part number by typing "MSP432" and it should come up for us. You can also use the left hand navigation and search by device family. Select MSP-EXP432P401R - Rev 2.x (Red) from the drop down menu.
6. Now in the left hand navigation under the "Software" folder click the "SimpleLink MSP432 SDK Plugins" > "Connectivity" > "SimpleLink Bluetooth Plugin" > "Examples" > "Development Tools" > "MSP432..." > "Bluetooth" and click on the "project zero" sub folder and the "TI-RTOS" > "CCS Compiler" folder and click one more level to "project_zero" to access the project files. On the right hand side on the top line above "board.h" there is a little cloud icon that says "Import to CCS Cloud" when you hover over it. Click that and it should open the project in your CCS Cloud workspace.
4. Note that the example uses the LightBlue Explorer app which is for iphone only :( If you have an iphone, download the app and run through the example. If you have android, we will skip ahead for now until the instructions get updated.
Now you have some experience with using the TI cloud tools. You can use these resources in the future if they suit your needs. As you can see there are other code examples available to explore if you want to use the official SDK, TI-RTOS, or TI provided libraries.
Another nice benefit of starting in cloud and running the example code is you also now have your drivers which will let you code smoothly in Energia IDE as well. You can manually install your board drivers using the Eneriga website instructions.
Lab 2a - Energia Introduction with Sensors BoosterPackHardware Required- TI LaunchPad
- Sensors BoosterPack
In this lab we are going to get our environment set up and then test out our Sensors BoosterPack. The first thing we can do is blink an LED to make sure we can program our microcontroller with our computer.
1. Open up the Energia IDE. Unzip your download and click the executable or app icon and it should start up.
2. First thing, make sure you select your board by going to Tools > Board and look for "LaunchPad with MSP432" on the menu. If your LaunchPad board is not present, go to the Boards Manager and install your LaunchPad board package. MSP432 should be the second option.
3. If you properly installed your drivers, then you should see COM ports under Tools > Port. Select the port with UART capability if there are multiple options. You can verify the COM port in your computer's device manager.
4. Go to File > Examples > Basics > Blink. We will use the Green LED instead of the Red LED in our code in the case when the out of box code is a blinking Red LED. Uncomment the #define LED GREEN_LED line and comment out the RED_LED line.
/*
Blink
The basic Energia example.
Turns on an LED on for one second, then off for one second, repeatedly.
Change the LED define to blink other LEDs.
Hardware Required:
* LaunchPad with an LED
This example code is in the public domain.
*/
// most launchpads have a red LED
//#define LED RED_LED
//see pins_energia.h for more LED definitions
#define LED GREEN_LED
// the setup routine runs once when you press reset:
void setup() {
// initialize the digital pin as an output.
pinMode(LED, OUTPUT);
}
// the loop routine runs over and over again forever:
void loop() {
digitalWrite(LED, HIGH);   // turn the LED on (HIGH is the voltage level)
delay(1000);               // wait for a second
digitalWrite(LED, LOW);    // turn the LED off by making the voltage LOW
delay(1000);               // wait for a second
}
Once you do Basic > Blink. You can go to File > New. Copy the sensor sample code below into the new window, overwriting the default setup() and loop() functions. Click upload and open your serial monitor to see sensor data being printed to your PC.
Troubleshooting
Code not uploading?
- Check for errors in Energia debug window. The compiler will tell you what is happening. Errors are in red text.
- Sometimes your LaunchPad gets stuck or hung up on the previous code. Unplug your LaunchPad and plug it back in to perform a full reset. This is called a power on reset. Sometimes using the RESET button can work but taking away the power and letting the microcontroller fully reset is often best.
- If you have a failure to upload it could be your drivers are not properly installed. Energia will sometimes give the error “No unused FET Found” which means it can’t find a LaunchPad connected to your computer. Make sure you download the drivers for your operating system found on the Getting Started Guide.
- If you had no problem with the previous Blink example, your Energia should be correctly set up. Restart your LaunchPad and restart Energia IDE if you encounter any problems. Make sure to select the right serial port and board type under the Tools menu.
LED not lighting up?
- Make sure you properly uploaded the code and that you properly named your variables for the LED pins. There is very little chance that your LED is broken, but we can verify by blinking a different LED with the same code.
- Hit the reset button, sometimes this is needed for the LaunchPad to run the newly uploaded program.
- TI LaunchPad
- Educational BoosterPack MKII
In this lab we are going to get our environment set up and then test out our Educational BoosterPack. The first thing we can do is blink an LED to make sure we can program our microcontroller with our computer.
1. Open up the Energia IDE. Unzip your download and click the executable or app icon and it should start up.
2. First thing, make sure you select your board by going to Tools > Board and look for "LaunchPad with MSP432" on the menu. If your LaunchPad board is not present, go to the Boards Manager and install your LaunchPad board package. MSP432 should be the second option.
3. If you properly installed your drivers, then you should see COM ports under Tools > Port. Select the port with UART capability if there are multiple options. You can verify the COM port in your computer's device manager.
4. Go to File > Examples > Basics > Blink. We will use the Green LED instead of the Red LED in our code in the case when the out of box code is a blinking Red LED. Uncomment the #define LED GREEN_LED line and comment out the RED_LED line.
/*
Blink
The basic Energia example.
Turns on an LED on for one second, then off for one second, repeatedly.
Change the LED define to blink other LEDs.
Hardware Required:
* LaunchPad with an LED
This example code is in the public domain.
*/
// most launchpads have a red LED
//#define LED RED_LED
//see pins_energia.h for more LED definitions
#define LED GREEN_LED
// the setup routine runs once when you press reset:
void setup() {
// initialize the digital pin as an output.
pinMode(LED, OUTPUT);
}
// the loop routine runs over and over again forever:
void loop() {
digitalWrite(LED, HIGH);   // turn the LED on (HIGH is the voltage level)
delay(1000);               // wait for a second
digitalWrite(LED, LOW);    // turn the LED off by making the voltage LOW
delay(1000);               // wait for a second
}
Once you do Basic > Blink. You can copy the custom Educational BoosterPack test code below.
/*
CustomEduBPTest for MSP432
This example is based off the EduBP_mkii_Production_Test code
for Energia IDE. Checks various functions of the BoosterPack.
Hardware Required:
* LaunchPad
* Educational BoosterPack MKII
This example code is in the public domain.
*/
#include <itoa.h>
#include <Wire.h>
#include <Adafruit_TMP006.h>
//#include "OPT3001.h"
#define USE_USCI_B1
#define USING_MSP430F5529_LAUNCHPAD
//#define USING_TIVA_C_LAUNCHPAD
// Core library for code-sense
#if defined(WIRING) // Wiring specific
#include "Wiring.h"
#elif defined(MAPLE_IDE) // Maple specific
#include "WProgram.h"
#elif defined(MPIDE) // chipKIT specific
#include "WProgram.h"
#elif defined(DIGISPARK) // Digispark specific
#include "Arduino.h"
#elif defined(ENERGIA) // LaunchPad MSP430, Stellaris and Tiva, Experimeter Board FR5739 specific
#include "Energia.h"
#elif defined(CORE_TEENSY) // Teensy specific
#include "WProgram.h"
#elif defined(ARDUINO) && (ARDUINO >= 100) // Arduino 1.0 and 1.5 specific
#include "Arduino.h"
#elif defined(ARDUINO) && (ARDUINO < 100) // Arduino 23 specific
#include "WProgram.h"
#else // error
#error Platform not defined
#endif
// Include application, user and local libraries
#include "SPI.h"
// Screen selection
#define HX8353E // HX8353E K35 HI32 W32 ILI9225B HY28A ST7735 PicasoSPE PicasoSGC
#include "Screen_HX8353E.h"
Screen_HX8353E myScreen;
// Define variables and constants
//uint32_t chrono;
///
/// @brief      protocolSquare
/// @details    measure time to draw a square with side=pixels
/// @param      pixels number of pixels of one side
///
void protocolSquare(uint16_t pixels)
{
   if ((pixels < myScreen.screenSizeX()) && (pixels < myScreen.screenSizeY()) && (pixels > 48)) {
       myScreen.setOrientation(0);
       myScreen.setPenSolid(false);
       uint16_t x100 = (myScreen.screenSizeX()-pixels)/2;
       uint16_t y100 = (myScreen.screenSizeY()-pixels)/2;
       myScreen.dRectangle(x100-1, y100-1, pixels+2, pixels+2, whiteColour);
       myScreen.setPenSolid(true);
       uint32_t chrono = millis();
       myScreen.dRectangle(x100, y100, pixels, pixels, grayColour);
       chrono = millis() - chrono;
       myScreen.setFontSize(myScreen.fontMax());
       myScreen.gText(x100 +2, y100 +2, "(" + i32toa(pixels) + ")");
       myScreen.gText(x100 +2, y100 +pixels -myScreen.fontSizeY() -2, i32toa(chrono) + " ms");
       Serial.print("Square(");
       Serial.print(pixels, DEC);
       Serial.print(")\t");
       Serial.println(chrono, DEC);
   }
}
///
/// @brief      protocolCopyPaste
/// @details    measure time to copy-paste a 64x64 area
/// @param      orientation default=1
///
void protocolCopyPaste(uint8_t orientation = 1)
{
   uint32_t chrono;
   myScreen.clear();
   myScreen.setOrientation(orientation);
   // Image
   chrono = millis();
   for (uint8_t i=0; i<64; i++) {
       for (uint8_t j=0; j<64; j++) {
           myScreen.point(i, j, myScreen.calculateColour(4*i, 4*j, 254-2*i-2*j));
       }
   }
   myScreen.setPenSolid(false);
   myScreen.rectangle(1, 1, 62, 62, blackColour);
   myScreen.line(0,   0, 63, 63, whiteColour);
   myScreen.line(32,  0, 63, 63, whiteColour);
   myScreen.line(0,  32, 63, 63, whiteColour);
   myScreen.dRectangle(0, 0, 64, 64, whiteColour);
   chrono = millis() - chrono;
   myScreen.setFontSize(0);
   myScreen.gText(0, 66, "0: Original");
   myScreen.setFontSize(1);
   myScreen.gText(0, 76, i32toa(chrono) + " ms");
   Serial.print("Original(=");
   Serial.print(orientation, DEC);
   Serial.print(")\t");
   Serial.println(chrono, DEC);
   // Method 1
   chrono = millis();
   for (uint16_t i=0; i<64; i++) {
       for (uint16_t j=0; j<64; j++) {
           myScreen.point(myScreen.screenSizeX()/2+i, j, myScreen.readPixel(i, j));
       }
   }
   chrono = millis() - chrono;
   myScreen.setFontSize(0);
   myScreen.gText(myScreen.screenSizeX()/2, 66, "1. point readPixel");
   myScreen.setFontSize(1);
   myScreen.gText(myScreen.screenSizeX()/2, 76, i32toa(chrono) + " ms");
   Serial.print("point(readPixel())\t");
   Serial.println(chrono, DEC);
   // Method 2
   chrono = millis();
   myScreen.copyPaste(0, 0, 0, myScreen.screenSizeY()/2, 64, 64);
   chrono = millis() - chrono;
   myScreen.setFontSize(0);
   myScreen.gText(0, myScreen.screenSizeY()/2 +66, "2. copyPaste");
   myScreen.setFontSize(1);
   myScreen.gText(0, myScreen.screenSizeY()/2 +76, i32toa(chrono) + " ms");
   Serial.print("copyPaste()\t");
   Serial.println(chrono, DEC);
   // Method 3
   if (myScreen.isStorage()) {
       uint32_t address;
       chrono = millis();
       address = 100;
       myScreen.copyArea(0, 0, 64, 64, address);
       address = 100;
       myScreen.pasteArea(myScreen.screenSizeX()/2, myScreen.screenSizeY()/2, 64, 64, address);
       chrono = millis() - chrono;
       myScreen.setFontSize(0);
       myScreen.gText(myScreen.screenSizeX()/2, myScreen.screenSizeY()/2 +66, "3. copy-paste SRAM");
       myScreen.setFontSize(1);
       myScreen.gText(myScreen.screenSizeX()/2, myScreen.screenSizeY()/2 +76, i32toa(chrono) + " ms");
       Serial.print("copyArea()+pasteArea() SRAM\t");
       Serial.println(chrono, DEC);
   }
}
///
/// @brief      protocolText
/// @details    measure time to draw text in 3 fonts, 4 orientations, 10x
///
void protocolText()
{
   uint32_t chrono1, chrono2;
   uint16_t colour;
   uint8_t k = 0;
   // Serial.print("fast gText... ");
   myScreen.clear(grayColour);
   myScreen.setFontSolid(true);
   chrono1 = millis();
   for (uint8_t j=0; j<10; j++) {
       for (uint8_t i=0; i<4; i++) {
           if (k==1) colour = redColour;
           else if (k==2) colour = yellowColour;
           else if (k==3) colour = greenColour;
           else if (k==4) colour = cyanColour;
           else if (k==5) colour = blueColour;
           else  colour = violetColour;
           k++;
           k %= 7;
           myScreen.setPenSolid(false);
           myScreen.dRectangle(0, 0, myScreen.screenSizeX(), myScreen.screenSizeY(), colour);
           myScreen.setOrientation(i);
           myScreen.setFontSize(0);
           myScreen.gText(4, 4, "font 0 on " + String(i), colour);
           myScreen.setFontSize(1);
           myScreen.gText(4, 14, "font 1 on " + String(i), colour);
           myScreen.setFontSize(2);
           myScreen.gText(4, 34, "font 2 on " + String(i), colour);
       }
   }
   chrono1 = millis()-chrono1;
   Serial.print("10xFontSolid(true)\t");
   Serial.println(chrono1, DEC);
   // Serial.print("slow gText... ");
   myScreen.clear(grayColour);
   myScreen.setFontSolid(false);
   chrono2 = millis();
   for (uint8_t j=0; j<10; j++) {
       for (uint8_t i=0; i<4; i++) {
           if (k==1) colour = redColour;
           else if (k==2) colour = yellowColour;
           else if (k==3) colour = greenColour;
           else if (k==4) colour = cyanColour;
           else if (k==5) colour = blueColour;
           else  colour = violetColour;
           k++;
           k %= 7;
           myScreen.setPenSolid(false);
           myScreen.dRectangle(0, 0, myScreen.screenSizeX(), myScreen.screenSizeY(), colour);
           myScreen.setOrientation(i);
           myScreen.setFontSize(0);
           myScreen.gText(4, 4, "font 0 on " + String(i), colour);
           myScreen.setFontSize(1);
           myScreen.gText(4, 14, "font 1 on " + String(i), colour);
           myScreen.setFontSize(2);
           myScreen.gText(4, 34, "font 2 on " + String(i), colour);
       }
   }
   chrono2 = millis()-chrono2;
   Serial.print("10xFontSolid(false)\t");
   Serial.println(chrono2, DEC);
   Serial.print("Ratio%\t");
   Serial.println((uint32_t)((uint64_t)(chrono1*100)/chrono2), DEC);
}
const int JOY_X = 2;
const int JOY_Y = 26;
const int SEL = 5;
//MIC
const int MIC = 6;
//ACCELEROMETER
const int ACC_X = 23;
const int ACC_Y = 24;
const int ACC_Z = 25;
//SWITCHES
const int SW1 = 33;
const int SW2 = 32;
//BUZZER
const int BUZZ = 40;
//RGB LED
const int RGB_RED = 39;
const int RGB_GRN = 38;
const int RGB_BLU = 37;
//TMP006
float tempReading = 0;
// notes in the melody:
#define NOTE_C4_1 260
#define NOTE_B0  31
#define NOTE_C1  33
#define NOTE_CS1 35
#define NOTE_D1  37
#define NOTE_DS1 39
#define NOTE_E1  41
#define NOTE_F1  44
#define NOTE_FS1 46
#define NOTE_G1  49
#define NOTE_GS1 52
#define NOTE_A1  55
#define NOTE_AS1 58
#define NOTE_B1  62
#define NOTE_C2  65
#define NOTE_CS2 69
#define NOTE_D2  73
#define NOTE_DS2 78
#define NOTE_E2  82
#define NOTE_F2  87
#define NOTE_FS2 93
#define NOTE_G2  98
#define NOTE_GS2 104
#define NOTE_A2  110
#define NOTE_AS2 117
#define NOTE_B2  123
#define NOTE_C3  131
#define NOTE_CS3 139
#define NOTE_D3  147
#define NOTE_DS3 156
#define NOTE_E3  165
#define NOTE_F3  175
#define NOTE_FS3 185
#define NOTE_G3  196
#define NOTE_GS3 208
#define NOTE_A3  220
#define NOTE_AS3 233
#define NOTE_B3  247
#define NOTE_C4  262
#define NOTE_CS4 277
#define NOTE_D4  294
#define NOTE_DS4 311
#define NOTE_E4  330
#define NOTE_F4  349
#define NOTE_FS4 370
#define NOTE_G4  392
#define NOTE_GS4 415
#define NOTE_A4  440
#define NOTE_AS4 466
#define NOTE_B4  494
#define NOTE_C5  523
#define NOTE_CS5 554
#define NOTE_D5  587
#define NOTE_DS5 622
#define NOTE_E5  659
#define NOTE_F5  698
#define NOTE_FS5 740
#define NOTE_G5  784
#define NOTE_GS5 831
#define NOTE_A5  880
#define NOTE_AS5 932
#define NOTE_B5  988
#define NOTE_C6  1047
#define NOTE_CS6 1109
#define NOTE_D6  1175
#define NOTE_DS6 1245
#define NOTE_E6  1319
#define NOTE_F6  1397
#define NOTE_FS6 1480
#define NOTE_G6  1568
#define NOTE_GS6 1661
#define NOTE_A6  1760
#define NOTE_AS6 1865
#define NOTE_B6  1976
#define NOTE_C7  2093
#define NOTE_CS7 2217
#define NOTE_D7  2349
#define NOTE_DS7 2489
#define NOTE_E7  2637
#define NOTE_F7  2794
#define NOTE_FS7 2960
#define NOTE_G7  3136
#define NOTE_GS7 3322
#define NOTE_A7  3520
#define NOTE_AS7 3729
#define NOTE_B7  3951
#define NOTE_C8  4186
#define NOTE_CS8 4435
#define NOTE_D8  4699
#define NOTE_DS8 4978
// OPT3001
//opt3001 opt3001;
Adafruit_TMP006 tmp006;
unsigned long readings = 0;
int melody[] = {
  NOTE_C4_1,NOTE_C4, NOTE_D4, NOTE_C4,NOTE_F4,NOTE_E4,
  NOTE_C4_1,NOTE_C4,NOTE_D4,NOTE_C4,NOTE_G4,NOTE_F4,
  NOTE_C4_1,NOTE_C4,NOTE_C5,NOTE_A4,NOTE_F4,NOTE_F4, NOTE_E4,NOTE_D4,
  NOTE_AS4,NOTE_AS4,NOTE_A4,NOTE_F4,NOTE_G4,NOTE_F4};
// note durations: 4 = quarter note, 8 = eighth note, etc.:
int noteDurations[] = {
 4, 4, 2, 2,2,1,
 4, 4, 2, 2,2,1,
 4, 4, 2, 2,4,4,2,1,
 4, 4, 2, 2,2,1};
void setup()
{
 // put your setup code here, to run once:
 Serial.begin(9600);
 delay(300);
 analogReadResolution(12);
 pinMode(SEL, INPUT);
 pinMode(SW1, INPUT);
 pinMode(SW2, INPUT);
 pinMode(BUZZ, OUTPUT);
 Serial.println("Welcome to the Educational BoosterPack MKII Custom Test:");
 tmp006.begin(TMP006_CFG_8SAMPLE);  // Takes 8 averaged samples for measurement
//  opt3001.begin();
}
char *ftoa(char *a, float f, int precision)
{
 long p[] = {0,10,100,1000,10000,100000,1000000,10000000,100000000};
 char *ret = a;
 long heiltal = (long)f;
 itoa(heiltal, a, 10);
 while (*a != '\0') a++;
 *a++ = '.';
 long desimal = abs((long)((f - heiltal) * p[precision]));
 itoa(desimal, a, 10);
 return ret;
}
void loop()
{
 int16_t i;
 uint16_t colour;
   Serial.println("*** LCD_screen test ****");
   Serial.println("(All times in ms)");
   myScreen.begin();
   Serial.println(myScreen.WhoAmI());
   Serial.print(myScreen.screenSizeX(), DEC);
   Serial.print("x");
   Serial.println(myScreen.screenSizeY(), DEC);
   myScreen.setFontSize(myScreen.fontMax());
   myScreen.clear(darkGrayColour);
   protocolSquare(300);
   protocolSquare(200);
   protocolSquare(100);
   protocolSquare(50);
   delay(2000);
   protocolText();
   delay(2000);
   if (myScreen.isReadable()) {
       protocolCopyPaste(1);
       delay(2000);
   }
   myScreen.clear();
   Serial.println("-END OF SCREEN TEST--");
   Serial.println();
   myScreen.clear(grayColour);
   myScreen.setFontSolid(false);
   colour = redColour;
	myScreen.setOrientation(i);
	myScreen.setFontSize(2);
 //Test out the joystick
 myScreen.gText(0, 0, "  JoyStick Test", blueColour);
 myScreen.gText(0, 15, "  Press middle btn", blueColour);
 myScreen.gText(0, 30, "  to exit ", blueColour);
 while(digitalRead(SEL)==0){
   if(analogRead(JOY_X)<900){
     myScreen.gText(0, 45, "Right", colour);
   }
   else if(analogRead(JOY_X)>0){
     myScreen.gText(0, 45, "Left ", colour);
   }
   else if(analogRead(JOY_Y)<4094){
     myScreen.gText(0, 45, "Up", colour);
   }
   else if(analogRead(JOY_Y)>0){
     myScreen.gText(0, 45, "Down", colour);
   }
   else {
     myScreen.gText(0,75, "Center", colour);
   }
 }
 delay(400);
 //Test out the microphone
 myScreen.clear(grayColour);
 myScreen.gText(0,0, "   Tap  Mic", blueColour);
 while(analogRead(MIC) > 100);
 myScreen.gText(50,10, " Passed!", colour);
 myScreen.gText(0,20, "  Button Tests", blueColour);
 //Test out button 1
 myScreen.gText(0,40, "Press S1", colour);
 while(digitalRead(SW1) == 1);
 myScreen.gText(50,40, " > Passed!", colour);
 //Test out button 2
 myScreen.gText(0,55, "Press S2", colour);
 while(digitalRead(SW2) == 1);
 myScreen.gText(50,55, " > Passed!", colour);
 myScreen.gText(0,70, "  Buzzer Test", blueColour);
 myScreen.gText(0,85, "hold S1 to skip", blueColour);
 //Test out buzzer
 delay(2000);
 if(digitalRead(SW1) == 1){
   for (int thisNote = 0; thisNote < 26; thisNote++) {
     // to calculate the note duration, take one second
     // divided by the note type.
     //e.g. quarter note = 1000 / 4, eighth note = 1000/8, etc.
     int noteDuration = 1000/noteDurations[thisNote];
     tone(BUZZ, melody[thisNote],noteDuration);
     int pauseBetweenNotes = noteDuration + 50;      //delay between pulse
     delay(pauseBetweenNotes>>2);
     noTone(BUZZ);                // stop the tone playing
   }
 myScreen.gText(0,85, "S1&S2 if sound", colour);
 while(digitalRead(SW2) == 1 || digitalRead(SW1) == 1);
 myScreen.gText(0,100, " PASSED!!", greenColour);
 delay(400);
 }
 //Test out 3-axis analog accelerometer
 // 1200 ~ -1G / 2000 ~ 0G / 2800 ~ +1G
 myScreen.clear(grayColour);
 myScreen.gText(0,0, " Accelerometer", blueColour);
 myScreen.gText(0,15, "Flat", colour);
 while(analogRead(ACC_X) < 900 || analogRead(ACC_X) > 900 || analogRead(ACC_Y) > 900 || analogRead(ACC_Y) < 900 || analogRead(ACC_Z) < 900);
 myScreen.gText(50,15, " > Passed!", colour);
 myScreen.gText(0,30, "Left", colour);
 while(analogRead(ACC_X) > 900 || analogRead(ACC_Y) > 900 || analogRead(ACC_Y) < 900 || analogRead(ACC_Z) > 900 || analogRead(ACC_Z) < 900);
 myScreen.gText(50,30, " > Passed!", colour);
 myScreen.gText(0,45, "Right", colour);
 while(analogRead(ACC_X) < 900 || analogRead(ACC_Y) > 900 || analogRead(ACC_Y) < 900 || analogRead(ACC_Z) > 900 || analogRead(ACC_Z) < 900);
 myScreen.gText(50,45, " > Passed!", colour);
 myScreen.gText(0,60, "Away", colour);
 while(analogRead(ACC_X) < 900 || analogRead(ACC_X) > 900 || analogRead(ACC_Y) < 900 || analogRead(ACC_Z) < 900 || analogRead(ACC_Z) > 900);
 myScreen.gText(50,60, " > Passed!", colour);
 myScreen.gText(0,75, "To you", colour);
 while(analogRead(ACC_X) < 900 || analogRead(ACC_X) > 900 || analogRead(ACC_Y) > 900 || analogRead(ACC_Z) < 900 || analogRead(ACC_Z) > 900);
 myScreen.gText(50,75, " > Passed!", colour);
 myScreen.gText(0,90, "Upside Down", colour);
 while(analogRead(ACC_X) < 900 || analogRead(ACC_X) > 900 || analogRead(ACC_Y) > 900 || analogRead(ACC_Y) < 900 || analogRead(ACC_Z) > 900);
 myScreen.gText(0,105, "   PASSED!!", greenColour);
 delay(400);
 myScreen.clear(grayColour);
 //TEST TMP006 TEMP SENSOR
 float temp = tmp006.readObjTempC();
 char* tempText;
 char ii;
 tempText = (char*) malloc(10);
 for (ii=0;ii<10;ii++)
 tempText[ii] = 0;
 tempText =  ftoa(tempText, temp, 4);
 myScreen.gText(0,0, "   TMP006 Test", blueColour);
 myScreen.gText(0,20, (char*)tempText , colour);
 myScreen.gText(60,20, "*C", colour);
 myScreen.gText(0,40, "   RGB LED Test", blueColour);
 //TEST OPT3001 LIGHT SENSOR
 //To be enabled once OPT3001 is added to future Edu BP MK II Rev.
 // Serial.println("Cover the light sensor to test the OPT3001.");
 // while(opt3001.readResult() > 30);
 // Serial.println("Shine flashlight onto the light sensor ");
 // while(opt3001.readResult() < 1000);
 // Serial.println("OPT3001 testing successful!");
 //TEST RGB LED
 i = 0;
 int brightness = 0;
 int fadeAmount = 5;
 for(brightness = 0; brightness<255; brightness+=fadeAmount){
   analogWrite(RGB_RED, brightness);
   // wait for 30 milliseconds to see the dimming effect
   delay(10);
 }
 for(brightness = 255; brightness>=0; brightness-=fadeAmount){
   analogWrite(RGB_RED, brightness);
   // wait for 30 milliseconds to see the dimming effect
   delay(10);
 }
 for(brightness = 0; brightness<255; brightness+=fadeAmount){
   analogWrite(RGB_GRN, brightness);
   // wait for 30 milliseconds to see the dimming effect
   delay(10);
 }
 for(brightness = 255; brightness>=0; brightness-=fadeAmount){
   analogWrite(RGB_GRN, brightness);
   // wait for 30 milliseconds to see the dimming effect
   delay(10);
 }
 for(brightness = 0; brightness<255; brightness+=fadeAmount){
   analogWrite(RGB_BLU, brightness);
   // wait for 30 milliseconds to see the dimming effect
   delay(10);
 }
 for(brightness = 255; brightness>=0; brightness-=fadeAmount){
   analogWrite(RGB_BLU, brightness);
   // wait for 30 milliseconds to see the dimming effect
   delay(10);
 }
 myScreen.gText(0,70, "S1 to Finish", colour);
 while(digitalRead(SW1) == 1);
 myScreen.gText(0,90, "ALL TESTS PASSED", greenColour);
 while(1);
}
For additional examples you can try the File > Examples> EducationalBP_MKII > EduBP_MKII_Production_Test which gives a demo of all the functions on the BoosterPack. Note for MSP432 make sure to add analogReadResolution(12); to your setup function. Also note for MSP432 the screen may have some refresh lag so it will appear slow.
Troubleshooting
Code not uploading?
- Check for errors in Energia debug window. The compiler will tell you what is happening. Errors are in red text.
- Sometimes your LaunchPad gets stuck or hung up on the previous code. Unplug your LaunchPad and plug it back in to perform a full reset. This is called a power on reset. Sometimes using the RESET button can work but taking away the power and letting the microcontroller fully reset is often best.
- If you have a failure to upload it could be your drivers are not properly installed. Energia will sometimes give the error “No unused FET Found” which means it can’t find a LaunchPad connected to your computer. Make sure you download the drivers for your operating system found on the Getting Started Guide.
- If you had no problem with the previous Blink example, your Energia should be correctly set up. Restart your LaunchPad and restart Energia IDE if you encounter any problems. Make sure to select the right serial port and board type under the Tools menu.
LED not lighting up?
- Make sure you properly uploaded the code and that you properly named your variables for the LED pins. There is very little chance that your LED is broken, but we can verify by blinking a different LED with the same code.
- Hit the reset button, sometimes this is needed for the LaunchPad to run the newly uploaded program.
- TI LaunchPad
- CC2650MA SimpleLink BLE BoosterPack
BLE
Now we can add BLE. The CC2650 is TI's BLE (and Zigbee) adapter for microcontrollers. CC2650MODA is the module version of the chipset, making it very easy to integrate into a custom design. It's very easy to interface with using UART and can be used with both TI LaunchPads and Arduinos because they both support the same programming language (Wiring). Writing a sketch that uses the CC2650 is also very easy as the web examples for both LaunchPad and Arduino will both work on this platform. You can get this board here: http://www.ti.com/tool/boostxl-cc2650ma
Install the Energia BLE library1. Mount the CC2650MA BoosterPack to the MSP432 LaunchPad if not already connected.
2. You will need the latest BLE library for crucial updates and new example Sketches. Inside Energia go to "Sketch" > "Include Libraries" > "Manage Libraries..." From the menu select "BLE" with the latest version (1.0.2+) and click install.
Alternatively you can get it (old version) from : https://github.com/ti-simplelink/ble_energia. Click the green "Clone" button and grab the zip file. Put the BLE folder in your Energia/libraries directory just as you would install any other Energia library. You can also import the library path from inside Energia. Go to Sketch > Include Library > Import .ZIP library... and grab what we got from GitHub.
3. Now in Energia, check your BLE library is loaded by going to File > Examples > BLE. You should see at least five examples listed.
Adding BLE Serial for basic controlOpen up the BLE > SerialoverBLE example in Energia
We are going to follow the directions for the SerialOverBLE example listed under the Energia Example page: http://energia.nu/reference/ble/
SerialOverBLE: http://energia.nu/reference/ble/serialoverblesampleapp/
Play around with that for a little bit and then we will move on to the next example of building an app.
Lab 4 - Energia BLE + BlynkHardware Required- TI LaunchPad
- CC2650MA SimpleLink BLE BoosterPack
The most common use case for BLE is pairing your BLE device with a phone or tablet. Therefore some iOS or Android app development will usually be required. This opens up a whole new can of complexity. An easy way to skip that step at first is to use a service that allows you to take advantage of their pre-built app.
Now we are going to try using Blynk.
You should already have your Energia BLE library installed from Lab 3. If not, make sure to go back and do it.
1. In Energia, Go to "Sketch" > "Include Library" > "Manage Libraries..." and this time select and install the latest "Blynk" library from the menu.
2. Under File > Examples > Blynk > Boards_BLE > Energia_BLE and change your advertise name to something unique. Don't upload yet as we need to get our Blynk Auth Token from the App.
/**************************************************************
* Blynk is a platform with iOS and Android apps to control
* Arduino, Raspberry Pi and the likes over the Internet.
* You can easily build graphic interfaces for all your
* projects by simply dragging and dropping widgets.
*
*   Downloads, docs, tutorials: http://www.blynk.cc
*   Blynk community:            http://community.blynk.cc
*   Social networks:            http://www.fb.com/blynkapp
*                               http://twitter.com/blynk_app
*
* Blynk library is licensed under MIT license
* This example code is in public domain.
*
**************************************************************
*
* This example shows how to use Energia BLE
* to connect your project to Blynk.
*
* NOTE: BLE support is in beta!
*
**************************************************************/
//#define BLYNK_DEBUG
#define BLYNK_PRINT Serial
#define BLYNK_RUN_YIELD() { ble.handleEvents(); }
#include <BLE.h>
#include <BlynkSimpleSerialBLE.h>
// You should get Auth Token in the Blynk App.
// Go to the Project Settings (nut icon).
char auth[] = "YourAuthToken";
void setup() {
 Serial.begin(115200);
 ble.setLogLevel(BLE_LOG_ERRORS);
 ble.begin();
 ble.serial();
 ble.setAdvertName("Blynk BLE MSP432");
 ble.startAdvert();
 Blynk.begin(ble, auth);
}
void loop() {
 Blynk.run();
}
3. Open up the Blynk app and register for an account.
4. Drag in a BLE widget and a button widget
5. Click the button and set the button to V5 (virtual pin 5).
6. Click the BLE button and create a new device. Select Generic Device. Connection BLE.
7. Grab the Auth token from the settings and in put that into your Energia code. Upload the Energia code.
8. Connect to your device through the blynk app from the BLE button. It should be the unique name you gave it in the Energia code.
9. Make sure the target device matches the auth code you set up.
10. Go back and click the play button at the top right
You see that we have the data printing like we had before but now completely wireless and point to point transmission.
Lab 5a - Getting Started with Evothings + EnergiaHardware Required- TI LaunchPad
- CC2650MA SimpleLink BLE BoosterPack
Now we can move on to creating our mobile app but we want to have a portable way to do this. By using HTML5 we can avoid having to spend as much effort maintaining a version for Android and a version for iOS.
For this part of the lab, we are going to use the Evothings cloud service to display our sensor readings. The first way will just show the demo, the second way will show you how to set up your Evothings studio on your computer.
1. In Energia, open the example BLE->BLEInputOutput Sketch.
2. Verify and upload the Sketch
3. On your phone, download the Evothings Viewer from the app store. There is one for iOS and Android.
4. Open the app and then in the “Enter connect key” enter http://energia.nu/ble/bleinputoutput/
5. Click connect.
6. The Energia BLE app should now open in the viewer.
7. Click the start button and the status should change to “Status: Connected”
8. You can now change the RGB sliders and you should see the LED’s on the LaunchPad match. Pressing the buttons will change the text for each button from “released” to “pressed”. You can also see the sensor data we viewed earlier.
Now if there is more than one person testing the experience will break. In this case we will need to customize our code!
9. Download Evothings Studio from http://evothings.com/download/
Agree and get the cloud token to install.
10. Open Evothings Studio and get a new connect key under the connect tab. Enter this key into your Evothings Viewer connect screen. You may have to do this multiple times as your keys expire, but now you know how to do it.
11. Create a new app called "ble-ti-energia" under the new app button on the top right corner.
12. Navigate to the parent folder where the app is located, delete the app folder ( all files and folders inside), and copy and paste the sample app from the zip file called ble-ti-energia.zip into the MyApps folder.
13. Unzip the folder and now your app should be ready to go. You probably need to restart the Evothings studio.
14. In your Energia code, change your advertising name to whatever you like so you can identify your LaunchPad. Click upload.
15. Now the code is similar to the demo but we can type in the name of our device to connect to it and control it.
Evothings is one of the services that you can learn to use to create HTML5 apps that will work on your mobile devices. Like any new application it takes some time to learn how to use it, but can help you speed up your development timeline.
Troubleshooting
Firmware Update?
One issue you may run into is that the firmware on your BoosterPack might not be the right version. Upgrading it is a bit of a hassle but we are working on making this simpler within Energia.
To upgrade the booster pack you will need a windows PC for now.
1. Download Smart RF Flash Programmer 2
2. Remove JTAG headers from MSP432 LP (TDI, TDO, TCK, TMS)
3. Remove the BoosterPack from the LaunchPad (you will need a RED MSP432 LaunchPad)
4. Attach 10 pin ARM ribbon cable (included in the BoosterPack box) to XDS110 header on the emulation side of the MSP432 LaunchPad. Attach other end to CC2650 BP. It is keyed so there is only one way to attach it.
5. Get the SNP images from this link: http://software-dl.ti.com/dsps/forms/self_cert_export.html?prod_no=ble_2_02_simple_np_setup.exe&ref_url=http://software-dl.ti.com/lprf/BLE-Simple-Network-Processor-Hex-Files
6. Once installed, find the image simple_np_cc2650bp_uart_pm_xsbl.hex
7. Plug the LaunchPad into your computer.
8. Launch Smart RF Flash Programmer 2.
9. The CC2650 should show up in the left pane titled “Connected Devices”
10. Right click the CC2650 and select connect. The status bar should say “Success!” when finished connecting.
11. On the “Main” tab, in the “Flash Image” field select single and then browse to the simple_np_cc2650bp_uart_pm_xsbl.hex image.
12. Still on the main tab, under the header “Actions” check “Erase”, “Program” and “Verify”.
13. Then click the Green Arrow image on the right bottom to program the image.
14. Remove the ribbon cable, replace the JTAG headers and reseat the BoosterPack. You are now good to go to run the Sketch/App.
Once you have successfully uploaded the program and connected it to the app you can see how to create an end to end IoT application using bluetooth.
Lab 5b - Educational BoosterPack MKII + EvothingsHardware Required- TI LaunchPad
- Educational BoosterPack MKII
- CC2650MA SimpleLink BLE BoosterPack
Now we are going to integrate our sensor functions with the BLE.
1. Go to File > New and copy the code below.
2. Click the upload button.
3. Open the new app on the Evothings Viewer
You see that we have the data printing like we had before but now completely wireless and point to point transmission.
Challenge: Can you create your own sensor app in Evothings?
Lab 5c - Sensors BoosterPack + EvothingsHardware Required- TI LaunchPad
- Educational BoosterPack MKII
- CC2650MA SimpleLink BLE BoosterPack
Now we are going to integrate our sensor functions with the BLE.
1. Go to File > New and copy the code below.
2. Click the upload button.
3. Open the new app on the Evothings Viewer
You see that we have the data printing like we had before but now completely wireless and point to point transmission.
Challenge: Can you create your own sensor app in Evothings?
Lab 6a - Energia BLE + Cayenne MQTT + Educational BoosterPackHardware Required- TI LaunchPad
- Educational BoosterPack MKII or
- CC2650MA SimpleLink BLE BoosterPack
Now we are going to integrate our sensor functions with the BLE.
1. Go to File > New and copy the code below.
2. Click the upload button.
3. Open the new app on the Evothings Viewer
You see that we have the data printing like we had before but now completely wireless and point to point transmission.
Challenge: Can you create your own sensor app in Cayenne?
Lab 6b - Energia BLE + Cayenne MQTT + Sensors BoosterPackHardware Required- TI LaunchPad
- Sensors BoosterPack
- CC2650MA SimpleLink BLE BoosterPack
Now we are going to integrate our sensor functions with the BLE.
1. Go to File > New and copy the code below.
2. Click the upload button.
3. Open the new app on the Evothings Viewer
You see that we have the data printing like we had before but now completely wireless and point to point transmission.
Challenge: Can you create your own sensor app in Cayenne?
More BLE services to tryDweet IoT Gateway - Does not support TI BLE yet
- Easily use dweet.io through an iOS or Android App to connect to your BLE dev kit
Dropsource - Does not support BLE yet
- Build a basic app quickly and then import that into Android Studio or Xcode to complete the BLE portion
Tago - Does not support BLE yet
- Use an MQTT client on a phone or tablet to connect a BLE device to Tago
Temboo - Does not support BLE yet
- Connect your BLE device to hundreds of APIs through Temboo
Losant - Only supports BLE gateways
- Connect your BLE devices to a gateway or bridge device to connect to Losant via MQTT
- TI LaunchPad
- Educational BoosterPack Mk II
- CC3100 SimpleLink Wi-Fi BoosterPack
In this part of the lab we will use the TI SensorTag App as a starting point for our mobile application.
1. Go back to www.ti.com/sensortag or go to your app store and download the TI SensorTag App
2. ?
3. ?
When finished you can return to this page to do the next lab.
Lab 8 - Using GUI Composer to create a dashboardHardware Required- TI LaunchPad
In this part of the lab we will utilize GUI Composer. This lab is optional. If you would like to skip to the next lab which continues with Wi-Fi, you may do so.
1. Go back to dev.ti.com and select the GUI Composer icon
2. Log in to your TI account if you have not already and click on the "Getting Started" option. Here you will see resources for learning about the features of GUI Composer. We will go through the prepared tutorial for MSP432.
3. Click to the tutorial here in a new tab: https://dev.ti.com/gc/designer/help/Tutorials/monitor/index.html
When finished you can return to this page to do the next lab.
ConclusionThat is a good sample of basic IoT prototyping with TI LaunchPad + BLE + Inputs&Outputs. There is obviously a lot more to do with the mobile app and cloud services that are accessible through Energia libraries. There are also many hardware combinations to try when connecting things wirelessly. You can learn more about the TI LaunchPad ecosystem at www.ti.com/launchpad and explore the Energia website for more ideas and help.

Comments