
Software apps and online services | ||||||
| ||||||
| ||||||
 |
| |||||
My mom suffers from menopausal symptoms such as hot flashes, fatigue & osteoporosis. This has caused her to feel uncomfortable at varying durations from minutes to hours. I've noticed that to find relief, she would lie on her back on a bed stretching out her arms and her legs leaning against a wall.
Different women would have different methods to finding relief from menopausal symptoms. The best approach would always to go for science-backed research on the problem. After some research, I've found that Yoga can be an effective noninvasive method providing temporary relief for menopausal symptoms. A study found that over eight weeks of an integrated approach to yoga therapy resulted in a better outcome as compared to physical activity in reducing climacteric symptoms, perceived stress and neuroticism in perimenopausal women.
Although, I've recommended my mom to join an outdoor yoga class, it's been met with some resistance as she dislikes going to big gatherings and wouldn't want to pay for an expensive one on one yoga sessions. With this in mind, I decided to tackle the issue of bringing Yoga for menopause at home while still making sure she's doing it the right way using the power of machine learning.
Project Goals and FeaturesThe goals of this project was to bring a fun & interactive yoga experience to your browser at home with:
- Realtime Yoga Pose Estimation
- Realtime Yoga Pose Classification
- The web-cam is used as the input to a deep learning model that estimates your pose and is visualized as tiny circles for joints with lines drawn to connect those joints together.
- The web-cam input is also passed to another deep-learning model that classifies your pose and checks whether you're doing it correctly.
- A progress bar is implemented where holding your pose correctly will fill the bar and if its finally full, you can move on to the next pose. Otherwise, if you're doing the pose incorrectly, the bar will drop.
Since the project is a web based application, you'll only need your personal computer/laptop with a web-cam to develop this on. Primarily, the PoseNet model on Tensorflow.js was used along with ml5.js as a high level wrapper with p5.js for animations.
PrerequisitesBefore starting, you should know that the project folder structure should ideally contain these 4 elements
- index.html, the landing page of the web application.
- sketch.js, where we'll write code for pose estimation, classification & the loading bar animations. We'll then export this file as a script element in the index.html file so it can be rendered & run.
- style.css for a bit of styling on the web page.
- a folder to keep JSON files & weights for classification (i.e: model_meta.json, model.json, model.weights.bin)
You'll also need to import the libraries for pose estimation, classification & animations in your index.html.
<script src="https://cdnjs.cloudflare.com/ajax/libs/p5.js/0.10.2/p5.js"></script>

<script src="https://cdnjs.cloudflare.com/ajax/libs/p5.js/0.10.2/addons/p5.sound.min.js"></script>

<script src="http://cdnjs.cloudflare.com/ajax/libs/p5.js/0.5.6/addons/p5.dom.js"></script>

<script src="https://unpkg.com/ml5@0.4./dist/ml5.min.js"></script>
For reference here are the links to the code for this project
Terminology- Pose estimation - defined as the problem of localization of human joints (also known as keypoints - elbows, wrists, etc) in images or videos. It is also defined as the search for a specific pose in space of all articulated poses.
- Pose classification - defined as the problem of classifying an image/video frames based on location of human joint keypoints.
Step 1: Gathering data for Pose classification
Ideally, training data for pose classification should be obtained from a certified yoga practitioner, but for the purposes of the demo, we'll be generating it ourselves. This website shows a number of different poses that can be done to relieve menopausal symptoms. Here we'll be selecting three types of poses:
Head over to this sketch, where you'll be able to run the program to gather pose data directly from your camera feed. The sketch works as follows:
- Once you press any key, it will wait for 10 seconds for you to prepare yourself to do the pose.
- After, it will start collecting pose data from your camera feed for another 10 seconds and then stops collecting.
if (state == 'collecting') {
      let inputs = [];
      for (let i = 0; i < pose.keypoints.length; i++) {
        let x = pose.keypoints[i].position.x;
        let y = pose.keypoints[i].position.y;
        inputs.push(x);
        inputs.push(y);
      }
      let target = [targetLabel];
      brain.addData(inputs, target); //brain is the neural network object
}- You then press another key to start gathering data for a different pose.
- Once done, you can press the 's' key to save the training data locally. If you take a look at the file, its a bunch of x and y coordinates representing different structure of joints in the time you were in the pose.
Note: The key press is mapped to whatever pose you were in, so do remember the key you pressed with respect to the pose. I've mapped the 'q' key to the Extended Triangle Pose, 'w' key to the Hero pose and 'e' key to the Bridge pose.
Step 2: Training neural network from gathered data
Next we'll train the data on a neural network for pose classification. Head over to this sketch, and upload your JSON training data from Step 1 into the workspace. Once loaded, run the sketch and hopefully your training performance is similar. You can define your own custom neural network architecture by defining your layers as noted here. You'll be prompted to download 3 files which are model.json, model_meta.json and model.weights.bin file. You'll need these for the next step.
Step 3: Test out your classification model
Head over to this sketch and upload your three files from earlier. These files will be used for the classifier as follows.
let classifyOptions = {
    inputs: 34,
    outputs: 4,
    task: 'classification',
    debug: true
  }
  brain = ml5.neuralNetwork(options);
    const modelInfo = {
    model: 'yoga/model.json',
    metadata: 'yoga/model_meta.json',
    weights: 'yoga/model.weights.bin',
  };
    brain.load(modelInfo, brainLoaded);
}
The sketch works by displaying the key mapped to the pose in Step 1. To remove some of the noise, we set the minimum confidence threshold to 0.75.
function classifyPose() {
  if (pose) {
    let inputs = [];
    for (let i = 0; i < pose.keypoints.length; i++) {
      let x = pose.keypoints[i].position.x;
      let y = pose.keypoints[i].position.y;
      inputs.push(x);
      inputs.push(y);
    }
    brain.classify(inputs, gotResult);
  } else {
    setTimeout(classifyPose, 100);
  }
}

function gotResult(error, results) {
  if (results[0].confidence > 0.75) {
    poseLabel = results[0].label.toUpperCase();
     console.log(poseLabel);
  }
  classifyPose();
}
Once the sketch is run, you should see similar results (depending on your pose of course).
Step 4: Putting it all together
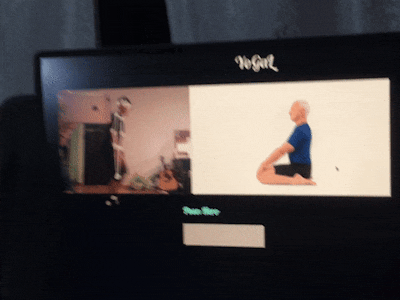
Now that we've confirmed our classifier is working, it's time we put it all together here. We've implemented a simple loading bar with p5.js that will incrementally increase with the right pose and decrease if you're doing it wrong. Once full, its on to the next pose! Also, you'll always have someone by your side to reference to as the pose changes.
Had a ton of fun (and struggle) being able to develop this application especially coming from a hardware background. There are definitely some improvements to be made in this project from the application's UI, improving the model's accuracy, to incorporate a variety of other features such as audio feedback and including more poses. Special thanks to AARP Innovation Labs for organizing this competition enabling us to promote innovation in finding ways to help solve menopausal problems.
Comments