


Hardware components | ||||||
_ztBMuBhMHo.jpg?auto=compress%2Cformat&w=48&h=48&fit=fill&bg=ffffff) |
| × | 1 | |||
| × | 1 | ||||
 |
| × | 1 | |||
| × | 5 | ||||
 |
| × | 1 | |||
 |
| × | 1 | |||
| × | 1 | ||||
| × | 1 | ||||
Software apps and online services | ||||||
| ||||||
 |
| |||||
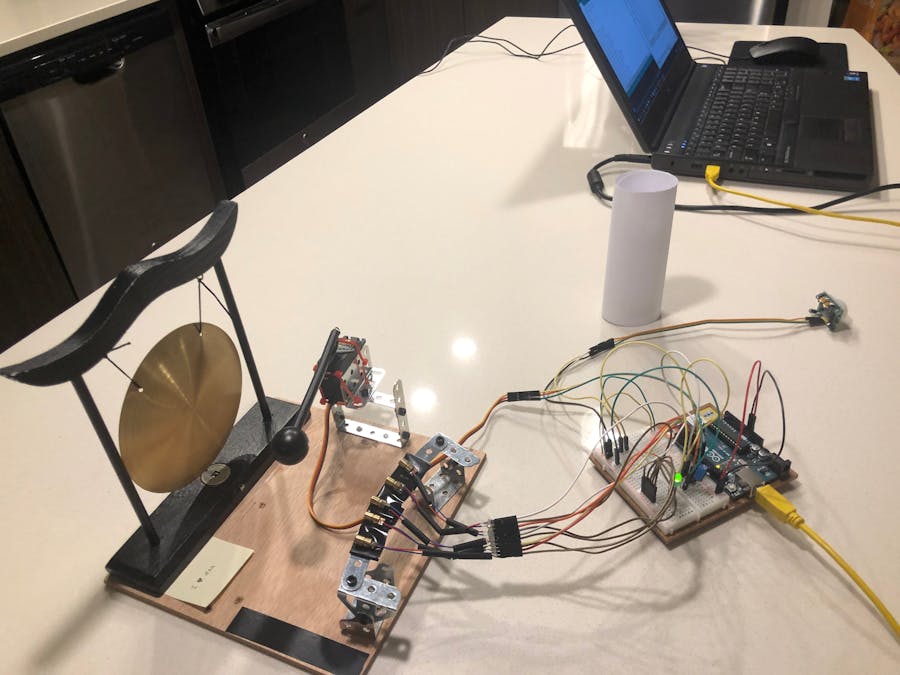
The project uses an Arduino Uno, PIR motion sensor, a 180 degree positioning servo and one LED.
Once motion is detected, the servo will move the hammer attached to its rotor into the path of the bell and back. There are two servo "teach positions".The rest teach position is where the servo waits for motion.The gong teach position is where the servo moves to gong(or ring) the bell.Green LED lights when the motion sensing is armed.
While armed, if motion is detected then...
- Lasers energize
- Servo moves from rest to gong position and back
- One second later, lasers will de-energize
- The one second delay above is adjustable
The tube standing near the PIR motion detector has two potential purposes if you put the PIR motion sensor into the entry of the tube
- First, is during debug. The PIR has a wide viewing angle. This is great, but trips the sequencer to energize lasers and gong the bell when anything in its view moves, making debug cumbersome
- Second, it turns the motion sensing portion of the project into a touch-less doorbell. You wave your hand in front of the tube opening and it triggers the motion
- Further instructions are in the Setup tab of the LO1 spreadsheet with the project
- Acquire the parts substituting as needed or desired
- Wire the Arduino and components according to the schematic
- The lasers are optional but affordable and fun
- Use a glue stick or other equivalent to mount the gong hammer to the servo
- Create some simple structure to hold the servo motor
- Same for lasers if using
- I purchased an Erector set previously and use it for all my projects
- Allows easy creation of useful and practical structures
- Install Microsoft Visual Studio Code IDE and the Arduino IDE onto your computer
- Upload the code (filename LO1.INO) to the Arduino Uno
- You may need to change the Com port number for you computer either one of two ways in VS Code
- Open code file in the VS Code Editor 'arduino.json and change line 6
- Hit <F1> and type 'Arduino: Select Serial Port' This method will auto update line 6 above
- It starts up enabled and green LED should be on if all is wired okay
- The motion sensing will be armed as a result
- Use the Serial Control Codes defined in the spreadsheet to test wiring
- You can also use the codes to set the servo positions for rest and gong
- Use code 11nnn to move the servo to different positions
- Substitute nnn with angles degrees from 0-179
- For example to command to 90 degrees then enter 11090 <enter>
- When happy with location then use code 10008 or 10009 to save rest or gong positions respectively
- Do the same for the second teach position
- If you do not want to take this action then move the actuator mount of the hammer on the motor and trigger motion and confirm positions are suitable.
The code uses a state machine concept where it cycles through steps and can only be in one step at a time. Adding, changing and removing steps is straight-forward. It also makes it simpler to know exactly what your code is doing and when - especially under the conditions that things must occur in specific order like this project.
A step can certainly do more what one thing but in general it is advisable to avoid this. Here, you will see steps that will move the servo then wait a fixed time, but that is the extent of a steps variability.
You can make the bell gong motion wait longer between sensed motion by experimenting with the step time delay in step number 40, line 156 of the code. Currently set to 1000 ms (1 second). Make it longer and the sequencer will sit in this step for longer. This works because motion sensing that activates the gong of the bell only occurs in step 5.
Gaps between step numbers like here is not required but is highly recommended. If you want to add a step, for example, after energizing the laser but before moving the servo, you have unused numbers.
Some MinutiaThis project was coded with Microsoft Visual Studio Code with the Arduino Extension as noted in the instructions spreadsheet that is part of the project.
For sending serial codes to the Arduino and for monitoring and setup, I used the Arduino IDE Serial monitor since it easily merges command sending to the Uno with automatic message display from the Uno.
Danisa Alejo was instrumental in the creation and documenting of this fun project!
Definitiongong (noun)meaning: a metal disk with a turned rim, giving a resonant note when struck.


Comments