Hardware components | ||||||
 |
| × | 1 | |||
Software apps and online services | ||||||
 |
| |||||
Hand tools and fabrication machines | ||||||
| ||||||
Iedere baby die luiers draagt kan last krijgen van luieruitslag. Hoewel het iets is wat vaak voorkomt, kan luieruitslag veel ongemak veroorzaken voor je baby.
Wanneer de huid van je baby te lang nat is geweest, kan hij/zij zelfs schimmelinfecties krijgen.
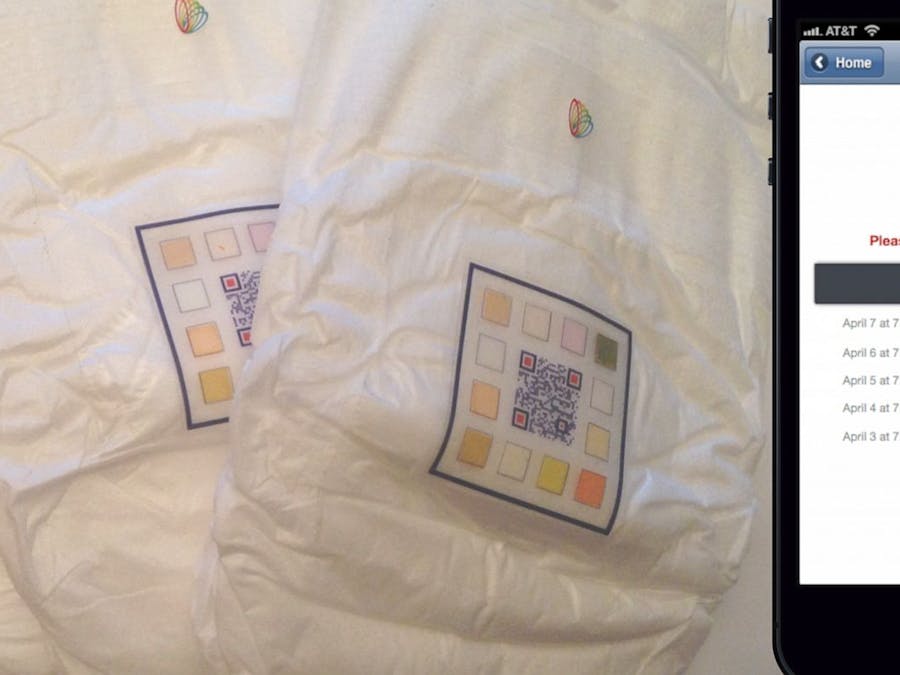
Dit probleem kan voorkomen worden door onze zelf ontwikkelde "Smart Diaper".
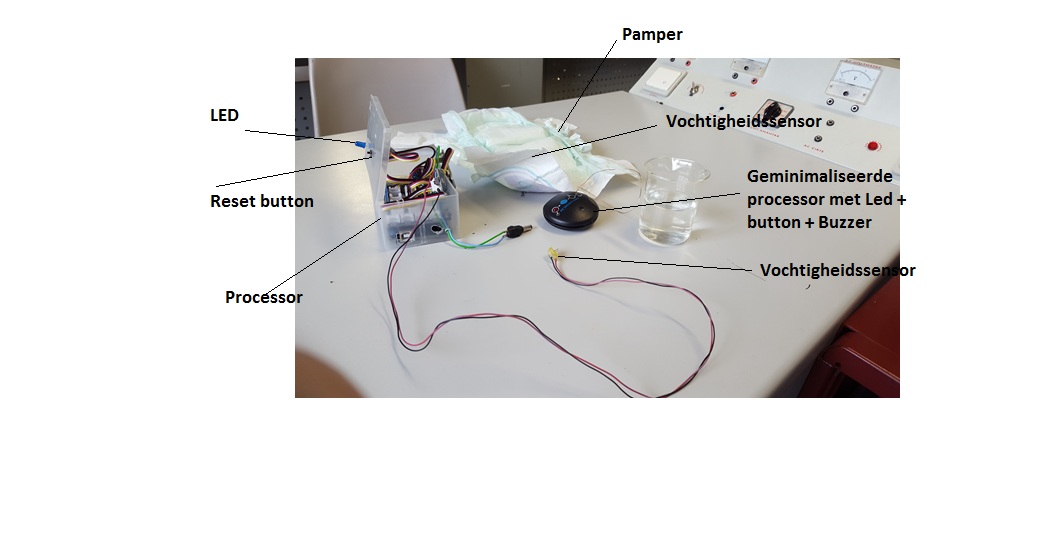
Een "Smart Diaper" is een pamper dat een signaal stuurt naar de ouders/kinderopvangster wanneer het kind heeft geplast.
Dit signaal kan onder de vorm zijn van een sms bericht die verstuurd wordt, een Led lampje die aan gaat of een geluidsignaal zijn wanneer het kind heeft geplast.
Ook kan men de "Smart Diaper" gebruiken voor zindelijkheidstraining.
Bovendien kan het ook toegepast worden voor mensen die bv. in coma liggen die zelf hun behoefte niet meer kunnen doen.
/*
  SmartLiving Makers Arduino UART Demo Sketch
  version 1.0 dd 25/11/2015

  This file is an example sketch to deploy a digital sensor and actuator in the SmartLiving.io IoT platform.

  ### Instructions

  1. Setup the Arduino hardware
    - Use an Arduino Genuino 101 IoT board
    - Connect the Arduino Grove shield
    - Connect USB cable to your computer
    - Connect a Grove push button to Pin D8 of the Grove shield
    - Connect a LED to Pin D7
    - Connect Grove wifi to pin UART (D0,D1)

  2. Add 'ATT_IOT_UART' library to your Arduino Environment. [Try this guide](http://arduino.cc/en/Guide/Libraries)
  3. Fill in the missing strings (deviceId, clientId, clientKey) and optionally change/add the sensor & actuator names, ids, descriptions, types
     For extra actuators, make certain to extend the callback code at the end of the sketch.
  4. Upload the sketch

  Note: for use of extra actuators, extend the callback function at the end of the sketch

*/

#include "ATT_IOT_UART.h"         // AllThingsTalk IoT library
#include <SPI.h>                  // Required to have support for signed/unsigned long type.
#include "keys.h"                 // Keep all your personal account information in a seperate file

// Enter below your client credentials.
// These credentials can be found in the configuration pane under your device in the smartliving.io website

ATTDevice Device(&Serial1);
char httpServer[] = "api.smartliving.io";                       // HTTP API Server host
char mqttServer[] = "broker.smartliving.io";                    // MQTT Server Address


// Define PIN numbers for assets
// For digital and analog sensors, we recommend to use the physical pin id as the asset id
// For other sensors (I2C and UART), you can select any unique number as the asset id
#define DigitalSensorA 8                                         // Digital Sensor (drukknop) is connected to pin D8 on grove shield
#define DigitalActuatorB 7                                        // LED
#define DigitalSensorC 5                                         // Switch
#define DigitalActuatorD 6                                      // BUZZER


// Required for the device
void callback(int pin, String& value);


void setup()
{
  pinMode(DigitalSensorA, INPUT);                                // Initialize the digital pin 8 as an input.      //Drukknop
  pinMode(DigitalActuatorB, OUTPUT);                             // Initialize the digital pin 7 as an output.    // LED
  pinMode(DigitalSensorC, INPUT);                                // Initialize the digital pin 5 as an input.      // Switch
  pinMode(DigitalActuatorD, OUTPUT);                             // Initialize the digital pin 6 as an output.     //  Buzzer


  Serial.begin(57600);                                          // Init serial link for debugging
  while(!Serial);                                         // om standalone te werken  --> while(!Serial && millis() < 1000);  ipv -->  while(!Serial);
  Serial.println("Starting sketch");
  Serial1.begin(115200);                                        // Init software serial link for WiFi
  while(!Serial1);

  while(!Device.StartWifi())
    Serial.println("retrying...");
  while(!Device.Init(DEVICEID, CLIENTID, CLIENTKEY))            // If we can't succeed to initialize and set the device credentials, there is no point to continue
    Serial.println("retrying...");
  while(!Device.Connect(httpServer))                            // connect the device with the IOT platform. No point to continue if we can't succeed at this
    Serial.println("retrying");

  Device.AddAsset(DigitalSensorA, "sensor", "Digital Sensor Description", false, "boolean");     // Create the Digital Sensor asset for your device
  Device.AddAsset(DigitalActuatorB, "acuator", "Digital Sensor Description", true, "boolean");   // Create the Digital Actuator asset for your device
  Device.AddAsset(DigitalSensorC, "sensor", "Digital Sensor Description", false, "boolean");     // Create the Digital Sensor asset for your device
  Device.AddAsset(DigitalActuatorD, "acuator", "Digital Sensor Description", true, "boolean");   // Create the Digital Actuator asset for your device


  delay(1000);                                                  // Give the WiFi some time to finish everything
  while(!Device.Subscribe(mqttServer, callback))                // Make certain that we can receive message from the IoT platform (MQTT). This stops the http connection
    Serial.println("retrying");

  Device.Send("false", DigitalActuatorB);
  Device.Send("false", DigitalActuatorD);
  Serial.println("button is ready");
}


bool sensorVal = false;
void loop()
{
  bool sensorReadA = digitalRead(DigitalSensorA);                 // Read status Digital Sensor drukknop
                                                                   // Verify if value has changed  --> if (sensorVal != sensorReadA)

    sensorVal = sensorReadA;
    if (sensorReadA == 1)
      Device.Send("true", DigitalSensorA);
    else
      Device.Send("false", DigitalSensorA);

  bool sensorReadC = digitalRead(DigitalSensorC);                 // Read status Digital Sensor Switch
                                                                   // Verify if value has changed  -->   if (sensorVal != sensorReadC)

   sensorVal = sensorReadC;
    if (sensorReadC == 1)
      Device.Send("true", DigitalSensorC);
    else
      Device.Send("false", DigitalSensorC);

  Device.Process();
}


// Callback function: handles messages that were sent from the iot platform to this device.
void callback(int pin, String& value)
{
	Serial.print("Incoming data for: ");           // Display the value that arrived from the cloud.
	Serial.print(pin);
	Serial.print(", value: ");
	Serial.println(value);

  if(pin == DigitalActuatorB)       //ActuatorB = LED
  {

    do
    {
      if(value == "true")
      digitalWrite(pin, HIGH);
    else
      digitalWrite(pin, LOW);
    Device.Send(value, pin);      // Send the value back for confirmation
    }
    while(DigitalSensorC==0);        //schakelaar
  }
   if(pin == DigitalActuatorD)       //ActuatorD = Buzzer
  {
    if(value == "true")
      digitalWrite(pin, HIGH);
    else
      digitalWrite(pin, LOW);
    Device.Send(value, pin);                     // Send the value back for confirmation
  }
}


Comments