


Hardware components | ||||||
 |
| × | 1 | |||
Software apps and online services | ||||||
| ||||||
Hand tools and fabrication machines | ||||||
| ||||||
| ||||||
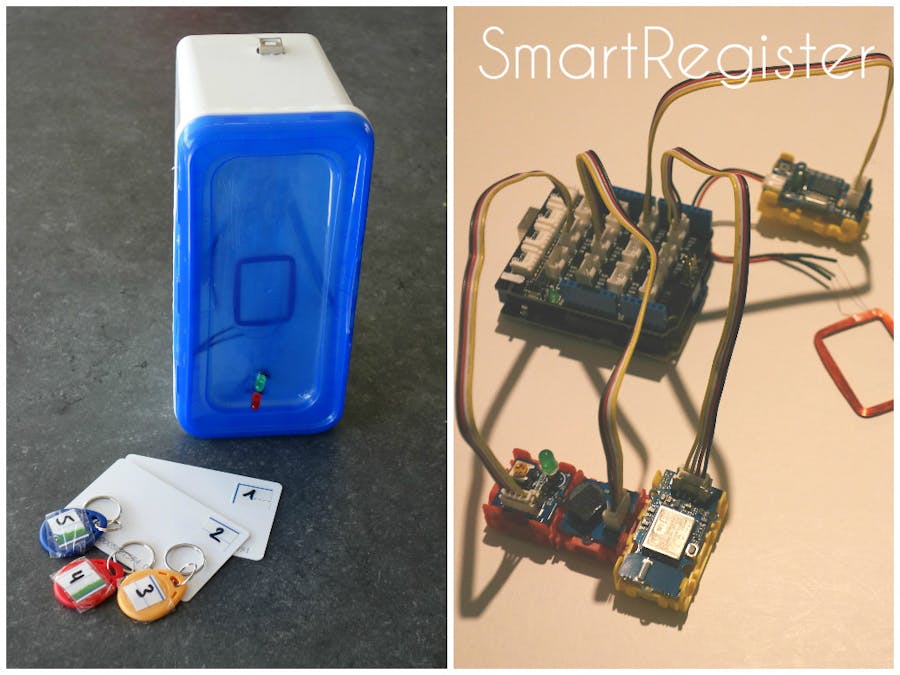
Bij het binnenkomen van een klaslokaal scannen de leerlingen hun
persoonlijke badge in op onze Smartregister. Wanneer het scannen
lukt, gaat er kort een groen lampje branden en volgt er een biep. De naam
van de leerling bij de badge wordt automatisch als aanwezig gemarkeerd.
10 minuten na de start van het lesuur ontvangt de aanwezige leerkracht een
bericht op zijn of haar smartphone ter controle of alle aanwezige leerlingen
ook daadwerkelijk in de klas aanwezig zijn. Een handig hulpmiddeltje dus om
fraude te voorkomen. Nadien wordt de lijst met afwezigen getoond aan het
onthaal.
Welke voordelen biedt het Smartregister?
Het Smartregister is tijdbesparend voor de onthaalmedewerker, hij of zij moet
niet meer door de hele school lopen om alle registers op te halen. Hij of zij
moet ook niet meer op zoek naar klassen die in andere dan
ingeroosterde lokalen zitten, ook hiervan krijgt de secretariaatsmedewerker meteen een overzicht.
Het Smartregister heeft ook voordelen voor de leerkrachten en leerlingen. De
leerkracht kan geen foute namen meer ingeven en hij moet geen energie meer
steken in het overlopen van alle namenlijsten. Kortom, de les kan
meteen van start gaan.
Minder beweging in de gangen zorgt ook voor de nodige rust, rust die de
concentratie van de leerlingen verhoogt.
Dat zijn heel wat voordelen op een rij.
Met het Smart Register verliest de school dus geen overbodige tijd meer
en kan iedereen heel efficiënt en in alle rust werken.
Yes we scan!
smartregister.ino
Arduino/*
Author: students JOMA secundair Merksem and K. Kuypers
Contact: kathleen.kuypers@gmail.com or kkuypers@jomasecundair.be
Arduino UART Demo Sketch. This Sketch is made for an Genuino 101 IoT board with a Grove
UART WiFi module based on the popular ESP8266 IoT SoC to communicate to the AllThingsTalk
IoT developer cloud.
The Grove UART WiFi module has firmware installed which includes the ATT_IOT library. It
communicates through Serial1 of the Genuino 101 board.
Version 1.0 dd 16/03/2016
### Instructions
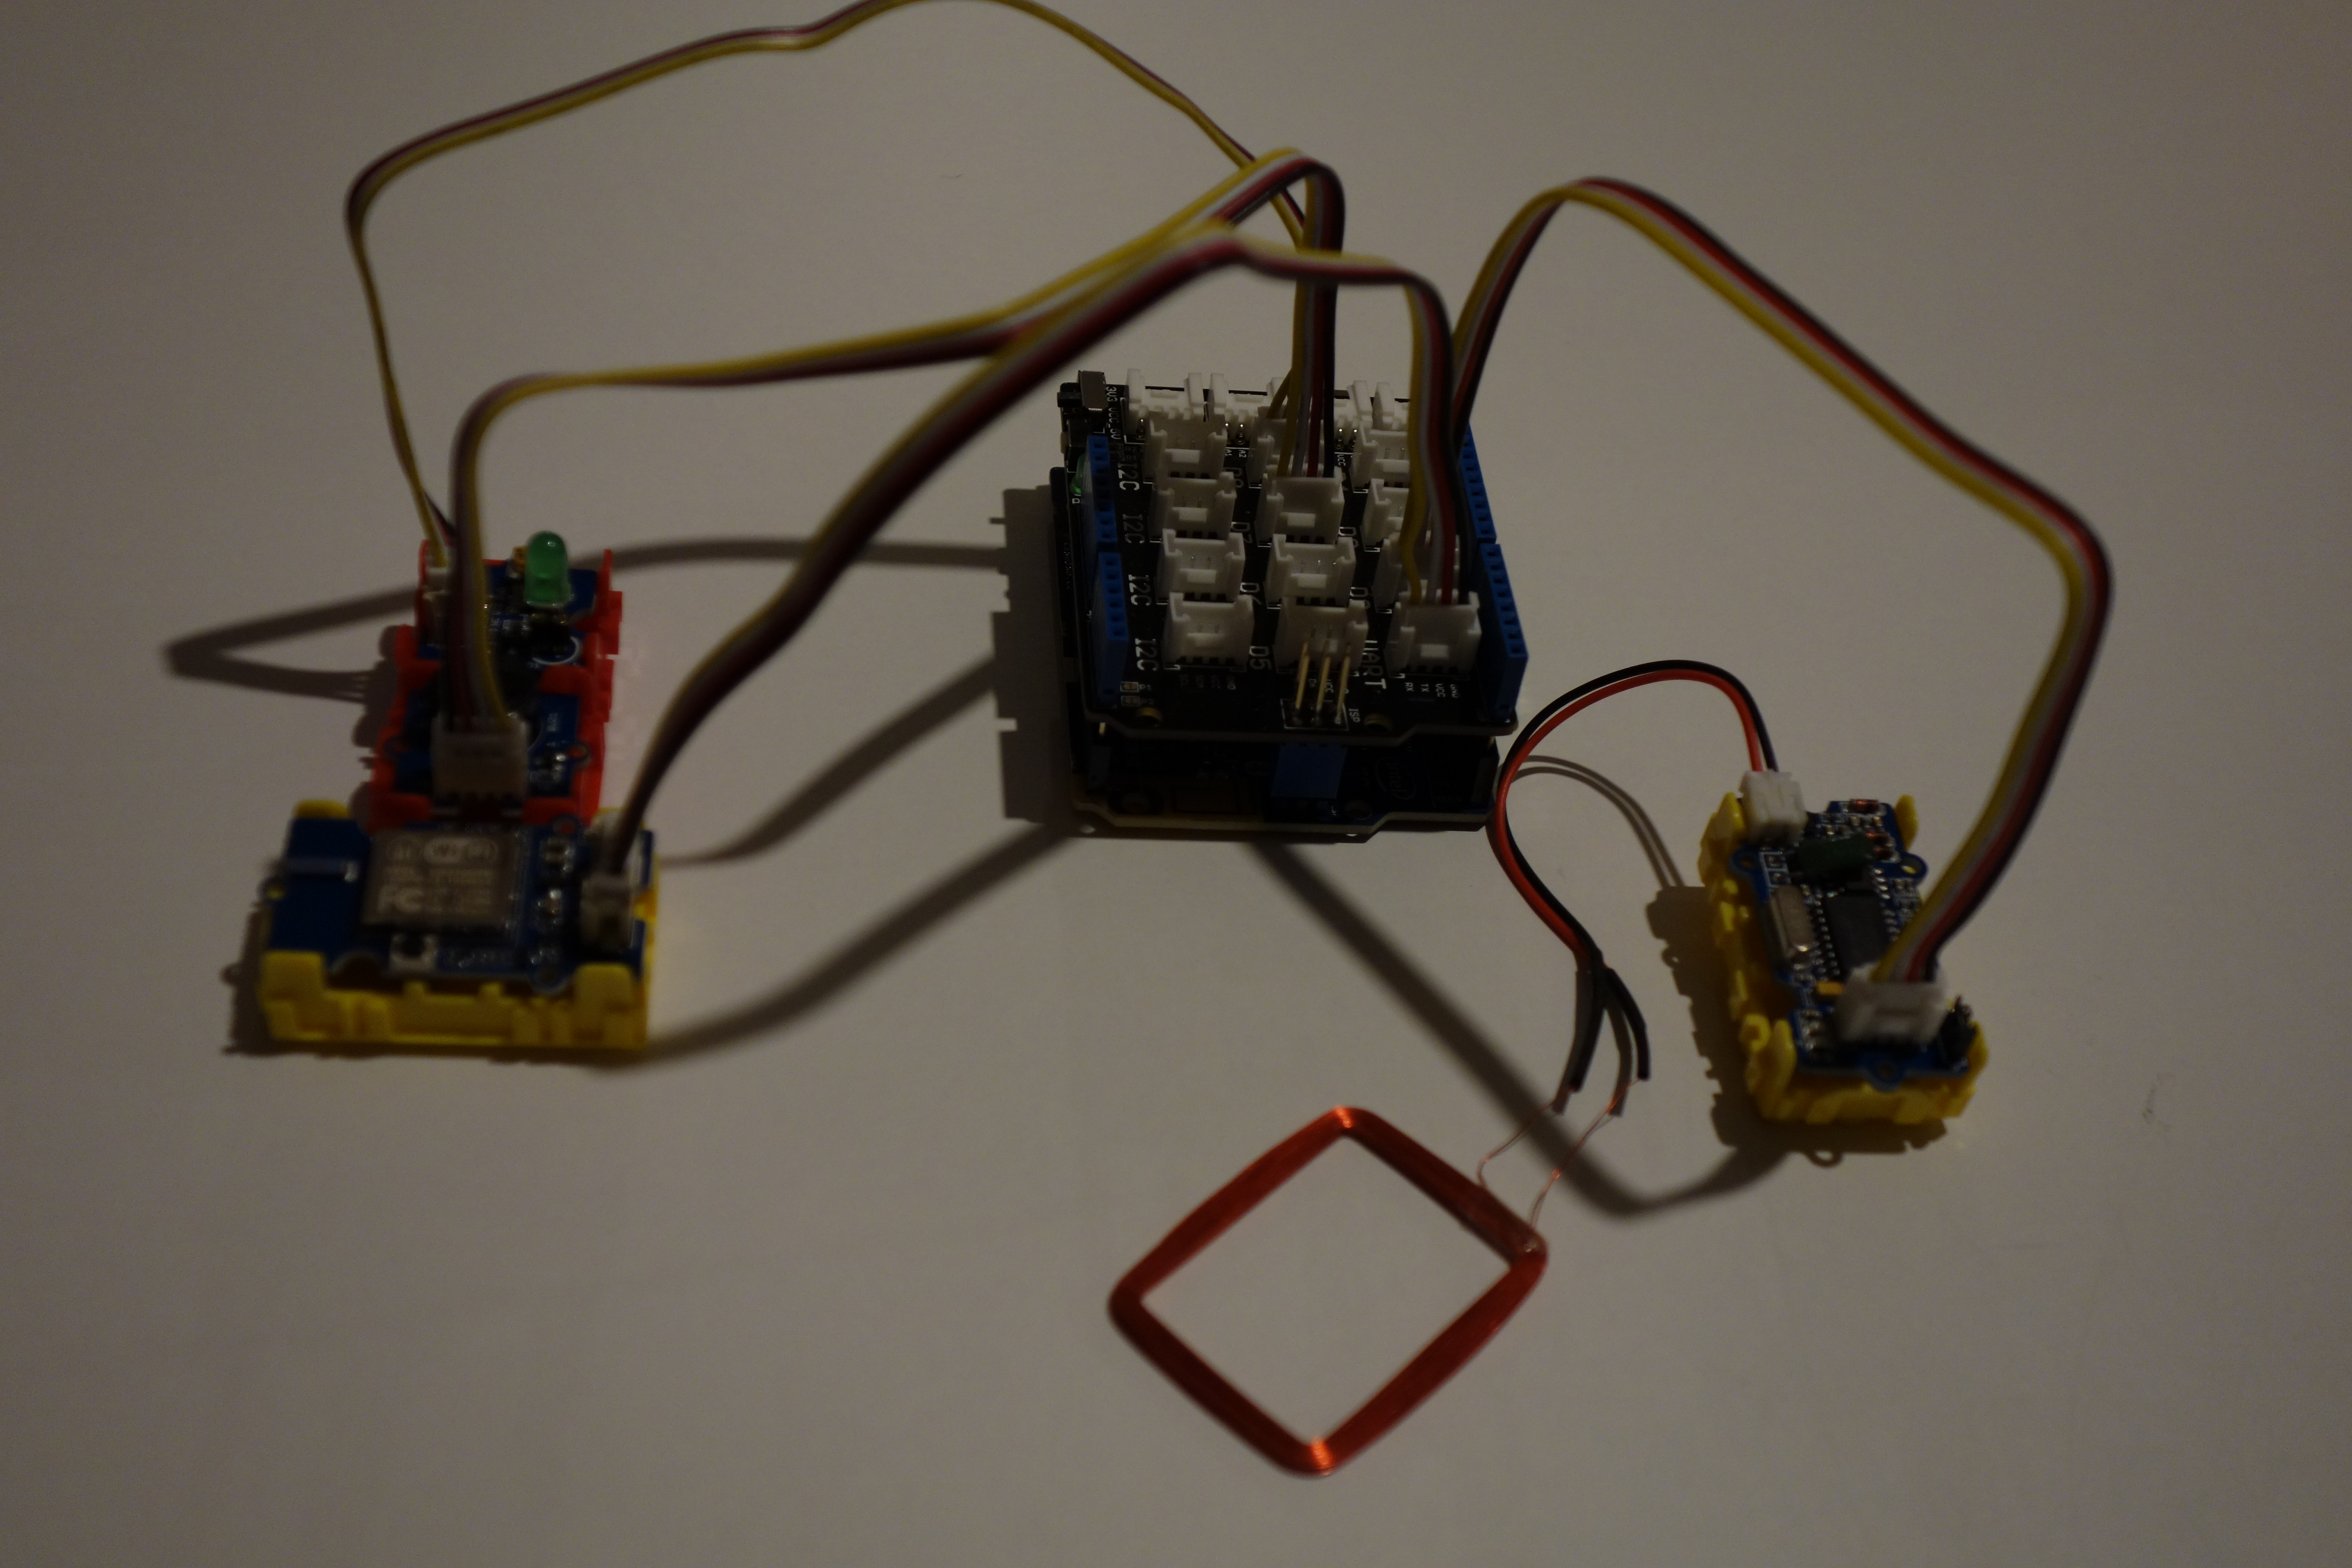
1. Setup the Arduino hardware
- Use an Arduino Genuino 101 IoT board
- Connect the Arduino Grove shield, make sure the switch is set to 5.0V
- Connect USB cable to your computer
- Connect a Grove RFID reader to pin D2 of the Arduino shield
- Grove UART wifi to pin UART (D0,D1)
- Connect a green led to pin D8 of the Arduino shield
- Connect a green led to pin D4 of the Arduino shield
- Connect the buzzer to pin D7 of the Arduino shield
2. Add 'ATT_IOT_UART' library to your Arduino Environment
More info can be found at http://arduino.cc/en/Guide/Libraries
3. Fill in the missing strings (deviceId, clientId and clientKey) in the keys.h file
4. Optionally, change sensor names, labels as appropiate
5. Upload the sketch
used RFID tags
card0: 2 197 86 26 102 152 53 9 134 70 102 54 22 154 102 224
card1: 2 197 86 26 102 152 53 229 70 150 22 154 102 208 67 13 254
card2: 2 193 86 6 6 22 86 90 102 204 56 229 134 54 54 248
card3: 2 193 70 6 6 134 86 150 102 38 26 103 208 70 13 254
card4: 2 193 102 6 6 150 38 38 218 102 179 102 205 52 13 254
*/
#include "ATT_IOT_UART.h" // AllThingsTalk Arduino UART IoT library
#include <SPI.h> // Required to have support for signed/unsigned long type
#include "keys.h" // Keep all your personal account information in a seperate file
#include <SoftwareSerial.h>
ATTDevice Device(&Serial1);
char httpServer[] = "api.smartliving.io"; // HTTP API Server host
char mqttServer[] = "broker.smartliving.io"; // MQTT Server Address
//****************************************************************
//** PIN numbers
//****************************************************************
#define greenledId 8 // led is connected to pin D8 on grove shield
#define redledId 4 // led is connected to pin D8 on grove shield
#define buzzerId 7 // led is connected to pin D7 on grove shield
#define readerId 0 // rfid
#define nameId 1 // Virtual actuator to show the name of the student in smartliving IOT cloud
#define listAbsentStudentsId 3 // Virtual actuator to show absent students in label in smartliving IOT cloud
#define messageId 6 // Virtual sensor to add a message from teacher in smartliving IOT cloud
#define numberOfStudents 5 // Number of students in the class group
SoftwareSerial SoftSerial(2, 3);
// Required for the device
void callback(int pin, String& value);
//****************************************************************
//** setup
//****************************************************************
void setup()
{
Serial.begin(57600); // Init serial link for debugging
while(!Serial && millis() < 1000); // Make sure you see all output on the monitor. After 1 sec, it will skip this step, so that the board can also work without being connected to a pc Serial.println("Starting sketch");
Serial1.begin(115200); // Init serial link for WiFi module
while(!Serial1);
SoftSerial.begin(9600); // start serial to RFID reader
while(!Device.StartWifi())
Serial.println("Retrying...");
while(!Device.Init(DEVICEID, CLIENTID, CLIENTKEY)) // If we can't succeed to initialize and set the device credentials, there is no point to continue
Serial.println("Retrying...");
while(!Device.Connect(httpServer)) // Connect the device with the AllThingsTalk IOT developer cloud. No point to continue if we can't succeed at this
Serial.println("Retrying");
//*** Add assets to the smartliving IOT cloud
// Device.AddAsset(readerId, "RFID reader", "reader", false, "string");
Device.AddAsset(greenledId, "OK", "OK", false, "boolean");
Device.AddAsset(redledId, "not OK", "not OK", false, "boolean");
Device.AddAsset(nameId, "NAME:", "name", false, "string");
Device.AddAsset(listAbsentStudentsId, "STUDENTS:", "students", false, "string");
Device.AddAsset(messageId, "MESSAGE", "message", true, "string");
//***
delay(1000); // Give the WiFi some time to finish everything
while(!Device.Subscribe(mqttServer, callback)) // Make sure that we can receive message from the AllThingsTalk IOT developer cloud (MQTT). This stops the http connection
Serial.println("Retrying");
pinMode(readerId, INPUT); // Initialize the digital pin as an input.
Serial.println("RFID reader is ready for use!");
pinMode(greenledId, OUTPUT); // Initialize the digital pin as an output.
Serial.println("greenled is ready for use!");
pinMode(redledId, OUTPUT); // Initialize the digital pin as an output.
Serial.println("redled is ready for use!");
pinMode(buzzerId, OUTPUT); // Initialize the digital pin as an output.
Serial.println("buzzer is ready for use!");
pinMode(nameId, OUTPUT);
Device.Send("", nameId);
Serial.println("Name is ready for use!");
pinMode(listAbsentStudentsId, OUTPUT);
Device.Send("", listAbsentStudentsId);
Serial.println("Absent student list is ready for use!");
pinMode(messageId, INPUT);
Device.Send("", messageId);
Serial.println("Message is ready for use!");
}
/*********************************************
* variables
*********************************************/
String names[numberOfStudents] {"Yasmina", "Salma", "Dominika", "Tomislav", "Branco"}; //contains the names of the students of the class group
boolean absent[numberOfStudents] {true,true,true,true,true }; //indicates whether the students are absent
int rfid[numberOfStudents][14] //contains the rfids of the student cards
{
{2,49,21,6,25,102,58,66,225,70,102,54,22,154}, //card1
{2,49,21,6,25,102,58,57,209,150,22,154,102,208}, //card2
{2,48,213,6,6,22,86,90,102,204,56,229,134,54}, //tag3 yellow
{2,48,209,6,6,134,86,150,102,38,26,103,208,70}, //tag4 red
{2,48,217,6,6,150,38,38,218,102,179,102,205,52} //tag5 blue
};
int newTag[14] = {0,0,0,0,0,0,0,0,0,0,0,0,0,0}; //newly read tag
int data1 = 0;
int studentNumber = -1; //corresponding students number
int minutes = 1; //period of time registration is open
int seconds = minutes * 60; //period of time registration is open (in seconds)
int timer = 0; //keep track of time in seconds
String message = ""; //in case the teacher wants to add a message
/*********************************************/
void loop()
{
Serial.println("seconden: "); Serial.println(timer);
if (timer >= seconds) //registration period has expired
{
Serial.println("registration time is over");
int studentsPresent = countStudentsPresent();
Serial.print("Number of students present:");Serial.println(studentsPresent);
String list = listAbsentStudents();
Serial.print("Absent students list:");Serial.println(list);
String groupStatus = "present: " + String(studentsPresent) + " students"+ '\n' + "Absent: " + list + '\n' + "Message from teacher: " + message ;
Device.Send(groupStatus, listAbsentStudentsId);
timer = 0;
}
else if (SoftSerial.available() > 0)
{
Serial.println("reading");
delay(100); // needed to allow time for the data to come in from the serial buffer.
for (int i = 0 ; i < 14 ; i++) // read the rest of the tag
{
data1 = SoftSerial.read();
newTag[i] = data1;
}
digitalWrite(buzzerId, HIGH);
delay(50);
digitalWrite(buzzerId, LOW);
SoftSerial.flush(); // stops multiple reads
showTag();
studentNumber = matchMyTags(); //look for corresponding student number
Serial.println(studentNumber);
if (studentNumber > -1) //it's a valid tag
{
Device.Send(names[studentNumber], nameId);
Device.Send("true", greenledId);
Device.Send("false", redledId);
digitalWrite(greenledId, HIGH);
digitalWrite(buzzerId, HIGH);
delay(50);
digitalWrite(greenledId, LOW);
digitalWrite(buzzerId, LOW);
Device.Send("false", greenledId);
delay(300);
absent[studentNumber] = false; //student isn't absent
}
else //it's an invalid tag
{
Device.Send("true", redledId);
Device.Send("false", greenledId);
digitalWrite(redledId, HIGH);
delay(350);
digitalWrite(redledId, LOW);
Device.Send("false", redledId);
}
delay(600); //to make up to 1 sec of delay in total
Device.Send("", nameId); //clear text
}
else delay(1000); //wait 1 second
timer++; //1 more second has past
Device.Process();
}
/***************************************
* compare 2 tags
****************************************/
boolean comparetag(int aa[14], int bb[14])
{
for (int i = 7 ; i < 14 ; i++) //first 8 numbers seem to differ while scanning a tag
{
if (aa[i] != bb[i])
{
return false;
}
}
return true;
}
/***************************************
* compare each tag against the tag just read
****************************************/
int matchMyTags()
{
for (int i=0;i< numberOfStudents;i++)
{
if (comparetag(newTag, rfid[i]))
return i;
}
return -1; // no match
}
/***************************************
* Show the rfid
****************************************/
void showTag()
{
for (int i=0;i<13;i++)
{
Serial.print(newTag[i]);
Serial.print(",");
}
Serial.println(newTag[13]);
}
/***************************************
* Get the number of present students
****************************************/
int countStudentsPresent()
{
int n=0;
for (int i=0;i<numberOfStudents;i++)
{
if (absent[i]==false)
n++;
}
return n;
}
/***************************************
* Create string with list of absent students
****************************************/
String listAbsentStudents()
{
String ll="# ";
for (int i=0; i<numberOfStudents;i++)
{
if (absent[i]==true)
ll = ll+names[i]+" # ";
}
return ll;
}
/***************************************
* Callback function: handles messages that were sent from the iot platform to this device.
****************************************/
void callback(int pin, String& value)
{
Serial.print("incoming data for: "); // Display the value that arrived from the AllThingsTalk IOT developer cloud.
Serial.print(pin);
Serial.print(", value: ");
Serial.print(value);
Device.Send(value, pin); // Send the value back for confirmation
if (pin == messageId)
{
if (value !="")
message = value;
else
message = "none";
}
}
keys.h
ArduinoFill in the missing strings (deviceId, clientId and clientKey) in the keys.h file you get for the device
#ifndef SETTINGS
#define SETTINGS

#define DEVICEID "xxx"           // Your device id comes here
#define CLIENTID "xxx"           // Your client id comes here;
#define CLIENTKEY "xxx"          // Your client key comes here;

#endif

Comments