


Hardware components | ||||||
 |
| × | 1 | |||
 |
| × | 1 | |||
Software apps and online services | ||||||
| ||||||
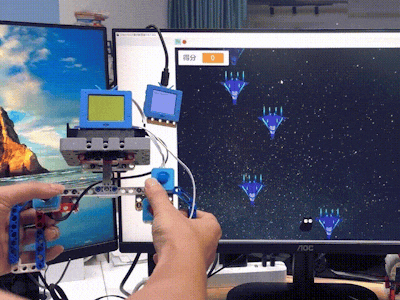
When playing a game programmed by ourselves, we may need to connect the controller to the computer with a USB cable, which is not so comfortable to play with when the cable limits our operation with the handheld. It's impossible to stand away from the computer or to lie down on the sofa. So to make it more comfortable to play these games, in this project, we will teach you to make a game console with Lego bricks that communicates wirelessly with the Future board of the computer, to control the sprite in the game.
Step 1: Assemble the game consoleAssemble this device according to the instruction here, or go to the Schematics part.
Step 2: Connect the circuitIf you use a normal 4-direction analog joystick module, then the ACD (analog) pinouts should be P0, P1, P12, P14, and P15.Step 3: Write programs
Two Future boards will be used in this project and the system can be divided into two parts:
- The game console sending end, which is to send the control instructions;
- Receiving end. A Future board is connected to the computer to receive the instructions from the console to control the interaction of characters in the game.
1. Sending end (gameconsole)
Download the code and open it in Kittenblock. The program needs to be downloaded to the Future board.
If you don't know how to download the program to the board, please refer to the How to use Use Future board with Kittenblock? part of this article
2. Receiving end
To process the instructions from the console and interact with the sprites in the game.
Connect to the main control board
There are two steps connecting to the board: first to use USB-C to connect the Future board hardware-wise, then connect the serial port in the software.
1. Hardware connection
2. Choose hardware - the Future board
3. Connect the serial port
Program Upload
Find the Switch to Coding on the upper right corner and switch it to the coding mode. Then click upload, wait till it has uploaded successfully.


Comments