

Hardware components | ||||||
 |
| × | 1 | |||
 |
| × | 1 | |||
 |
| × | 1 | |||
| × | 1 | ||||
| × | 2 | ||||
| × | 2 | ||||
| × | 4 | ||||
| × | 1 | ||||
| × | 1 | ||||
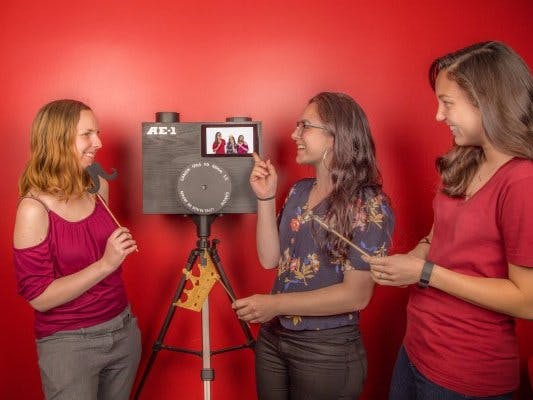
We love clowning around in a digital photo booth at parties, then sharing the photos online. But who wants to risk a laptop getting doused with margaritas or champagne?
Cheap single-board computers make it easy to roll your own standalone photo booth that can connect to the Internet with no help from your precious PC. Here’s a simple project that’s based on the Raspberry Pi and Pi Camera Module. It’s touchscreen-controlled by partygoers, and it automatically emails your photos (if you wish) and uploads them to Google Photos where anyone with the password can see and share. All the software is open source.
We (me and pals at WyoLum) originally made a Raspberry Pi photo booth to write custom images for E Ink badges at the Open Hardware Summit in 2013, pairing the Pi with our popular AlaMode Arduino-compatible development board. The touchscreen display we used was nice, but expensive. Since then, the official Raspberry Pi Touchscreen has been released, and the new Raspberry Pi Model 3 has integrated Wi-Fi. Perfect for this project!
So we redesigned our OpenSelfie photo booth as the TouchSelfie, and tied it all together with a minimal set of mounting brackets you can 3D print (or laser-cut) to mount the whole thing on a tripod. You can also design and build your own amusing enclosure if you prefer
First you’ll set up the Pi with the right software, then connect all the hardware. I like to use a wireless keyboard for setup, but you can use a wired keyboard, or after initial configuration, you can use SSH.
1. Configure the Pi’s operating systemIf this is your first Pi project, follow Raspberry Pi’s Quick Start Guide. You’ll need to download the latest version of Raspbian, the official Linux operating system for Raspberry Pi.
Then copy the Raspbian-Jessie.img file onto your SD card (Figure A), using Apple Pi Baker (Mac) or Win32DiskImager (PC).
Place the SD card in your Pi, and plug the Pi into a monitor and keyboard. Plug in your camera module too (you’ll connect the touchscreen later).
Now power up the Pi, open Terminal, and run the command:
sudo raspi-config
Follow the Setup Options (Figure B) to:
- Expand Filesystem,
- Enable Camera,
- Change User Password, and
- set your Internationalization Options (locale/time zone).
Now reboot the Pi.
Connect the Pi to your network (Wi-Fi or Ethernet) and type the following commands:
sudo apt-get update
This will provide you with a menu of browsers to pick as the default; set it to luakit.
NOTE: We’re using luakit because Raspbian’s default browser doesn’t work with Google 2-part authentication.
3. Download the TouchSelfie scriptsStill in Terminal, run:
mkdir git
NOTE: Be sure that for the following steps you’re continuing to use the web browser on your Raspberry Pi / monitor setup.
4. Set up your Google Photos albumGo to Google and create a Google account (or use your own account if you have one already). Then go to Google Photos and create a new Album. You’ll have to upload at least one photo to create it (Figure C).
Visit your Account Security Settings and enable 2-Step Verification. Then return to the same page and click on “App passwords” to generate a 16-character application password (Figure D). Write it down in a safe place. You’ll use it later to connect your photo booth to Google Photos.
NOTE: If you lose the app password or forget it, don’t worry; you’ll just have to generate a new one.
6. Create API keys with Google DeveloperWhile logged in to your account, visit Google’s Developers Console. Click on Select a project → Create a project, and name it whatever you’d like (Figure E).
While your new project is selected, click on Credentials on the left menu, and then select the “OAuth consent screen” tab. You’ll need to create a “Product name shown to users,” which can be anything you’d like (Figure F).
Now select the Credentials tab, select “OAuth client ID,” and click the “Create credentials” pulldown. Select “Other” for Application type, name it “Installed,” and click Create (Figure G).
NOTE: You don’t have to explicitly enable any additional APIs; here you’re dealing with basic authentication and authorization which is used by every API, and the photo APIs haven’t been explicitly added to the console.
Now you’ll be able to see it in your list of credentials for this app. Select the “Installed” credential. Click the Download JSON button, and a file named something likeclient_secret_90328409238409238xxxxx.json should download to your computer (Figure H).
Once it’s completed downloading, rename the file OpenSelfie.json (Figure I), then drag and drop it into the /home/pi/git/TouchSelfie/scripts directory.
If you haven’t already, connect the camera board to the Pi. Power up the Pi, open Terminal, and run:
cd /home/pi/git/TouchSelfie/scripts
Since this is your first time running the photo booth interface (GUI), it doesn’t yet have the proper credentials to connect to your Google account. Your web browser will pop up; sign in to Google (with the same email address and password you used to configure everything in the previous steps), and then it will ask you whether your Pi photo booth can manipulate your photos (Figure J).
Click on Allow, and then it will display a long string of numbers and letters. Copy this string and paste it into the Terminal window after the prompt that says “Enter the Authentication Code” (Figure K). Hit Enter, and if all is well your photo booth will snap a photo and upload it to the album you have previously configured! (Or fail if you haven’t set it yet.)
An Album ID error will pop up, indicating that you have not yet selected an album in your Google photos account to send your photos to. Click the “Customize” button in the upper left corner of the display (Figure L).
Click the “Lookup” button beside the “albumID” label to pull up the album lookup dialog (Figure M). It might take a few seconds for the dialog to appear. If you are logged into your Google account, all of your albums should be queried into the selection list. Select the album you wish to send your photos to.
When you see the album that you’d like, click on it in the list menu, then click the “Select” button on the top of the window (Figure N).
The album ID will automatically be put in the correct box on the customize screen. Click the “Save” button to save your new configuration (Figure O).
Fortunately, you only have to do this once! After this it will remember the credentials and periodically refresh them. The cached credentials are stored in a file called credentials.dat, so if you delete it, you’ll have to do the web dance again, as long as your JSON file is still there.
Troubleshooting TipsIf you get an error that says “cannot connect to Google Account,” it’s probably because Google periodically invalidates the credentials. To refresh them, try the following:
- Double-check that you’re connected to the internet » Remove the file credentials.dat from the scripts file folder
- Run:
cd /home/pi/git/TouchSelfie/scripts
- Run:
python ./photobooth_gui.py
- Allow access to Google Photos
- Re-enter credentials in Terminal window
While you’re still in openselfie.conf (or the GUI configuration screen) you can also create a customized message for your event. Just edit the text shown in italics here:
emailsubject =
To customize the logo that’s stamped on each photo, just save a new PNG file (1366×235 pixels, with transparency if you wish) in the folder /pi/git/TouchSelfie/scripts. Then run the photo booth again (photobooth_gui.py) and click the Customize button. In the pop-up window, next to “Logo File” click the Browse button. Select your file, and click Open. You should see a preview of your new logo. When you’re done, click Done (Figure P).
Reopen the photobooth_gui.py file and remove the # symbol from the beginning of the line
#root.attributes(“-fullscreen”,True)
Now the photo booth interface can run fullscreen on the Touch Display.
Once you connect your Pi 3 to the touchscreen, you won’t want to be lugging around your USB keyboard to type commands. To install a touchscreen keyboard on your Pi, follow these step-by-step instructions by ModMyPi.
10. Make the mounting brackets (optional)We created simple brackets you can 3D print for standing your photo booth on a tabletop or mounting it on a standard tripod (Figure Q). You can also laser-cut the camera mount from 1/16″ acrylic if you prefer that look, but the 3D-printed version seems to hold up longer.
- Tabletop mount Print the files camera_mount.stl and PiTouchScreenStand.stl, found on the WyoLum GitHub. This requires using two M2.5×14mm and two M2.5×16mm screws.
- Tripod mount Jenny Ching at Make: created an updated version of our tripod mount that’s a great improvement. Print the files PiTouchScreenMount.stl and PiCameraMount.stl. and use 10mm and 6mm M2.5 screws instead.
Fasten the Pi 3 and the Touch Display together using the included screws and standoffs. Connect the touchscreen’s ribbon cable to the Pi headers marked “Display.” Use a red jumper wire to connect the touchscreen’s 5V pin to the Pi’s GPIO pin 2. Use a black wire to connect touchscreen GND to Pi GPIO pin 6 (Figures R and S).
Thread the camera’s ribbon cable through the slot in the camera mount. Plug it into the camera, and affix the camera to the mount with the M2 screws (Figures T and U) or double-stick tape. Plug the camera cable into the Pi (Figure V).
Fasten the tripod stand to the touchscreen with M2.5×6mm screws (Figure W) through the 2 bottom holes. Then fasten the camera mount using M2.5×10mm screws through the top holes in the stand (Figure X).
Next, press-fit the ¼-20 hex nut tightly into the stand’s base and mount it to any standard camera tripod (Figure Y).
Finally, connect the Pi 3 to the wall charger or a portable battery pack using the Micro-USB cable. Your photo booth is complete!
NOTE: The portable battery must be able to output 2A at 5V to power both the touchscreen and Pi. It should also be rated at least 10,000mAh to last through a long party or event.
Strike a PoseYour Raspberry Pi Photo Booth is ready for all manner of festivities. Here’s how to use it.
Start upOpen Terminal and run:
cd /home/pi/git/TouchSelfie/scripts
When the photo booth launches, it will automatically take a photo and upload to Google Photos, to check that everything’s working. (If not, you probably just need to refresh the credentials — see “Troubleshooting Tips” above.)
Take and Send PhotosTo take a photo, tap the touchscreen anywhere on the image. The photo booth will count down from 5 and then snap the picture. Then it will automatically upload the photo to Google Photos on your Google account.
If you want to email the photo too, touch the white box next to the Send Email button. The touchscreen keyboard will pop up. Enter an email address, press the Close KB button to close out of the keyboard, then press Send Email to send the current photo to that address.
Touch the screen again to initiate the next photo. And so on.
When your party is all said and done, log into your Google account and view all your party photos in Google Photos!
kevino
 Sonia Wong

Comments