

I have bought a mechanical arm before some days. Its picture looks a little cute. There are two colors for consumers to choose, black and white. I chose black one.
There are four servos for it. First one is to control its mechanical hand to catch something. The second one is to control height of its arm and hand. The third servo is to distance between mechanical and object. The last one is to control mechanical arm to turn direction, left or right.
When you finish the construction, how to make it work?
- I chose an Arduino UNO board named Freaduino to control it.
- Connecting the first servo with D0 pin in the UNO board.
- Connecting the second servo with D1 pin in the UNO board.
- Connecting the third servo with D2 pin in the UNO board.
- Connecting the fourth servo with D3 pin in the UNO board.
- Check if every servo is working normally. At the end of the passage I will upload test code.
Now I am very carried away with how to control this mechanical arm. We can use potentiometer, rocker or Bluetooth to control it. Potentiometer is awkward to use in here. Rocker is universal and not cool enough. So I chose Bluetooth module last.
The last step, connecting Bluetooth module with board.
Because there are four servos connected with board, we give the board extra power. If don’t do that, the USB circuit is not enough to support it.
If we want to control it by UNO board, we must put the libraries of Servo into the folder of libraries. The libraries will be uploaded at last of passage.
We can use class of Servo to create four variable. Such as:
Servo Servo_Catch;
Servo Servo_Height;
Servo Servo_Distance;
Servo Servo_Direction;
And we must give them pins’ number to control corresponding servos. We use “attach” function to do it. Such as:
Servo_Catch.attach(0);

Servo_Height.attach(1);
Servo_Distance.attach(2);

Servo_Direction.attach(3);
These are initialize of servos.
The most useful function of servos is “write()”. This is to control degrees of servos. If you fill a number in the parameter, the servo will turn to the corresponding degree. For example, if I want servo of catching to turn 30 degrees, I can use it like:
Servo.write(10);
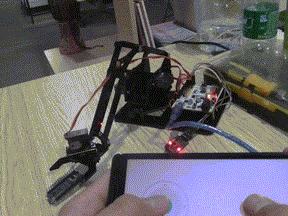
Mechanical Arm Demo
Is it very easy to use? Next, let’s try to write program about how to control the mechanical arm by Bluetooth.
In here, I use libraries of ElecfreaksCar directly to receive data from Bluetooth module. It will be easy if I use the libraries.
We can use class of ElecfreaksCar to create a new variable which is named BluetoothModule, such as:
ElecfreaksCar BluetoothModule;
And we use function of “recievedData()” to receive data which is from Bluetooth. We use function of “getRoll()” and “getPitch()” to get data of rocker of APP to control the mechanical arm.
Now it is an example about use APP to turn on and turn off LED which is on the UNO board.
#include "ElecfreaksCar.h"

ElecfreaksCar BluetoothModule;
int ledPin = 13;

void setup()
{
  Serial.begin(115200);
  pinMode(ledPin, OUTPUT);
}

void loop()
{
  while(Serial.available())
{
    uint8_t c = Serial.read();
    BluetoothModule.recievedData(&c, 1);
  }
  if(BluetoothModule.getRoll() > 125)
{
    digitalWrite(ledPin, LOW);
  }
else
{
    digitalWrite(ledPin, HIGH);
  }
}
Of course, we don’t use these functions to control the LED. So we modify it to make it can control the mechanical arm by Bluetooth. Now I list out functions about class of ElecfreaksCar:
getRoll();  //it will return data of roll, from 0 to 250
getPitch();  //it will return data of pitch, from 0 to 250
setFun(void (*Function)());  //it will run the sentence of Function when user presses button of APP.
This is program about the mechanical arm witch is written by me. And you can change it to create yourself program of mechanical arm.
#include "ElecfreaksCar.h"
#include "Servo.h"

ElecfreaksCar BluetoothModule;  //define a variable of class of ElecfreaksCar which is named BluetoothModule

Servo Servo_Roll;  //This is a servo which to turn direction
Servo Servo_Distance;  //This is a servo which is to control the distance between the machanical hand and object.
Servo Servo_Catch;  //THis is a servo which is to control the manchanical hand to catch or let go.

float P=125.00;  //This is value of pitch. This value is middle value when the rocker in the middle
float R=125.00;  //This is value of roll. This value is middle value when the rocker in the middle
unsigned char Flag_Catch = 0;  //This is a flag about if the machanical hand catch or not

void Button()  //This function is to be run when user touch the button of APP
{
    if(Flag_Catch == 1)
    {
        Servo_Catch.write(0);  //Catch
        Flag_Catch = 0;
    }
    else
    {
        Servo_Catch.write(90);  //let go
        Flag_Catch = 1;
    }
}

void setup()
{
    Serial.begin(115200);  //baud rate
    BluetoothModule.setFun(Button);  //The arduino will run the function which is in the parameter. In here, it will run the function of "Button"

    Servo_Catch.attach(2);  //the servo of catch is connected with pin D2
    Servo_Distance.attach(4);  //the servo of controlling distance between machanical hand and object is connected with pin D4
    Servo_Roll.attach(5);  //the servo of controlling direction is connected with pin D5
}

void loop()
{
    while(Serial.available())  //if there is any data come from bluetooth, it will into the function of while
    {
        uint8_t c = Serial.read();  //read the data of serial com
        BluetoothModule.recievedData(&c, 1);  //recieve the data
        P=(float)BluetoothModule.getPitch();  //get the data of pitch
        R=(float)BluetoothModule.getRoll();  //get the data of roll

        P = P * 0.72;  //This is important. the value of the rocker of APP is from 0 to 250, But the degree of servo is from 0 degree to 180 degrees.
                       //So we must make the value of pitch to multiplicative (180/250).
        R = R * 0.72;  //the same as pitch
    }
    Servo_Distance.write((int)P);  //make the servo to run the degree
    Servo_Roll.write((int)R);
}


Comments