


Hardware components | ||||||
 |
| × | 1 | |||
 |
| × | 1 | |||
 |
| × | 1 | |||
 |
| × | 1 | |||
 |
| × | 1 | |||
 |
| × | 1 | |||
Software apps and online services | ||||||
 |
| |||||
| ||||||
| ||||||
Lighting control based on luminosity level using oneM2M platform.
- JAVA 1.8
- Arduino IDE 1.8.5
- NodeJS
Download the oneM2M demo project from Github from the following link: https://github.com/mbenalaya/onem2m-demo
The project contains the following folders:
- onem2m-platform
- onem2m-device
- onem2m-app
The oneM2M platform is available on folder “oneM2M Platform”.
Configure the platformYou can keep the default configuration for a local demonstration. The platform will listen on ports 8080 and 8443. The database is reset after each restart.
If needed, you can change the configuration of the platform byediting the file “configuration/config.ini”.
Start the platformStart the platform by executing the "start.bat" script on Windows or "start.sh" on Linux and Mac OS.
Open the following URL in your browser to access the oneM2Mplatform web interface: http://127.0.0.1:8080/webpage
Enter "Cae-admin" as originator then click on “connect”.
The arduino source code and required libraries are available onthe folder onem2m-device.
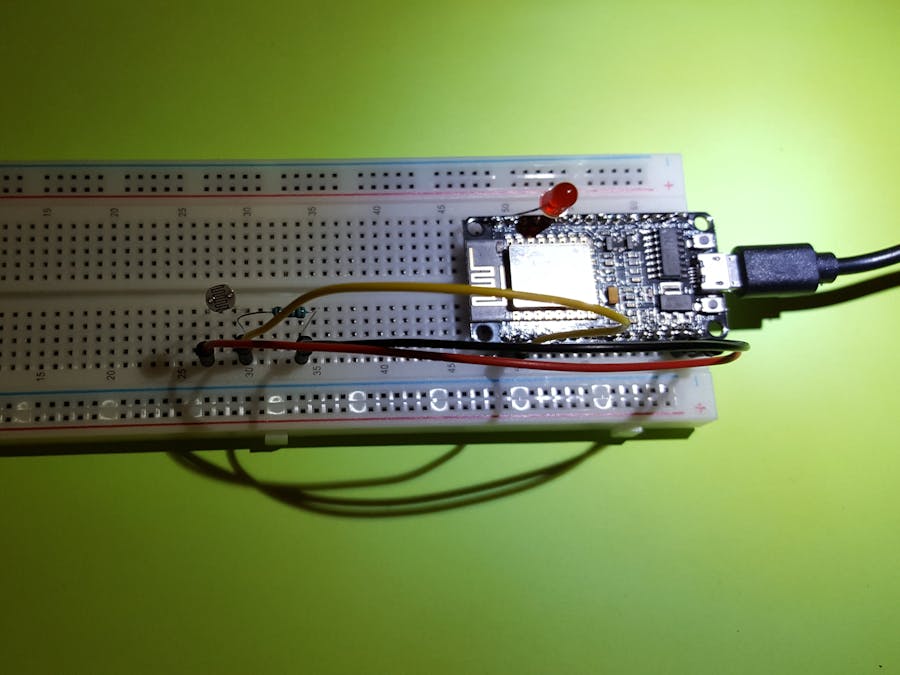
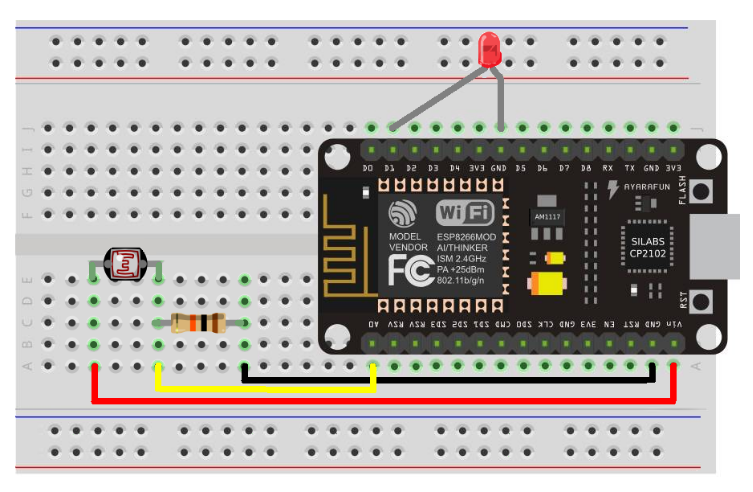
SchematicsConnect the LED and luminosity sensor to the Nodemcu board usingthe following components:
- Breadboard
- Nodemcu board
- LED
- Luminosity Sensor
- 1K ohm resistance
Download and install the Arduino IDE v1.8.5 from the following link: https://www.arduino.cc/en/Main/Software
If the NodeMCU port is not detected, then you need to downloadand install the USB driver manually using the following link: https://github.com/nodemcu/nodemcu-devkit/tree/master/Drivers
Add Nodemcu board to Arduino IDEFirstly open the Arduino IDE Go to files and click on the preference in the Arduino IDE
Copy the below URL in the Additional boards Manager URLS
http://arduino.esp8266.com/stable/package_esp8266com_index.json
click OK to close the preference Tab.
After completing the above steps, go to Tools and board, and then select board Manager
Navigate to esp8266 by esp8266 community and install the software for Arduino.
Go to Tools and board, and then select"NodeMCU 1.0" board.
Once all the above process been completed you are ready to program the nodemcu board with Arduino IDE.
Add Arduino “Timer.h” libraryThe “Timer.h” library is available on the zip folder“Timer-master.zip”.
Go to Sketch, and then select “include library”.
Chose the “Add.ZIP library” option
Select the zip folder “Timer-master.zip” thenconfirm.NB: You don’t have to extract the zip content.
Configure the oneM2M sketchOpen the sketch “onem2m-adn.ino” in your Arduino IDE.
Set your WIFI parameters
· const char* ssid ="XXXXXXXX";
· const char* password ="XXXXXXXX";
Set the IP address of the oneM2M platform
· const char* host ="XXXXXXXX";
Click on verify button to compile the sketch.
Compilation output:
Upload the oneM2M sketch to Nodemcu boardClick on upload button to upload the sketch to the nodemcuboard.
Upload output:
Debug the code execution using serialmonitorClick on button to open the Arduino Serial Monitor to displaythe Nodemcu console.
Then after opening the Serial Monitor select 115200 from the drop-down list.
Check IoT device resources on oneM2M webinterfaceYou should see “mydevice1” Application Entity resource with“luminosity” and “led” containers created on the oneM2M web interface.
Connect your IoT applicationThe luminosity monitoring application source code is availableon the folder onem2m-app
Configure applicationOpen the file onem2m-monitor.js with your favorite javascript or text editor.
Set the IP address of the oneM2M platform. You can keep localhost if you are running the oneM2M platform and the application in the same machine.
Start the applicationInstall the following node modules using the npm tool:
> npm install express
> npm install request
Start the nodejs oneM2M application using the following command:
> node onem2m-monitor.js
You should see “mymonitor1” Application Entity resource created on the oneM2M web interface.
If you hide the luminosity sensor for few seconds, you should see the led switched ON by the monitoring application and vice versa.
AdditionaloneM2Mresources
Source Code:
- (Javascript) Get the latest Content Instance resource https://github.com/mbenalaya/onem2m-demo/blob/master/onem2m-app/onem2m-get-latest-cin.js
- (Javascript) Get all Content Instance resources https://github.com/mbenalaya/onem2m-demo/blob/master/onem2m-app/onem2m-get-all-cin.js
- onem2mlib by Andreas Kraft.This Python3 module implements a library to access and manage resources on a oneM2M CSE.https://github.com/ankraft/onem2mlib
Documentations:
- oneM2M API example: http://sensinov.com/oneM2M-API-example.pdf
- oneM2M developer guide: http://www.onem2m.org/application-developer-guide


Comments