


Hardware components | ||||||
| × | 1 | ||||
| × | 1 | ||||
| × | 1 | ||||
| × | 1 | ||||
| × | 1 | ||||
| × | 1 | ||||
 |
| × | 1 | |||
 |
| × | 2 | |||
 |
| × | 1 | |||
Software apps and online services | ||||||
 |
| |||||
 |
| |||||
| ||||||
 |
| |||||
| ||||||
| ||||||
| ||||||
Hand tools and fabrication machines | ||||||
 |
| |||||
| ||||||
| ||||||
| ||||||
| ||||||
Millions of lives are believed to end prematurely due to air pollution and it is the world’s largest environmental health risk as discussed by the World Health Organization (WHO). Cities like Beijing and New Delhi regularly experience high Air Quality Index (AQI) values. Reducing air pollution has the added benefit of reducing exorbitant healthcare costs. Based upon statistics obtained from the World Health Organization, in 2012, there were a staggering 3.3 million deaths linked to indoor air pollution, and 2.6 million deaths linked to outdoor air pollution.
This project will demonstrate how to set up an air quality monitoring station using the Intel Edison with an Arduino Breakout for harmful gas detection. We will also describe how to connect to Amazon AWS and produce useful visualizations. We will take it one step further by applying machine learning. Because we employ a GPS module, you can use a drone to respond to and survey an area with a monitoring station. This is an alternative to employing living creatures or cars. Machine learning ensures the validity of sensor data to avoid needless drone excursions.
About Intel Edison
The Intel Edison specs are well documented. The Compute Module’s hardware guide can be found here, and the breakout’s here.
About AWS
Amazon AWS is a collection of cloud computing services that allows this project to be deploy-able on a large scale, e.g. by government agencies. We make use of a number of cloud computing services, such as S3, IoT, ML, and Elasticsearch with Kibana.
Components
Notes:
5v analog output sensor
Best data acquired after 24 hour preheat time
Detecting concentration scope:
200ppm-5000ppm - LPG and propane
300ppm-5000ppm butane
5000ppm-20000ppm methane
300ppm-5000ppm H2
100ppm-2000ppm Alcohol
Notes:
5V analog output sensor
Best data acquired after 24 hour preheat time
Detecting concentration scope:
200-10000ppm (LPG,LNG, Natural gas, iso-butane, propane, Town gas)
We used the Grove collection of sensors from SeeedStudio. Allow for ample time to receive these. Links to purchase parts are provided on the right.
Board PrepAssemble your board, update the firmware, and download PuTTY or similar application. This is documented by Shawn M. (Intel) here. Choose your OS and follow the steps in the respective ‘getting started guide’. Choose JavaScript and Node.js as the programming language. Choose Intel XDK IoT Edition as the IDE.
You can also visit the Downloads section in order to find the latest firmware and individual component updates.
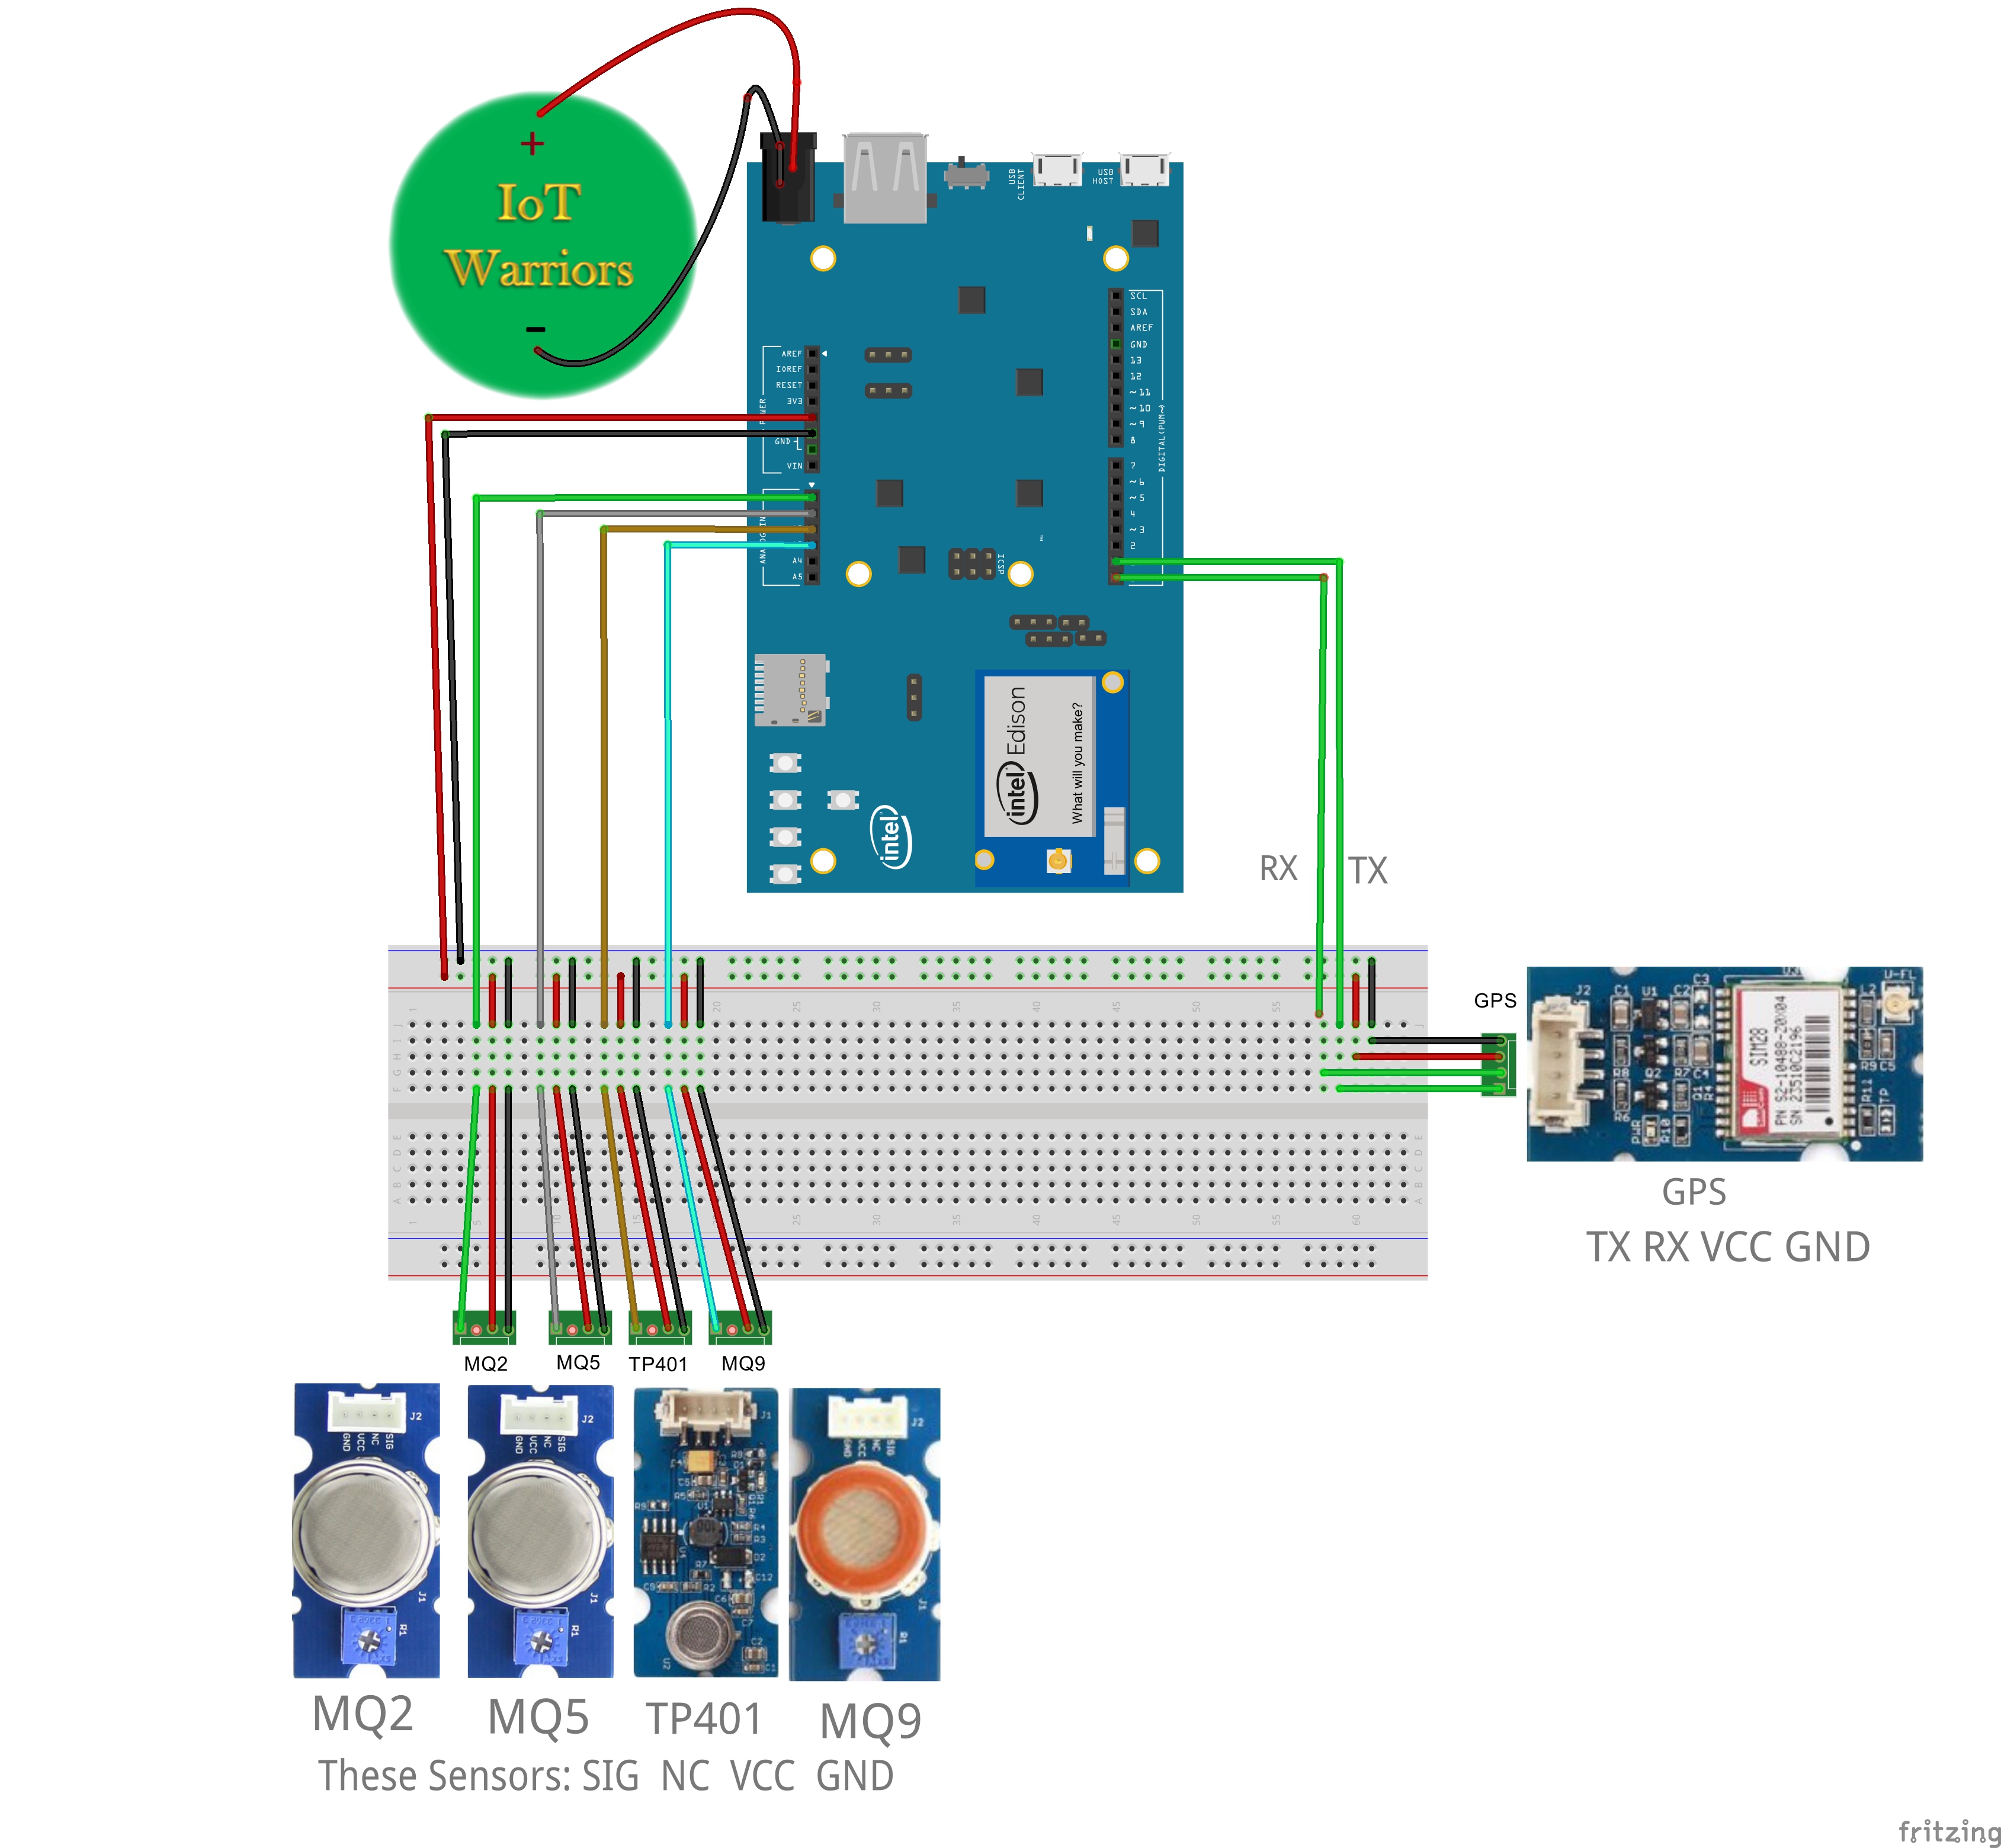
Connections with sensors to base board are as follows:
MQ2-> pin A0; MQ5 ->A1 ; TP401->A2; MQ9->A3, GPS->UART
Grove sensors come with cables that prevent faulty connections. Make sure the base board is set to 5 volts via the little switch on the shield. Use the command shutdown and provide the electronics with adequate power (9-12V, 1.5A). See the Schematics section for a Fritzing file.
Connecting with AWSSet up an AWS account. Then sign in to the AWS Management Console. Open the AWS IoT console. We use AWS IoT to connect our nodes and the AWS cloud in a secure fashion over the MQTT protocol.
1. Name your monitoring station under 'Create a thing':
2. Click 'Create'. And then 'View thing'.
3. Click on 'Connect a device' on the detail panel that appears so as to connect the shadow to the real thing.
4. When the following screen appears, choose 'Node.js'.
5. Click 'Generate certificate and policy':
6. Before clicking 'Confirm & start connecting' on the following screen, download the key pair and certificate necessary for encrypted communication:
7. Download the AWS IoT Node.js Software Development Kit from GitHub. Save the code snippet presented and click on 'Return to Thing Detail'.
8. It may be necessary here to refresh the IoT console to get the Edison, policy, and certificate to appear. Select the certificate and activate it through the Actions pane as shown below.
AWS Simple Notification Service (SNS)
To set up SNS, return to the main console by clicking the orange box at the top left. Select SNS and create a topic. We choose to do an 'Alarm' for instance in the event of 'Levels HI' (Display Name). By creating a subscription to the Amazon Resource Name (ARN), choosing 'Email' as the protocol, and typing an email address into 'Endpoint', we can create the subscription. You will need to go to your email client and confirm the subscription. Hit refresh in the SNS topic. Select 'Publish to topic' to verify.
For a more comprehensive tutorial on SNS, see the getting started guide on Amazon AWS or by Gustavo Gonnet here.
Returning to AWS IoT, create a rule by selecting 'Create a resource' followed by 'Create a rule'. We will use this rule to publish data through AWS IoT to SNS when a particular condition is met. In this project, if the values from the sensors crosses a certain threshold, this condition would be activated.
Rule query statement:
SELECT MQ2_gas, MQ5_gas, MQ9_gas, TP401_gas FROM 'Data_1'
Attribute:
MQ2_gas, MQ5_gas, MQ9_gas, TP401_gas
Topic filter:
Data_1
Condition:
(MQ2_gas>400 AND MQ5_gas>400) OR (MQ5_gas>400 AND MQ9_gas>400) OR (MQ2_gas>400 AND MQ9_gas>400) OR (MQ2_gas>400 AND TP401_gas>400) OR (MQ5_gas>400 AND TP401_gas>400) OR (MQ9_gas>400 AND TP401_gas>400)
Choose an action: SNS
SNS target: Alarm
Machine LearningThis is what makes the system ‘intelligent’ and gives its predictive abilities. By providing a set of CSV training files from data collection over a period of days, you can train a model that will truly recognize when a gas leak is really a gas leak or a traffic rush. Learn more about Amazon Machine Learning with this Getting Started Guide.
Amazon ML uses CSV files for the input data. Our files have 11 Attributes and 96 observations/ rows to represent data collection per 15 minute intervals.
(Amazon Elasticsearch Service)
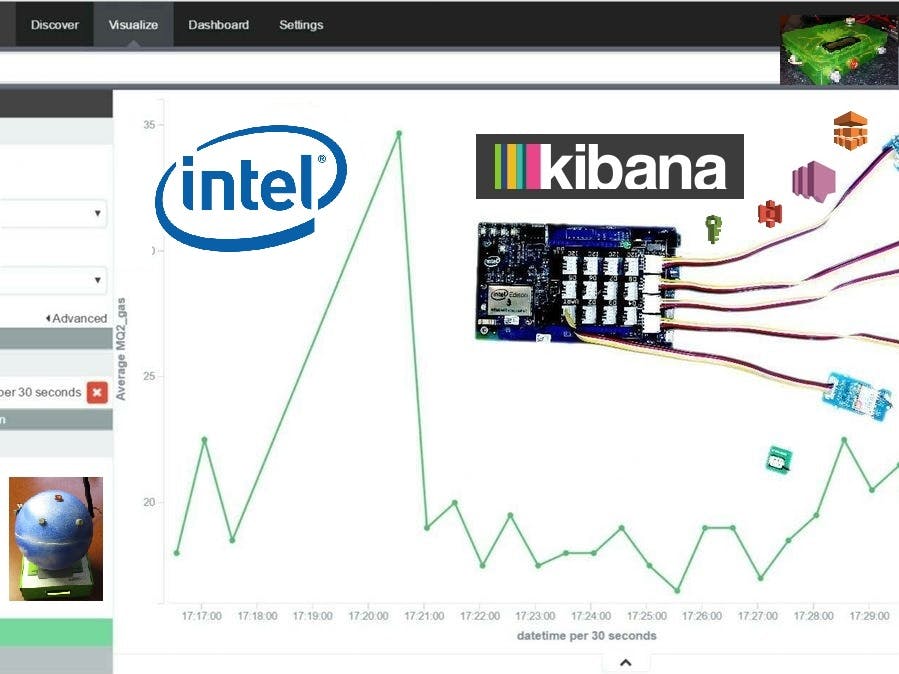
Kibana is a flexible analytics and visualization platform with near real-time summary and charting of streaming data. Its intuitive interface allows users to share and embed their dashboards that can be viewed on computers or mobile devices. AWS IoT to Amazon Elasticsearch Service allows users access to powerful analytics and monitoring features. If you came across this project and were just interested in the visualization portion, you may want to read up on AWS IoT a little first.
1. Configure Amazon Elasticsearch domain:
This is to enable AWS to store and index the transmitted data. First, go to the Amazon Elasticsearch console and create a new domain. Name it anything you want. For this example, we'll call it, "AWS-Elasticsearch-Domain". While navigating through the domain creation wizard, you'll need to set the domain access policy to allow AWS IoT data migration to Elasticsearch domain. The policy would be similar to the following and is based on this blog post.
{
  "Version": "2012-10-17",
  "Statement": [
    {
      "Effect": "Allow",
      "Principal": {
        "AWS": "arn:aws:iam::xxxxxxxxxxxx:role/iot-es-action-role"
      },
      "Action": "es:ESHttpPut",
      "Resource": "arn:aws:es:us-east-1:xxxxxxxxxxxx:domain/iot-es/*"
    },
    {
      "Sid": "",
      "Effect": "Allow",
      "Principal": {
        "AWS": "*"
      },
      "Action": "es:*",
      "Resource": "arn:aws:es:us-east-1:xxxxxxxxxxxx:domain/iot-es/*"
    }
  ]
}
We have removed "Condition":{ "IpAddress": {"aws:SourceIp": ["xxx.xxx.xxx.xxx", "xxx.xxx.xxx.xxx"]}}
Specify public IP addresses or address ranges of your intended clients (such as your desktop) in the "aws:SourceIp" list. One way to look up public IP on a client is to navigate to "https://www.google.com/#q=what+is+my+public+ip+address" on the client.
After you create the domain, grab a refreshing cup of coffee or tea, it will take a couple minutes for the domain to become accessible or become active. When it does go active you may notice there is a bunch of stuff after it, something like, AWS-Elasticsearch-Domain-xxxxxxxxxxxxxxxxxxx.us-east-1.es.amazonaws.com". No need to worry. This is normal.
To create an index for the stored data within the Elasticsearch domain, you will need to use an HTTP client such as DHC or curl. To incorporate geo-location and time stamping of the data, you'll need to define your "mapping" within the HTTP body. The HTTP Put request would look like the code below:
curl -i -X PUT \
   -d \
'{
  "mappings": {
    "airquality": {
      "properties": {
        "timestamp": {
          "type": "long",
          "copy_to": "datetime"
        },
        "datetime": {
          "type": "date",
          "store": true
        }
      }
    }
  }
}
' \
 'https://search-delivery-fleet-xxxxxxxxxxxxxxxxxxxxxxxxxxxxxxx.us-east-1.es.amazonaws.com/trucks'
{
    "sql": "SELECT *, timestamp() AS timestamp FROM 'Data_1'",
    "actions": [
        {
            "elasticsearch": {
                "roleArn": "arn:aws:iam::xxxxxxxxxxxx:role/iot-es-action-role",
                "endpoint": "search-iot-es-xxxxxxxxxxxxxxxxxxxxxxxxxxxxxxx.us-east-1.es.amazonaws.com",
                "index": "airquality",
                "type": "airquality",
                "id": "${newuuid()}"
            }
        }
    ]
}
3. Use Kibana to visualize our data:
To View the data Visualization, click the following link: Go ahead and explore the page a little bit. If you don't see any data, click on 'Last 15 minutes' on the top right and change it, try 'last 30 days' for example. On the left change the sensor type and click 'Apply'.
You should see something like this:
We may not have a node running so you may need to play around with the interface to visualize data that was stored in the past.
EnclosuresMake an enclosure! Give due consideration to whether or not the node will be outdoors or in an industrial setting. Here is one feasible for home:
For build details on this one, see here.
The plastic kit box that the grove seeed starter kit comes in is a great project box that with a little effort can be made to be rain proof for outdoor environmental sensing. You would just need to make sure the RGB screen and the latch are facing down and you place tape over the edges and use hot glue to seal holes from the placement of sensors.
In order to place the Intel Edison Development board with the Arduino extension board connected you will need to cut the little white legs provided with the Intel Edison Dev board in half and then secure them to the board and through the bottom of the clear green project box.
Just make sure that you leave enough room for placement of the sensors. The sensor cluster will work with a single 9v battery, but it is recommended to connect the lead wires from a 2nd 9v battery in parallel to the one connected through the jack on the breakout board.
Use an 8mm drill bit to drill the hole for the CO2 sensor, a 5/8" spade-bit to drill hole for MQ-9 gas sensor. Due to the placement and direction of the connector, unless you desolder the 4 pins to the board and move it to the other side of the sensor board, you will need to drill a hole for the connector to stick out and another for the wires to go back into the project box. If you take the wires out of the connector, you can make a smaller hole and then put them back in connector once wires are through. Use a 3/4" spade-bit to drill hole for both the MQ-2 and MQ-5 gas sensors. Use a dremel to cut the hole for the RGB screen or you can also simply hot glue it to the cover inside the project box.
Use a touch of hot glue to mount the GPS board to the side of the project box. Drill a very small hole through the lid and pull the GPS antenna through the top. Use a metal washer or a small metal place to set the GPS antenna atop and hot glue it all in place. It would probably be better to place the GPS antenna on the bottom side of the project box atop and in the center of the piece of sheet metal that is cut just smaller than the perimeter of the project box. This metallic surface will help create a ground place to prevent the bouncing of interference from other locations on the ground back up to the sensor.
Drone Response[Note: The code has been tested using software stubs and simulator. The drone test are still pending due to university policy. Once we receive clearance from the university, we'll validate and update the code if needed.
Warning: The drone code holds no warranty of any kind. Please use the code with your discretion and risk. ]
3DR Solo is the working drone for this project. You will need DroneKit-Python (found at http://python.dronekit.io/guide/quick_start.html) which is compatible with most craft that communicate using the MAVLink protocol, including in our case the 3DR Solo.
Installing dependencies on the Linux based ground station
sudo apt-get install nodejs npm -y
sudo apt-get install python-pip
sudo apt-get install python-pip python-dev
sudo pip install dronekit

sudo pip install awscli
sudo pip install paho-mqtt

(Optional) If installing Software in loop simulator please use this
pip install dronekit-sitl -UI
The API allows us to connect to one or more drones from a script and create and manage waypoint missions (AUTO mode). This will allow us to send the drone for observation to a node at specific GPS coordinates or to drop off one there.
We use as an example coordinates over a field next to the Matthaei Athletic Campus. This field is a safe place for testing. Using Mission Planner, you can visualize the path of the drone from departure to target location and associated maneuvers around that location.
In Mission Planner, select Flight Plan and load the waypoints file and select 'Yes' when prompted to change home to the provided coordinates.
You should get something like this:
Any system running Linux should suffice. The code is provided below but has not been tested on drone due to insufficient permissions. We are working to improve this document in time but welcome specific comments below (or you can message us).

IoTWarriors


Comments