Bary Nusz
Published © GPL3+

Useless Machine with Multiple Photons and an UWA

There are many ways for Particle Photons to interact with each other. To explore these capabilities, I created a useless machine.
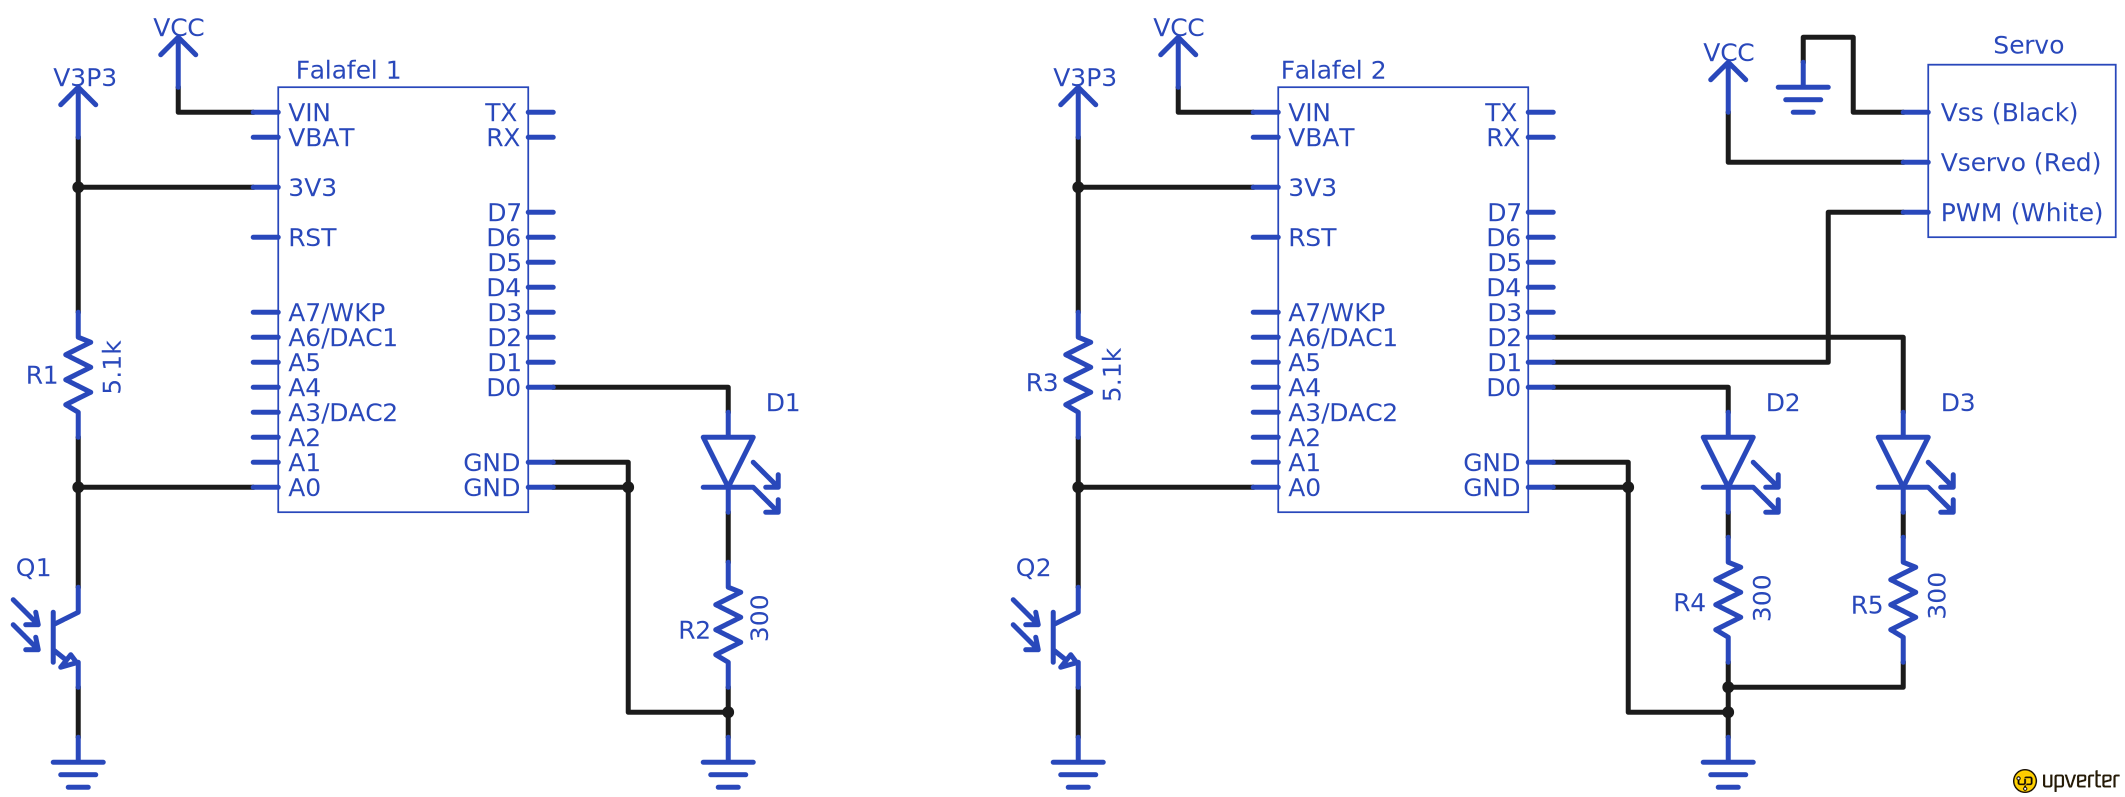
IntermediateFull instructions provided1,908
Useless Machine with Multiple Photons and an UWA

Things used in this project

Hardware components

Photon
Particle Photon
×2
LED (generic)
LED (generic)
Green
×2
Photo Resistor
×1
Servo Motor
×1
5.1K ohm resistor
×2
300 ohm resistor
×3

Software apps and online services

Visual Studio 2015
Microsoft Visual Studio 2015

Story

Read more

Schematics

Useless Machine

Useless Machine

Useless.png

Code

Photon 1

C#
The code for Photon 1 is very simple.
In the setup function, we need to enable the “Light” particle cloud variable so that it can be read by our UWA and enable the LED pin.
In the main loop function we’re reading the photo resister value. If that value is less than 800 we trigger the “NeedCover” event and flash the green LED. In our circuit, lower numbers mean brighter light.
#define LEDPIN D0
#define ANALOGPIN A0

int val = 0;

void setup() {
Particle.unsubscribe();
Particle.variable("Light", &val, INT);
pinMode(LEDPIN, OUTPUT); 
}

void loop() {
val = analogRead(ANALOGPIN);
if (val < 800)
{
Particle.publish("NeedCover",String(val));
digitalWrite(LEDPIN, HIGH);
delay(1000);
digitalWrite(LEDPIN, LOW);
delay(1000);
return;
}
delay(2000);
}

Photon 2 - Setup

C#
The code for Photon 2 is a little more involved.
We enable the LED and servo pins. We also need to subscribe to the event “NeedCover” on our Photon 1 device and set the callback function to “needCoverHandler”. Note that you’ll need Photon 1’s device ID to update the subscription call. Then we register the “position” function with the particle cloud and set the callback function to “positionFunction”.
#define LEDPIN D0
#define ALERTPIN D2
#define SERVOPIN D1
#define ANALOGPIN A0
Servo myservo;
int position = 0;
bool go = true;

void setup() {
Particle.unsubscribe();
pinMode(LEDPIN, OUTPUT); 
pinMode(ALERTPIN, OUTPUT); 
myservo.attach(SERVOPIN);
Particle.subscribe("NeedCover", needCoverHandler, "{PHOTON1DEVICEIDHERE}");
bool success = Particle.function("position",positionFunction);
Particle.publish("position",String(success));
}

Photon 2 - Loop

C#
The main loop is much like the loop in the first Photon. We read the value from the photo resistor, and react if it’s greater than 800 (higher values mean it’s dark). Upon detecting a dark value, we publish the event “NeedtoUncover” and flash the red LED. Even though none of the apps nor the Photons are listening for this event, it still shows up in your Particle dashboard so you have an idea of what’s happening. Note that we’re setting the variable “position” to zero only if the “go” variable is enabled. The last thing we do in the main loop is write the current value of “position” to the servo motor.
void loop() {
int val = analogRead(ANALOGPIN);

if (val > 800)
{
Particle.publish("NeedtoUncover",String(val));
if (go)
{
position = 0;
}
digitalWrite(ALERTPIN, HIGH);
delay(500);
digitalWrite(ALERTPIN, LOW);
}

myservo.write(position);
delay(2000);
}

Photon 2 - needCoverHandler

C#
The “needCoverHandler” function is called when the “NeedCover” event from Photon 1 is detected. We set the variable “position” to 90 degrees only if the “go” variable is enabled.
void needCoverHandler(const char *event, const char *data)
{
if (go)
{
position = 90;
}
digitalWrite(LEDPIN, HIGH);
delay(1000);
digitalWrite(LEDPIN, LOW);
}

Photon 2 - positionFunction

C#
The “positionFunction” function is called when the Particle Cloud “position” function is called. If the “command” parameter is set to “0” or “90”, we disable the “go” variable. Throughout the rest of the firmware, disabling the “go” variable prevents the “position” variable from being updated, which turns the useless function off. We then update the “position” variable to either 0 or 90. During the next loop function, the servo motor will be updated. If the “command” parameter is “Go”, then the “go” variable is enabled and the “position” variable is set to 0. This turns the useless function back on.
int positionFunction(String command) {
if (command=="0") {
go = false;
position = 0;
return position;
}
else if (command=="90") {
go = false;
position = 90;
return position;
}
else if (command=="Go") {
go = true;
position = 0;
return position;
}
else {
return -1;
}
}

Universal Windows App - Particle Event Stream

C#
The Universal Windows App has three simple calls.
The first shows how to open a Particle Event Stream. We setup the url according the online documentation and then open a stream through a simple WebRequest get. Note that we get the response in a json format. The value we’re interested in is stored in the “data” property.
string url = String.Format("https://api.particle.io/v1/devices/{0}/events/NeedCover?access_token={1}", PHOTON1DEVICEID, ACCESS_TOKEN);
WebRequest request = WebRequest.Create(url);
request.Method = "GET";
using (WebResponse response = await request.GetResponseAsync())
{
using (Stream stream = response.GetResponseStream())
{
StreamReader reader = new StreamReader(stream);
int blankRead = 0;
while (blankRead <= 1)
{
// Event comes streaming in 3 lines. blank line, 
// "event: NeedCover", 
// then a json line that starts with "data:",
// If more than a couple blank lines in a row then we're done with the stream.
var str = await reader.ReadLineAsync();
if (string.IsNullOrEmpty(str))
{
++blankRead;
}
else if (str == "event: NeedCover")
{
blankRead = 0;
var data = await reader.ReadLineAsync();
var jsonData = JsonConvert.DeserializeObject<ParticleEvent>(data.Substring(data.IndexOf("data:") + 5));
streamResultTextBox.Text = jsonData.data;
}
}
}
}

public class ParticleEvent
{
public string data { get; set; }
public string ttl { get; set; }
public string published_at { get; set; }
public string coreid { get; set; }
}

Universal Windows App - Particle Cloud Variable

C#
The next call shows how to access a Particle Cloud variable on a particular Photon device. We setup the url according the online documentation and make a WebResponse get. The response is returned in a json format. The value we’re interested in is stored in the “result” property.
string url = String.Format("https://api.particle.io/v1/devices/{0}/Light?access_token={1}", PHOTON1DEVICEID, ACCESS_TOKEN); 
WebRequest request = WebRequest.Create(url);
request.Method = "GET";
using (WebResponse response = await request.GetResponseAsync())
{
using (var stream = response.GetResponseStream())
{
StreamReader reader = new StreamReader(stream);
var str = await reader.ReadToEndAsync();
var jsonData = JsonConvert.DeserializeObject<ParticleVariable>(str);
resultTextBox.Text = jsonData.result;
}
}

public class ParticleVariable
{
public string cmd { get; set; }
public string name { get; set; }
public string result { get; set; }
public CoreInfo coreInfo { get; set; }
}

Universal Windows App - Particle Function

C#
The last call shows how to invoke a function on a Photon device. Again we setup the url according the online documentation and then make WebResponse post. We encode the function parameter into the request body.
string url = String.Format("https://api.particle.io/v1/devices/{0}/Position?access_token={1}", PHOTON2DEVICEID, ACCESS_TOKEN);
var request = WebRequest.Create(url);
var postData = "value="+(sender as RadioButton).Content;
var data = Encoding.ASCII.GetBytes(postData);
request.Method = "POST";
request.ContentType = "application/x-www-form-urlencoded";
using (var stream = await request.GetRequestStreamAsync())
{
stream.Write(data, 0, data.Length);
}
var response = await request.GetResponseAsync();
var responseString = new StreamReader(response.GetResponseStream()).ReadToEnd();
postTextBox.Text = responseString;

Github

https://github.com/falafelsoftware/MultiPhotonUselessMachine

Credits

Bary Nusz

Bary Nusz

8 projects • 32 followers
Nusz Labs “Tinkerer-in-Chief”.

Comments