


Hardware components | ||||||
 |
| × | 1 | |||
| × | 1 | ||||
In our school there is a problem related to the toilets. If you need to go to the toilet during the class, there are too many steps you need to take. Firstly, you need to ask the teacher for a hall pass and then you need to go to the ground floor where the administration opens the toilets with a key. After going to the toilet, you have to go back to the administration to give the key back and receive your hall pass and go to your classroom.
This process takes quite some time to complete!
From now on, the teachers will have an electronic hall pass. This way, the student can immediately open the doors with this card!
/*
Arduino UART Demo Sketch. This Sketch is made for an Genuino 101 IoT board with a Grove
UART WiFi module based on the popular ESP8266 IoT SoC to communicate to the AllThingsTalk
IoT developer cloud.
The Grove UART WiFi module has firmware installed which includes the ATT_IOT library. It
communicates through Serial1 of the Genuino 101 board.
Version 1.0 dd 26/12/2015
This sketch is an example sketch to deploy the Grove RFID reader (113020002) to the
AllThingsTalk IoT developer cloud.
### Instructions
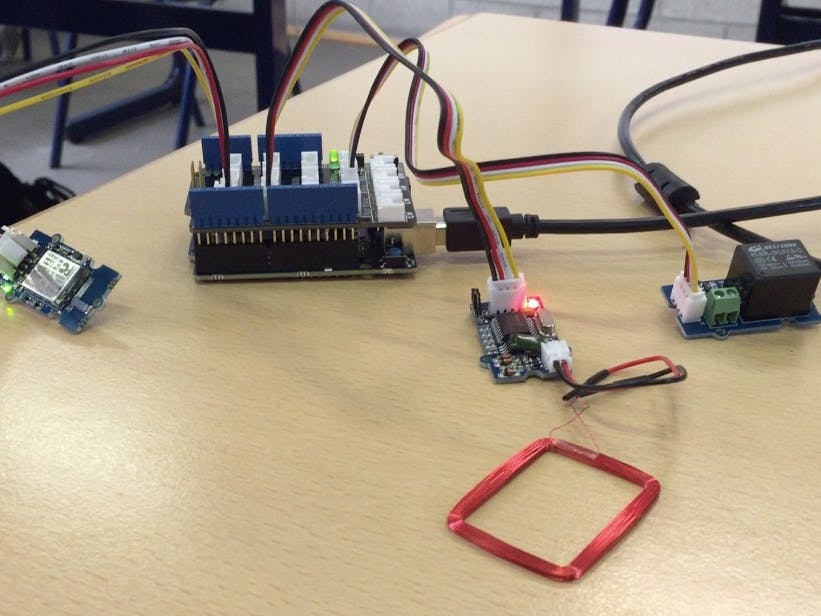
1. Setup the Arduino hardware
- Use an Arduino Genuino 101 IoT board
- Connect the Arduino Grove shield, make sure the switch is set to 5.0V
- Connect USB cable to your computer
- Connect a Grove RFID reader to pin D2 of the Arduino shield
- Grove UART wifi to pin UART (D0,D1)
2. Add 'ATT_IOT_UART' library to your Arduino Environment
More info can be found at http://arduino.cc/en/Guide/Libraries
3. Fill in the missing strings (deviceId, clientId and clientKey) in the keys.h file
4. Optionally, change sensor names, labels as appropiate
5. Upload the sketch
Note: for use of extra actuators, extend the callback function at the end of the sketch
*/
#include "ATT_IOT_UART.h" // AllThingsTalk Arduino UART IoT library
#include <SPI.h> // Required to have support for signed/unsigned long type
#include "keys.h" // Keep all your personal account information in a seperate file
#include <SoftwareSerial.h>
ATTDevice Device(&Serial1);
char httpServer[] = "api.smartliving.io"; // HTTP API Server host
char mqttServer[] = "broker.smartliving.io"; // MQTT Server Address
// Define PIN numbers for assets
// For digital and analog sensors, we recommend to use the physical pin id as the asset id
// For other sensors (I2C and UART), you can select any unique number as the asset id
#define readerId 0 // Analog sensor is connected to pin A0 on grove shield
SoftwareSerial SoftSerial(2, 3);
char buffer[64]; // Buffer array for data receive over serial port of the RFID device
int count=0; // Counter for buffer array
#define relayId 8 // Digital actuator is connected to pin D2 on grove shield
// Required for the device
void callback(int pin, String& value);
void setup()
{
Serial.begin(57600); // Init serial link for debugging
while(!Serial && millis() < 1000); // Make sure you see all output on the monitor. After 1 sec, it will skip this step, so that the board can also work without being connected to a pc Serial.println("Starting sketch");
Serial1.begin(115200); // Init serial link for WiFi module
while(!Serial1);
SoftSerial.begin(9600);
while(!Device.StartWifi())
Serial.println("Retrying...");
while(!Device.Init(DEVICEID, CLIENTID, CLIENTKEY)) // If we can't succeed to initialize and set the device credentials, there is no point to continue
Serial.println("Retrying...");
while(!Device.Connect(httpServer)) // Connect the device with the AllThingsTalk IOT developer cloud. No point to continue if we can't succeed at this
Serial.println("Retrying");
Device.AddAsset(readerId, "RFID reader", "reader", false, "string"); // Create the sensor asset for your device
Device.AddAsset(relayId, "Relay", "relay", true, "boolean"); // Create the actuator asset for your device
delay(1000); // Give the WiFi some time to finish everything
while(!Device.Subscribe(mqttServer, callback)) // Make sure that we can receive message from the AllThingsTalk IOT developer cloud (MQTT). This stops the http connection
Serial.println("Retrying");
pinMode(readerId, INPUT); // Initialize the digital pin as an input.
Serial.println("RFID reader is ready for use!");
pinMode(relayId, OUTPUT); // Initialize the digital pin as an input.
Device.Send("false", relayId);
Serial.println("Relay is ready for use!");
}
void clearBufferArray() // Function to clear buffer array
{
for (int i=0; i<count;i++)
{ buffer[i]=NULL;} // Clear all indices of array with command NULL
}
void loop()
{
if (SoftSerial.available()) // Data is coming from software serial port comes from SoftSerial shield
{
while(SoftSerial.available()) // Reading data into char array
{
buffer[count++] = SoftSerial.read(); // Writing data into array
if(count == 63) break;
delay(10); // Delay because the Genuino 101 seems to be to fast for the serial port routine
}
buffer[count++] = '\0'; // Needs a terminating String char.
Serial.print("RFID tag: ");Serial.println(buffer);
Device.Send(buffer, readerId);
clearBufferArray(); // Call clearBufferArray function to clear the stored data from the array
count = 0; // Set counter of while loop to zero
}
Device.Process();
}
// Callback function: handles messages that were sent from the iot platform to this device.
void callback(int pin, String& value)
{
Serial.print("Incoming data for: "); // Display the value that arrived from the AllThingsTalk IOT developer cloud.
Serial.print(pin);
Serial.print(", value: ");
Serial.println(value);
if(pin == relayId)
{
if(value == "true")
{
digitalWrite(relayId, HIGH);
Device.Send(value, relayId);
delay(5000);
value = "false";
digitalWrite(relayId, LOW);
}
else
digitalWrite(relayId, LOW);
Device.Send(value, relayId); // Send the value back for confirmation
}
}


Comments