

Hardware components | ||||||
 |
| × | 1 | |||
 |
| × | 1 | |||
 |
| × | 1 | |||
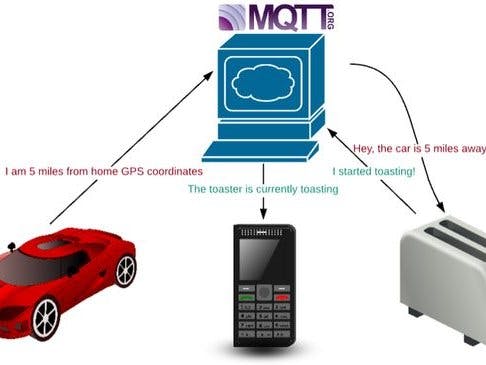
Here first of all we are going to publish HC-SR04 data to MQTT Broker and also we will tell about how to subscribe some of the topics using MQTT. For the demo purpose we've subscribed two topics named Bulb1 and Bulb2 as we are taking two leds for that. So we can control these leds from our MQTT server.
a) Raspbian OS: This is the recommended os for raspberry pi. You can also installed other OS from third party. Raspbian OS is debian based OS. We can install it from noobs installer. you can Download here
b) Python idle: This is the software we get in raspbian os. For this project we have used python script.
c) Putty: We are using putty for remote access of Raspberry Pi.you can Download here
d) Win32DiskImager: This software is used to burn Raspbian Os on SD Card. you can Download here e) SDFormatter: This software is used to format memory card. you can Download here
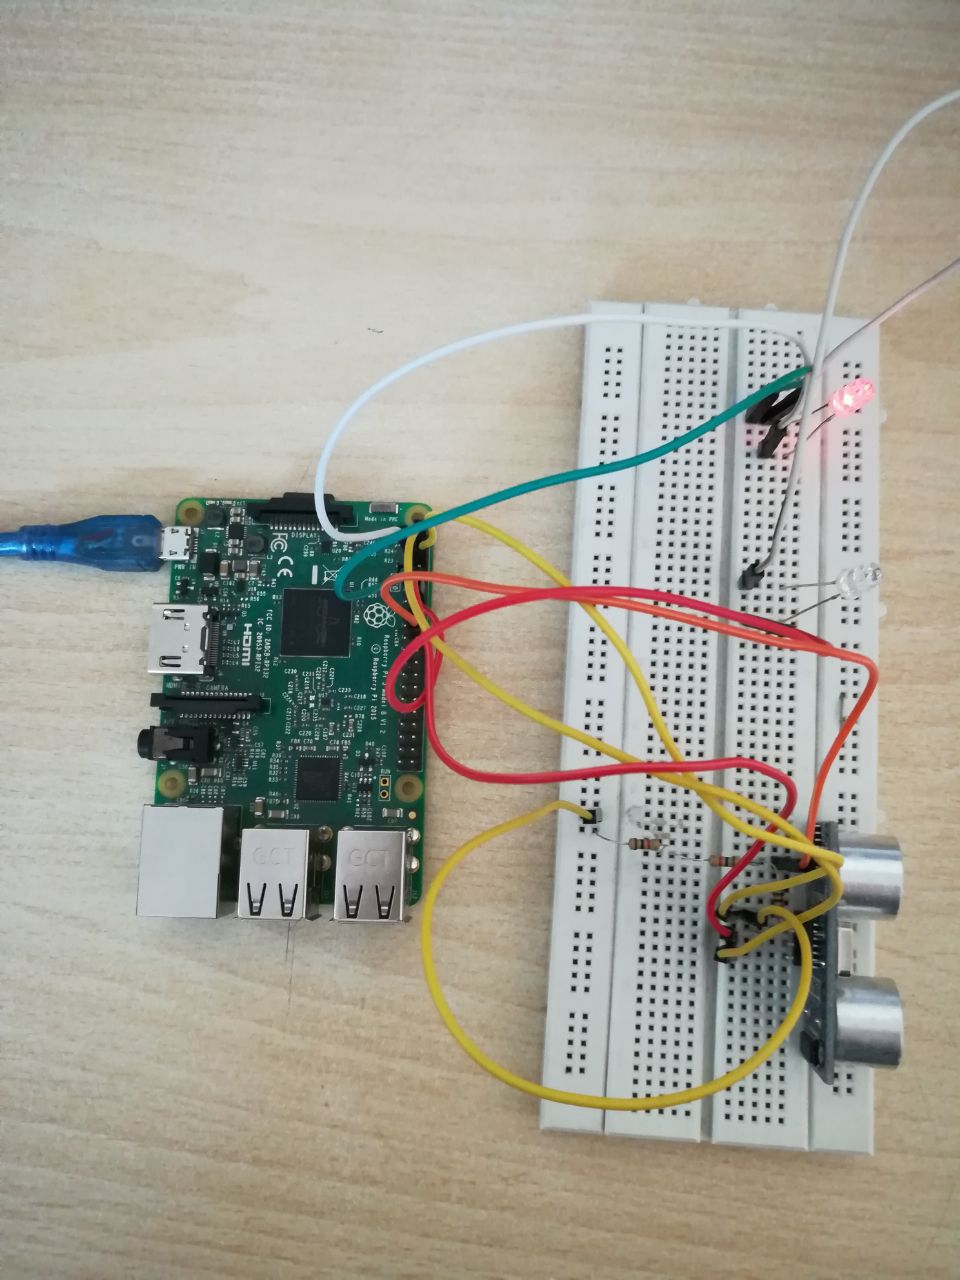
Component Used:1) Raspberry Pi 2) Ultrasonic sensor
3)Two leds
4)jumper wires
5)Bread Board
1)Raspberry Pi:
This is the latest version of raspberry pi. In this we have inbuilt Bluetooth and wi-fi, unlike previously we have to use Wi-Fi dongle in one of its usb port. There are total 40 pins in RPI3. Of the 40 pins, 26 are GPIO pins and the others are power or ground pins (plus two ID EEPROM pins.) There are 4 USB Port and 1 Ethernet slot, one HDMI port, 1 audio output port and 1 micro usb port and also many other things you can see the diagram on right side. And also we have one micro sd card slot wherein we have to installed the recommended Operating system on micro sd card. There are two ways to interact with your raspberry pi. Either you can interact directly through HDMI port by connecting HDMI to VGA cable, and keyboard and mouse or else you can interact from any system through SSH.
2)Ultrasonic sensor:
This is the HC-SR04 ultrasonic ranging sensor. This economical sensor provides 2cm to 400cm of non-contact measurement functionality with a ranging accuracy that can reach up to 3mm. Each HC-SR04 module includes an ultrasonic transmitter, a receiver and a control circuit.
In this step I'm going explain you about how we can create Mqtt Dashboard. So for that we are using Adafruit Mqtt. The UI of Adafruit IO is very user-friendly. So Step by step I'm going to explain you about this. So you just follow the process. So Here are the steps:
1. First you need to create account in io.adafruit.com
2. You will get the page like above, so fill these details, now when you will sign in you will get the page like below
3. In this page in the top right corner you will get some icons. From this you can click on 'Create a new block'.
So from here you can create toggle button or gauge or other things. So you can see creating blocks are very simple. Now one more important thing is 'Key' icon so click on that, and you will see that some random alphanumeric number you will get. That is your Adafruit IO Key this is very important note down that, this key you need to use on your python script. You can regenerate your key by clicking on REGENERATE AIO KEY.
Importing Adafruit IO for Your Python ScriptYou need to import Adafruit io for your python script. So you can import that.
To use Adafruit IO with a Python program you can install and use the Adafruit io-client-python code from Github. This library can use both the REST API and MQTT API to access feeds and data on Adafruit IO.
In case of code we are going to do two important things. So we have two separate code for that. First of all we are going to publish Ultrasonic Sensor(HC-SR04) data to MQTT Broker. And then we are going to subscribe two topics Bulb1 and Bulb2. So here we can control two led by clicking these two toggle button Bulb1 and Bulb2 from MQTT Broker. So in this way you can control any electrical appliances and also you can get the data from any sensor and publish it in MQTT broker. Your data will be saved in the broker side.
Congratulations you have successfully finished your project.
If have any doubt regarding this project feel free to comment us below or you can mail us on info@deligence.com And if you want to learn more about these type of project then feel free to visit our youtube channel
Thanks & Regards,
Deligence Technologies
Comments