


Hardware components | ||||||
 |
| × | 1 | |||
 |
| × | 1 | |||
 |
| × | 1 | |||
 |
| × | 1 | |||
| × | 1 | ||||
| × | 1 | ||||
 |
| × | 1 | |||
Software apps and online services | ||||||
| ||||||
Hand tools and fabrication machines | ||||||
 |
| |||||
 |
| |||||
 |
| |||||
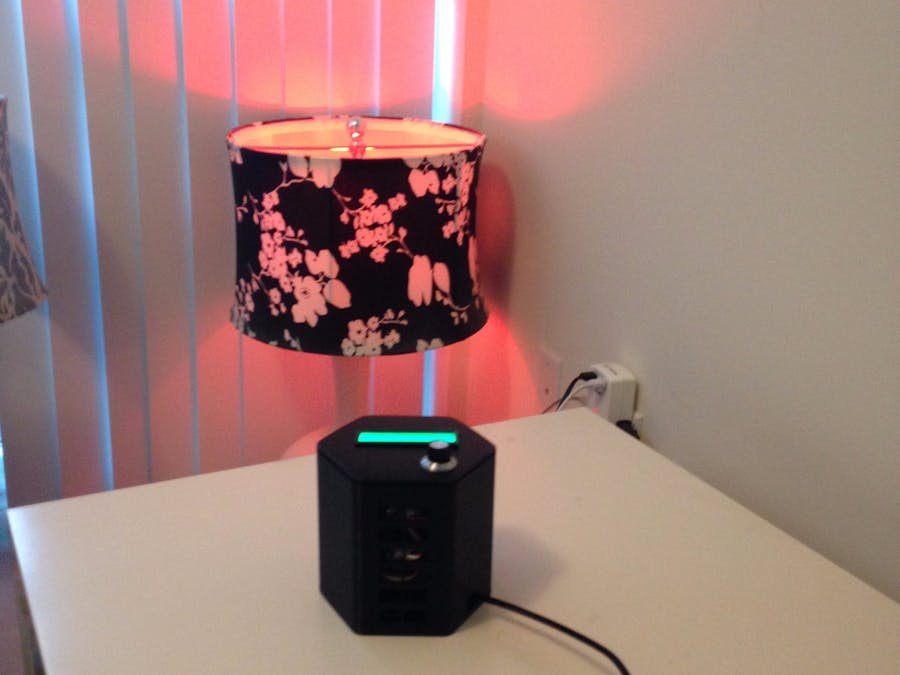
IoT command Center, is a great way to monitor the conditions inside your home and upload data to ARTIK cloud for logging, which you can reference in the future. And also use the ARTIK rules engine to control Hue Light. There are two parts to the project --
- The Arduino Yun and grove sensor as part of the main IoT Command Center, are used to post temperature , Humidity and Air Quality in the house,based on which various rules are created in the ARTIK cloud to control Hue light bulbs.
- And a Raspberry Pi A+ is used to create a Key Less door entry mechanism, which sends data for the ARTIK cloud to turn On/Off the lights at home and save energy.
Here is a picture gallery of the features
Here are the Steps to follow to complete the build
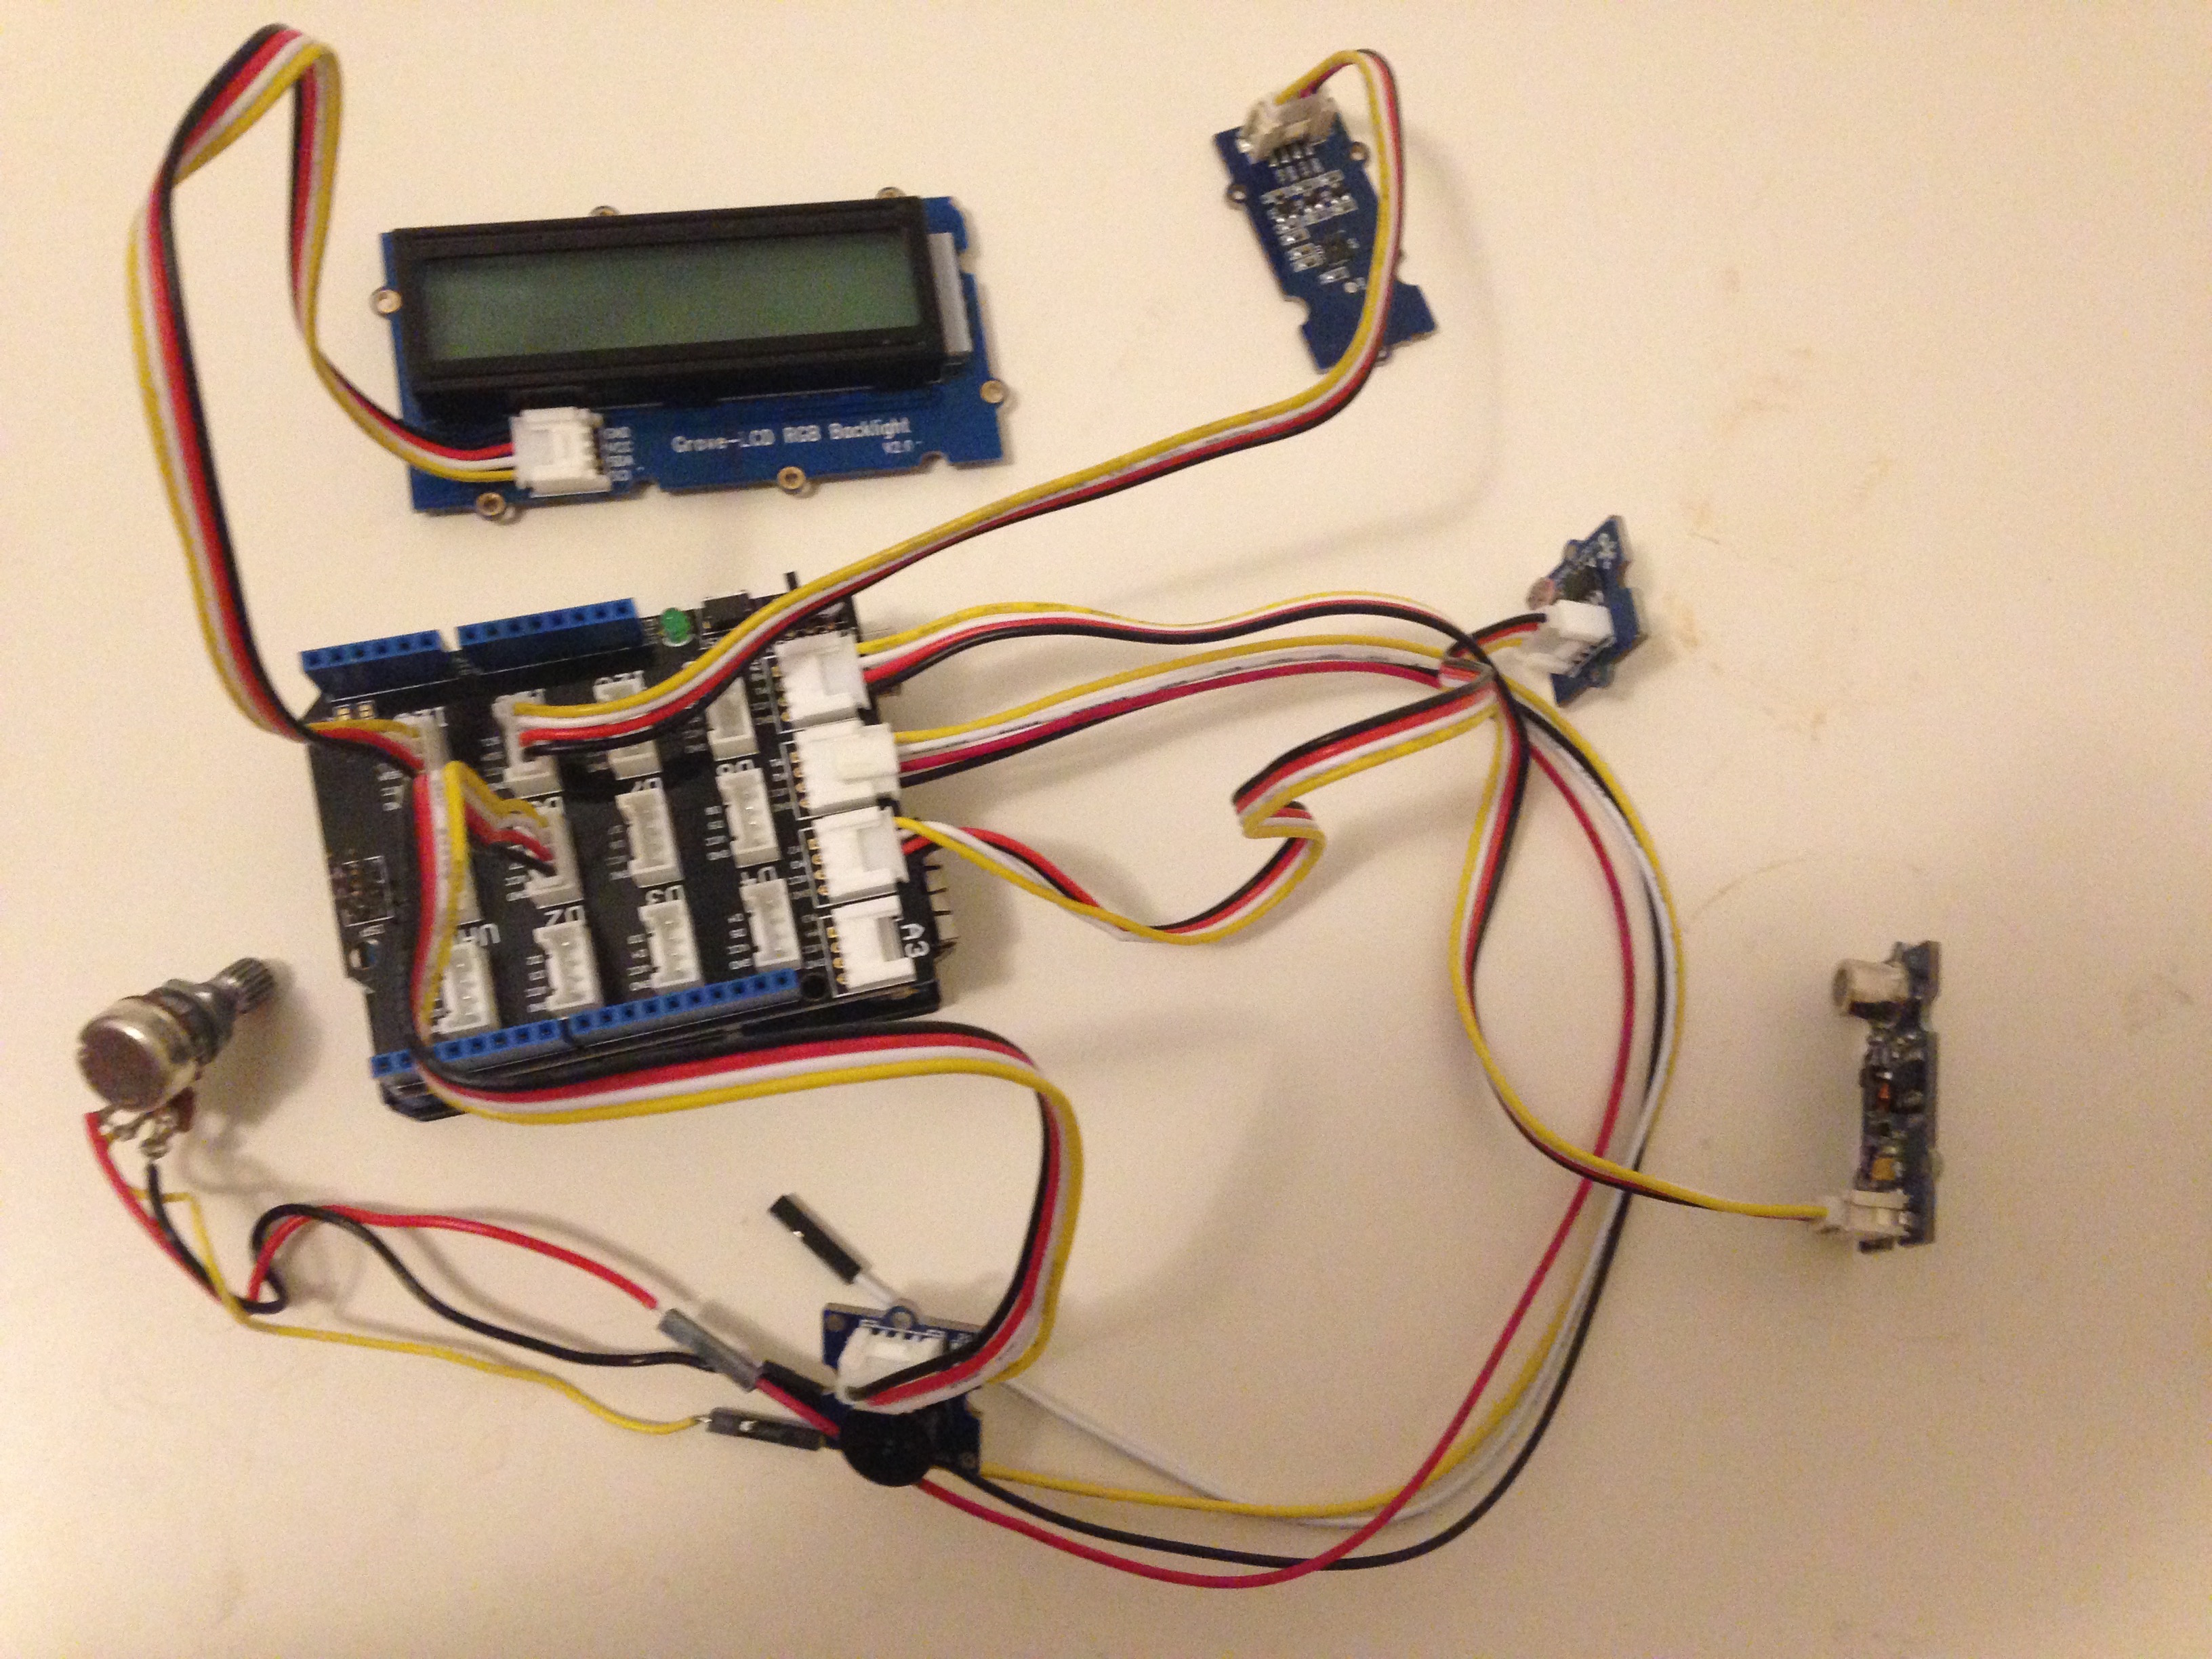
IoT Command center -Circuit with Arduino YunAs part of the Circuit mount the Grove connector shield on the Arduino Yun and make the following connections
- Air Quality sensor is connected to A0
- Potentiometer is connected to A1
- Light Sensor connected to A2
- Buzzer connected to D6
- RGB Backlight LCD connected to I2C
- Temperature and Humidity Sensor connected to I2C
3D print the STL files ,here you have 3 STL files to print , in my case I am using a Flashforge Creator pro and here are some suggested 3D printer settings
- 0.3 mm layer height
- fill density of at-least 25%
- Temperature -205 , in my case I am using Hatchbox 1.75mm black PLA
3D printing should take about 6 to 7 hours depending on you printer settings
Follow the link below to setup your WiFi details of your Arduino Yun
https://www.arduino.cc/en/Guide/ArduinoYun
In your browser go to http://yun.local as shown in the screen shot below
Remember to give your Yun a name and make a note of the IP address , which you will need to SSH into the Yun
Open a terminal App(putty in windows) and run the following command
ssh root@IPAddressOfYun
once you have entered you password , install pip package manager using the following commands
opkg update
opkg install distribute
easy_install pip
and then to install the ARTIK python library run
pip install artikcloud
Sign up for new account if you dont have a Samsung account already at https://developer.artik.cloud/
Once you have logged in create an application, under the Dashboard --Application , I am calling mine "YunHomeAutomation"
Once done Create a new Device Type called - "ArduinoYunHome"
And also create a Manifest with the Fields as shown in the screen shot below
Now login to https://artik.cloud/my/devices , and use the connect another device to add the Device type you just created in the above step .
Once done hit the generate token button
Also add the Phillips Hue as a device using the connect another device , here you will see a configure button which will ask for your Phillips Hue account details.
Once done you should see all you Phillips Hue light , with the names that you have given them while setting them up using the Hue ios/android app. As you see in the screen shot below I have 3 Hue bulbs
Upload the code attached below and you are now done with you setup of the IoT command center , open the Serial monitor to test and also check out the data log section under my Artik cloud -> Data Logs to verify the the sensor values are logged.
To add the electronic components you will need a Hot glue gun and at-least 16 2-56 screws and nuts as shown in the picture below
Now we are going setup a couple of ARTIK cloud rules to test our setup as shown in the video below, basically when we move the potentiometer dial to one end, we will post data to ARTIK cloud, which in turn will trigger a rule to turn on one lamp and the color of the other hue light to blue.
And when the potentiometer dial is moved to other direction we will turn off the one lamp and turn the color of the other light to red.
As part of the rule setup as shown in the screen shot below, you will have to decide the time the rule needs to be run, if you plan on giving a specific time(suggestion for testing keep this blank for your first rule)
Choose the Device Activity to monitor, here as you see in the screen shot below we are going to select ArduinoYunHome followed by homeon = 1
And then in the Send action section we are going to
- select the Office Lamp to turn seton.
- and the Color for living room lamp to blue =255
similarly create another rule and set
- ArduinoYunHome :homeon = 0
- In the action set Office Lamp to turn setoff
- and the Color for living room lamp to red =255
For the second part of the project we are going to build a key less door entry mechanism , which will turn on/off the hue lights when the door is open/closed , using a ARTIK cloud rule. Here is a quick video demo of my setup
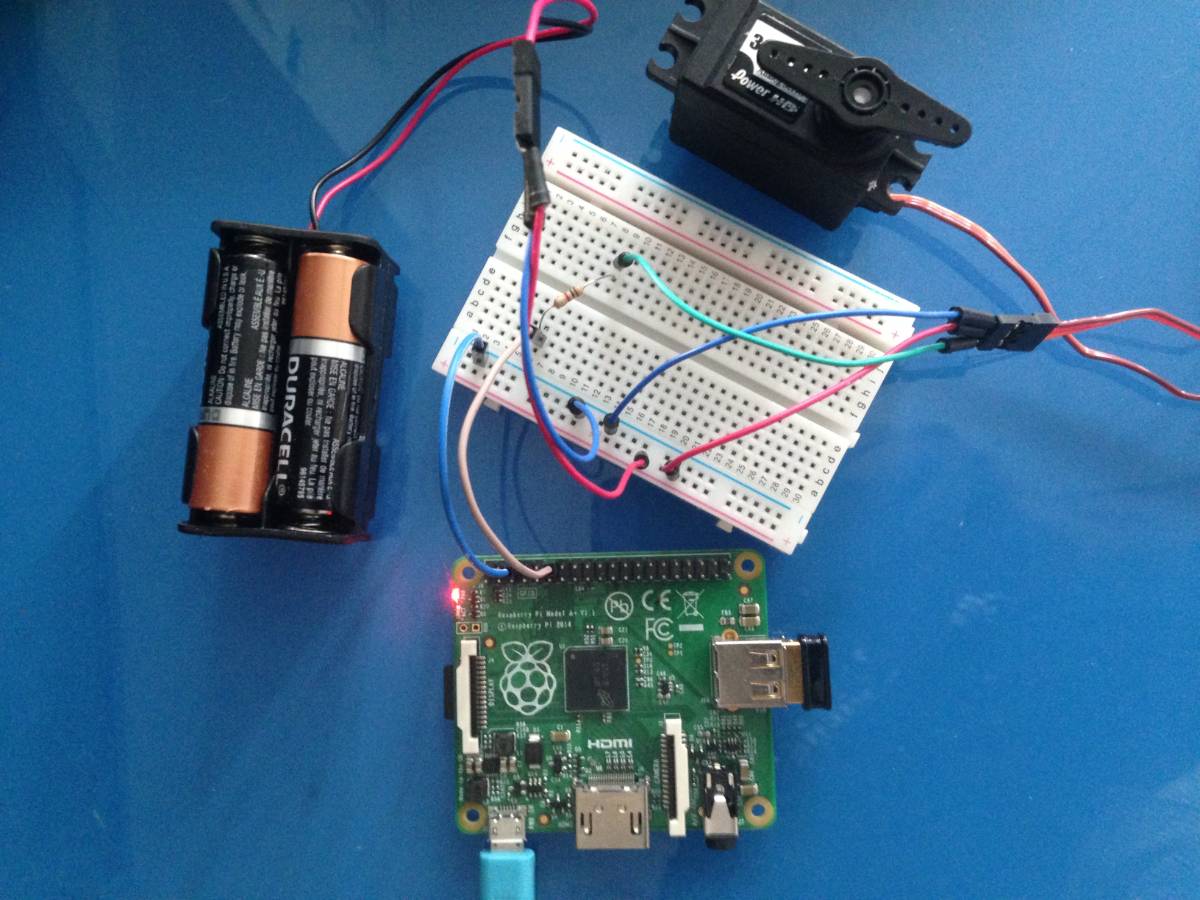
Keyless Door Entry -Circuit with Raspberry Pi A+As part of the circuit
- Connect the servo to GPIO pin number 18 on the Pi, which is a PWM pin
- To power up the servo I am using 4 AA batteries (this is a temporary setup, but in the final setup we are going to cut a USB cable to power up the servo)
- Connect the GND pin of the Pi to GND pin of battery pack and the servo.
- I am also using a 1K ohms resistor to protect the GPIO pin from unexpected high current .
Now lets write a small program to test the servo motor. Copy paste the code below into the nano editor
sudo nano servo.py
you will also have to create a file, servoState.txt to store the state of the servo, basically to check the position of servo, that is if the door is open or closed
import RPi.GPIO as GPIO
import time
import sys
argVal = sys.argv[1]
print argVal
GPIO.setmode(GPIO.BCM)
GPIO.setup(18, GPIO.OUT)
pwm = GPIO.PWM(18, 50)
pwm.start(7.5)
try:
#Reading the servo state value from the file to check if is Open/Closed
       fRead = open('servoState.txt')
       stateVal = fRead.read()
print 'State value in file:'+ stateVal
       fRead.close()
if argVal == 'open' and stateVal == 'close': #Open the door
print 'opening the servo lock'
               pwm.ChangeDutyCycle(7.5)  # turn towards 90 degree #Open
               fWrite = open('servoState.txt','w')
               fWrite.write('open')
               fWrite.close()
               time.sleep(1)
elif argVal == 'close' and  stateVal == 'open': #Close the door
               pwm.ChangeDutyCycle(2.5)  # turn towards 0 degree
               time.sleep(1) # sleep 1 second
print 'closing the servo lock'
#pwm.ChangeDutyCycle(12.5) # turn towards 180 degree
               fWrite = open('servoState.txt','w')
               fWrite.write('close')
               fWrite.close()
               time.sleep(1)
else:
print 'do nothing'
#except KeyboardInterrupt:
       pwm.stop()
       GPIO.cleanup()
except IOError as e:
print "I/O error({0}): {1}".format(e.errno, e.strerror)
you will also have to create a file, servoState.txt to store the state of the servo, basically to check the position of servo, that is if the door is open or closed
sudo nano servoState.txt
and type in open
Now to test type in, this will move the servo to one end
sudo python servo.py close
And to move the servo to the other end type in
sudo python servo.py open
Installing Flask on the PiOnce you have ssh'ed into you Pi use the following commands to install flask, which is a micro web development framework for Python
sudo apt-get update
sudo apt-get upgrade
install pip , a python package management system using
sudo apt-get install python-pip
install flask , which we are going to use to build a simple web app
sudo pip install flask
Test the flask installSetup a simple flask web app to check if the installation was successful, open the nano editor and copy paste the code below
from flask import Flask
app = Flask(__name__)
@app.route('/')
def doorlock():
return 'Hello python flask!'
if __name__ == '__main__':
   app.run(host='0.0.0.0', port=80, debug=True)
sudo nano demoFlaskApp.py
And then to run the web app
sudo python demoFlaskApp.py
To open the app in your browser type: http://ipaddressOfPi:80
3D Print the 4 STL files attached3D print the STL files ,here you have 3 STL files to print , in my case I am using a Flashforge Creator pro and here are some suggested 3D printer settings
- 0.2 mm layer height
- fill density of at-least 35%
- Temperature -205 , in my case I am using Hatchbox 1.75mm Silver PLA
3D printing should take about 3 to 4 hours depending on you printer settings
Adding 3D printed part Door Knob
To add the 3D printed parts to the door knob, you will have to remove the existing door mechanism, and also remove the metallic rod just behind the open/close knob,.We will use this metallic part to add to the 3D printed part which will then connect to the servo horn.
Link to the servo motor used - Standard Servo Motor (4.4KG*CM) and here is the link to mini breadboard which fits nicely in the Pi A+ enclosure.In addition as part of the setup , as you see in the pictures above I am using a 4AA batteries to drive the servo, but as part of the final setup I plan to use a USB cable cut at one end.
ARTIK Cloud - Developer - Create Device TypeCreate a new Device Type called - "PiKeyLessDoorEntry"
And also create a Manifest with the Field "doorState" as shown in the screen shot below, and then activate the Manifest
Now login to https://artik.cloud/my/devices , and use the connect another device to add the Device type you just created in the above step .
Once done hit the generate token button
Install the ARTIK cloud python libraryTo install ARTIK cloud python library, we are going to use pip
sudo pip install artikcloud
FTP the Web App Code to PiDownload the code from the code section below and use a FTP tool like filezilla to upload code to the Pi
In the webApp folder run the following command to run the web-app
sudo python dooropen.py
Also check the Datalog section under My Artik Cloud , to validate that data is logged which we are going to use Rule as part of the next step
Create two simple rules to turn on the Hue light when the door lock is open and one for when the door lock is closed as shown in the screen shots below
Basically , set the Hue Light to ON when the door is opened and set if to off when the door is closed.
Testing Key Less Door Entry mechanism
As part of testing the code you will need to enter a password to open the door , as part of the code it is setup as "artikpi" and yes! you phone/tablet will have to be connected to your home WiFi to get to the web app.
Use your pebble to control you Hue lights when you are feeling lazy and still in bed. For this you will have to install the Samsung ARTIK cloud app from the Pebble app store and then follow the instruction to enter you Samsung account details , that you used to log in into my Artik cloud web page above
For more device that you can easily use check out Works with page at
IoT Command Center - with Arduino Yun
- Air Quality sensor is connected to A0
- Potentiometer is connected to A1
- Light Sensor connected to A2
- Buzzer connected to D6
- RGB Backlight LCD connected to I2C
- Temperature and Humidity Sensor connected to I2C


Comments