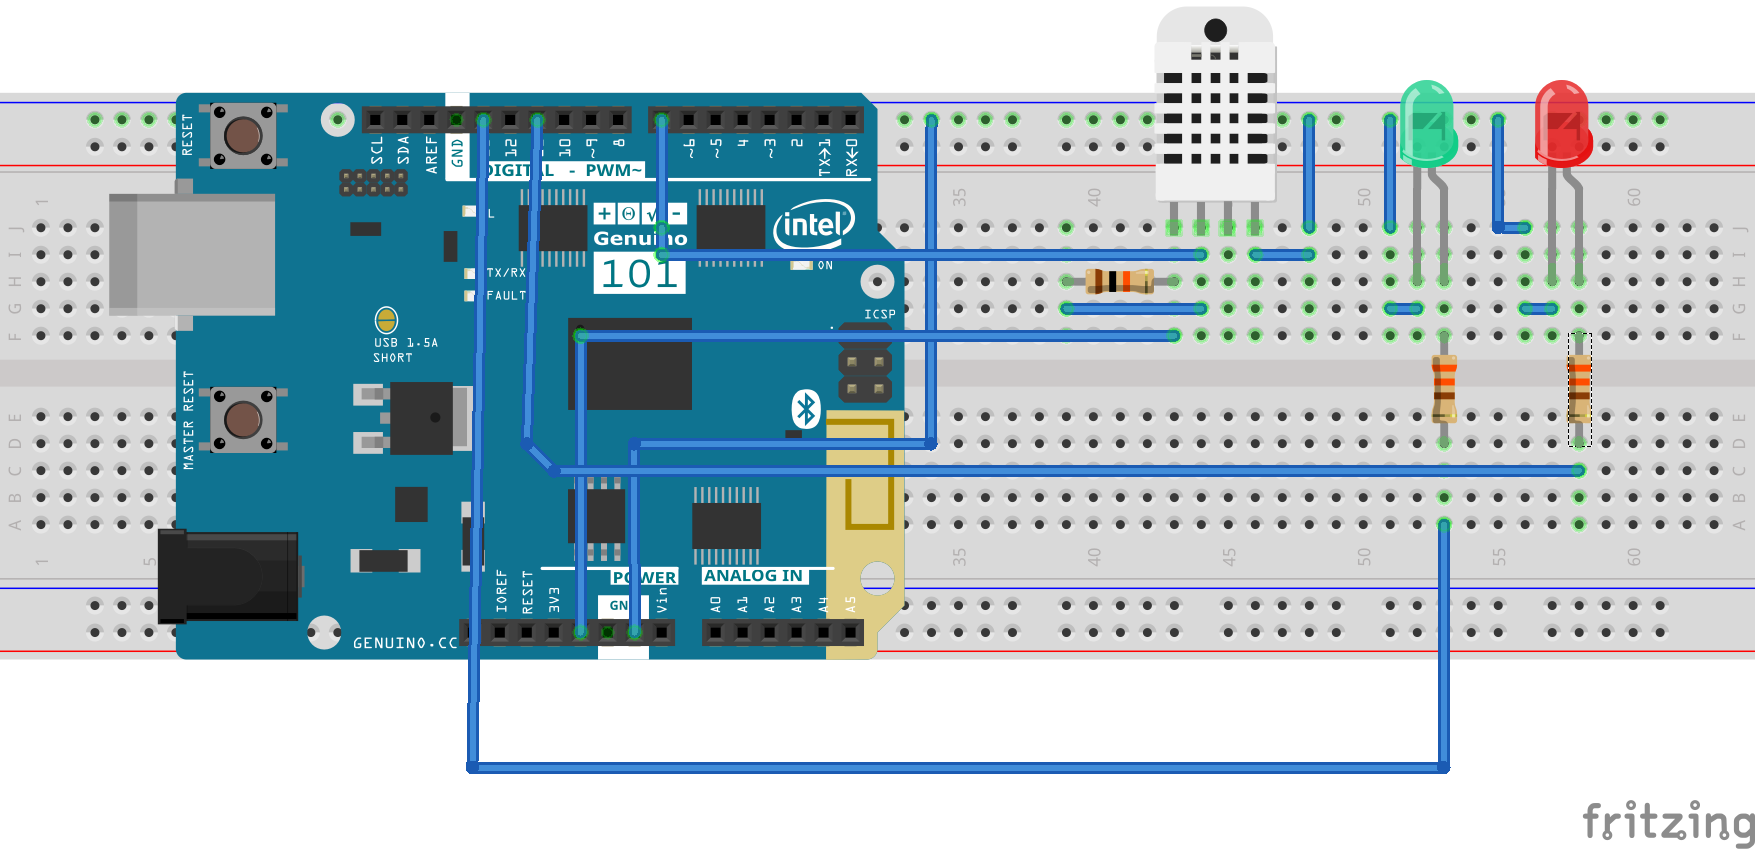
Alexis Santiago Allende
Published © GPL3+

Arduino 101 BLE App

I want to show you how to make an application and connect it with the Arduino 101 platform for Internet of Things applications.

IntermediateWork in progress2 hours24,718
Arduino 101 BLE App

Things used in this project

Hardware components

Arduino 101
Arduino 101
×1
DHT22 Temperature Sensor
×1
LED (generic)
LED (generic)
×2
Jumper wires (generic)
×1
Resistor 330 ohm
Resistor 330 ohm
×2
Android device
Android device
×1
Breadboard (generic)
×1
USB-A to B Cable
USB-A to B Cable
×1
Resistor 10k ohm
Resistor 10k ohm
×1

Software apps and online services

Arduino IDE
Arduino IDE
MIT App Inventor
MIT App Inventor

Story

Read more

Schematics

Simple

Code

Arduino 101 code

Arduino
My code
/*Made by Alexis Santiago Allende Last Update 17/03/17*/
#include <CurieBLE.h>
BLEPeripheral blePeripheral;//BLE Peripheral Device (Arduino Device)
BLEService demo111("19b10010-e8f2-537e-4f6c-d104768a1214"); // BLE demo111 Service

// BLE demo111 buttons Characteristic - custom 128-bit UUID, read and writable by central
BLEUnsignedCharCharacteristic buttons("19b10011-e8f2-537e-4f6c-d104768a1214", BLERead | BLEWrite);
// BLE sensor rate Characteristic"
BLEUnsignedIntCharacteristic sensors("19b10012-e8f2-537e-4f6c-d104768a1214", BLERead | BLENotify);
//DHT 22 library and things
#include "DHT.h"
#define DHTPIN 7
#define DHTTYPE DHT22
DHT dht(DHTPIN, DHTTYPE);

long previousMillis = 0;  // last time the sensor was checked, in ms
const int green = 13; // pin to use for the green light
const int red = 11;// pin to use for the red light
boolean a = LOW, b = LOW; //Control variables


void setup() {
  Serial.begin(9600);
  dht.begin();//sensor begin
  pinMode(green, OUTPUT);
  pinMode(red, OUTPUT);
  // set advertised local name and service UUID:
  blePeripheral.setLocalName("Demo111");
  blePeripheral.setAdvertisedServiceUuid(demo111.uuid());
  // add service and characteristic:
  blePeripheral.addAttribute(demo111);//service 
  blePeripheral.addAttribute(buttons);// add the buttons characteristic
  blePeripheral.addAttribute(sensors); // add the sensor characteristic
  // set the initial value for the characeristic:
  buttons.setValue(1);
  // begin advertising BLE Light service:
  blePeripheral.begin();
  Serial.println("Demo111 service begin!");
}

void loop() {
  // listen for BLE peripherals to connect:
  BLECentral central = blePeripheral.central();
  digitalWrite(green, LOW);
  digitalWrite(red, LOW);
  // if a central is connected to peripheral:
  if (central) {
    Serial.print("Connected to central: ");
    // print the central's MAC address:
    Serial.println(central.address());

    // while the central is still connected to peripheral:
    while (central.connected()) {
      // if the remote device wrote to the characteristic,
      // use the value to control the leds:
      if (buttons.written()) {
        if (buttons.value() == '1' && a == LOW) { // 1 in ASCII

          digitalWrite(green, HIGH);         // will turn the LED on
          a = HIGH;
        } else if (buttons.value() == '1' && a == HIGH)  {  //when 1 was read again (second time)          

          digitalWrite(green, LOW);          // will turn the LED off
          a = LOW;
        }

        if (buttons.value() == '2' && b == LOW) { // 2 in ASCII

          digitalWrite(red, HIGH);         // will turn the LED on
          b = HIGH;
        } else if (buttons.value() == '2' && b == HIGH)  { //when 2 was read again (second time)  

          digitalWrite(red, LOW);          // will turn the LED off
          b = LOW;
        }
      }

      long currentMillis = millis();
      // if 10s have passed, check the sensor:
      if (currentMillis - previousMillis >= 10000) {
        previousMillis = currentMillis;
        updateSensor();
      }
      //finish
    }
    // when the central disconnects, print it out:
    Serial.print(F("Disconnected from central: "));
    Serial.println(central.address());
  }
  else
  {
    digitalWrite(green, LOW);
    digitalWrite(red, LOW);

  }
}

void updateSensor() {
  int temp=dht.readTemperature();//read temperature 
  sensors.setValue(temp);//send temperature value
  Serial.println(temp);//if you want check temperature i serial monitor
}

Demo111.aia

Arduino
App Inventor Code, if you want try make, you can download
No preview (download only).

Credits

Alexis Santiago Allende

Alexis Santiago Allende

0 projects • 73 followers
Im a person who since young feel a passion for electronics, I also like to cook pizza and travel. Now Im working on the internet of things

Comments