


Hand tools and fabrication machines | ||||||
 |
| |||||
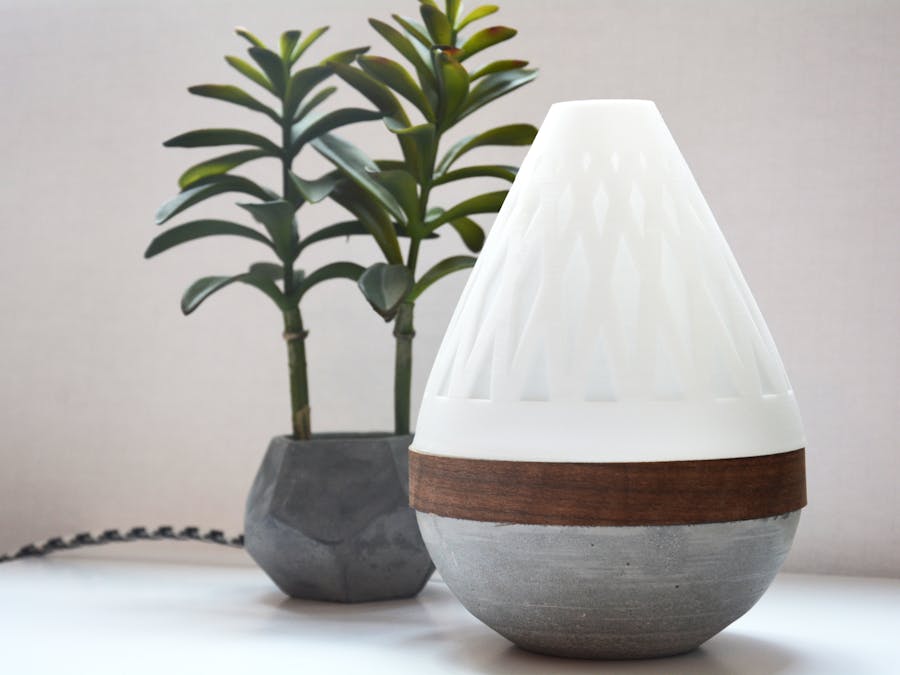
The Teardrop Lamp was designed to utilize 3D printing for a mixed media project. The project includes a concrete base made out of Shapecrete which was molded out of a 3D printed mold, on top of the concrete base sits a wood ring which is a 3D printed ring with wood veneer adhered around the face, then at the top sits the 3D printed shade printed in natural color HIPS which gives a nice white translucent look which works well with white and color lights. No specialized tools are required and a 3D printer is not required - you can utilize a print service such as 3DHubs.com to obtain the 3D printed parts from a local printer.
What You Will NeedMaterials:
Shapecrete ~$30
- Wooden Stirring Sticks ~$14 (likely cheaper for less quantity at local hardware store)
- Walnut Wood Veneer ~$13
- Linseed Oil ~$6
- Glue ~$8
- Sanding Paper ~$4
- Light bulb ~$16 (for 2 bulbs)
- Light Kit ~$60 (cheaper alternative listed in Recommendations Section)
- Binder Clip (optional) ~$2
- Clear Coat (optional) ~$4
- 3D Printed Concrete Mold (This may be destroyed in the process, so if building more than 1 lamp, make sure to have 1 per lamp.
Tools:
- Clothes Iron ~$22
- Orbital Sander (optional) ~$27
- Hot Glue Gun (optional) ~$10
***Links provided are affiliate links if used to purchase something may provide Adylinn Studio a small commission.
Concrete Base- Ensure that the inside of the mold is smooth, if not, sand as best as you can. The concrete can be sanded so this step isn’t absolutely crucial but it does help.
- Mix roughly 3 parts concrete mix to 1 part water (use the box instructions if using something different than Shapecrete).
- Optional (may help remove concrete from the mold): mix 10 parts water and 1 part dishwashing soap and lightly coat to inside of the mold. Pour concrete immediately after.
- Once it is well mixed and cake batter type consistency, pour into mold. Try to fill close to the top edge but not all the way. You have roughly 30 minutes of working time so no need to rush this step.
- Try to remove any air bubbles by slowly shaking the mold. Optionally you can use an orbital sander to apply vibrations to the outside of the mold while spinning it around.
- Let the concrete mold sit for at least 48 hours. For now, work on Wood Ring and Shade steps.
- Once the concrete is hardened, remove from mold. You may need to break apart the mold to do this.
- Sand outside of the concrete base to desired surface finish. You can use sandpaper manually or use an orbital sander. You can use as low as 80 grit initially and then move toward 320 grit or higher if desired.
Heat up a clothes iron on the cotton setting. (Warning - some residue from the process may get on heat plate, though this did not happen during my build)
- Lightly sand the outside of the 3D printed ring so the surface is smooth enough for the veneer to adhere to it. You can use 120 or 220 grit sandpaper for this.
- Wipe down sanded ring with a very lightly damp paper towel and remove all dust.
- Wrap the veneer around the ring to measure how much is needed, cut roughly 1 inch longer than needed.
- Before using Clothes Iron remove any water and allow clothes iron to dry.
- Wrap wood veneer around wood ring and use a binder clip to assist keeping veneer in place during the process.
- Use iron to melt adhesive, allowing it to stick to the 3D printed ring. The general speed to avoid scorching the wood is 2 inches per second but it seems to be quite tolerant of the heat. Do this until all veneer is glued onto the ring.
- Once at the end you can trim up the excess and finally adhere the last section of the veneer.
- Apply linseed oil to veneer by applying a generous amount all the way around.
- Let the oil sit and penetrate wood for roughly 10 minutes.
- Wipe any excess oil from veneer.
- Lightly sand the outside of the 3D printed shade so the surface is smooth.
- Wipe down sanded shade with very lightly damp paper towel and remove all dust.
- Optionally apply clear coat to sanded shade and let dry.
- Insert light fixture into the concrete base and glue the fixture to the base.
- Glue wood ring to concrete base.
- Insert Light Bulb into fixture
- Lightly hot glue Shade to wood ring (I would suggest using a drop of hot glue to 2-4 points around the ring in the event you want/need to change the bulb. You will be able to use a knife to remove shade from the ring. The diameter of the shade at the top is very narrow and does not allow for easy exchanging of bulbs.
- Plug in and enjoy.
Here are some different options for light bulbs I recommend (in order of price):
RGB LED Light bulb ~$16
Phillips Hue Smart Light Bulbs Starter Pack (WHITE ONLY) ~$60
Phillips Hue Smart Light Bulbs Pack (FULL COLOR) ~$200
The light kits I chose were on sale but still expensive. Here is an alternative option that is much cheaper:
Light Kit ~$20
- I would suggest color changing LED bulbs for lights since it will give you long lasting bulbs and the flexibility to change the color of the lights at any time.
- Phillips Hue bulbs though expensive can give you “smart” features for your lamps as well.
If you are sourcing your 3D printed parts, I’d suggest a local printer on 3D Hubs so you can pick up your printed pieces without having to risk shipping. Be sure to communicate the below settings when placing your order:
Shade (this needs to have high surface quality)
- Filament recommendation - e-Sun HIPS in Natural Color
- 0.1mm layer height
- 25% infill
- Slow printing speed
- No support
- Brim optional
Ring and Mold for Concrete Base (surface quality not important)
- Filament recommendation - white PLA (any/cheap)
- 0.2mm layer height
- 15% infill
- Support optional (might be needed for concrete base mold)
Visit 3D Hubs to order a 3D print.
Thanks for checking out the Teardrop Lamp build! If you enjoyed it, I post monthly builds using 3D printing on my website, https://www.adylinn.com/builds/.

Comments