


Hardware components | ||||||
 |
| × | 1 | |||
| × | 1 | ||||
 |
| × | 4 | |||
 |
| × | 1 | |||
| × | 1 | ||||
 |
| × | 1 | |||
 |
| × | 1 | |||
 |
| × | 1 | |||
 |
| × | 1 | |||
Hand tools and fabrication machines | ||||||
 |
| |||||
 |
| |||||
| ||||||
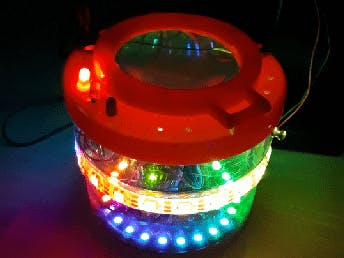
In case a mechanical force (e.g., a "beat") hits a simple piezo sensor, an LED color pattern is lit. Brightness depends on how hard the beat hits the piezo sensor. LED color pattern can be selected by turning a potentiometer.
What made me to do this ?As so often, there's not only a single cause...
Curiosity: Can I successfully implement the component I bought into an Arduino project ?
Family business: Can I support my little son's desire to "help" me in an Arduino project ?
Challenge: Can I make up a project that supports my son's above mentioned whish AND convinces him (once more), that playing around with Arduino is fun ?
Education: Last but not least I hoped to stimulate my son's practicing simple drum patterns for music school.
How did I do it ?Mechanics
First a word on the "housing". My son decided to get rid of his bug eye viewer ("Becherlupe"). That seemed to just perfect to me, cause in my experience manufacturing of a nice containment is one of the most challenging parts in Arduino projects.
Hardware
A piezo sensor (output voltage changes depending on applied mechanical force) is connected to an analog input of an Arduino Nano. In case the signal from that piezo sensor increases above a defineable threshhold
- its strength is determined and used to set the brightness of the connected LEDs (LED ring at bottom of bug eye viewer and LED strip along outer circumference).
- a counter is increased and depending on that counter a red, yellow or green LED (connected to 3 digital outputs of the Arduino Nano) is lit for a short time.
The color pattern of those LEDs is determined depending on the resistance across a potentiometer (connected to another analog input of the Arduino Nano).
The three single LEDs are lit depending on the number of counts, i.e., how often the piezo sensor threshhold was surpassed. This could serve as a indication how intense someone practiced his drum patternsby simply counting beats ;-). Up to now my experience w/ this tells me not to underestimate the impression red, yellow or even green lights have on children ;-).
Since this thingy should be mobile and safe I decided to use simple AA batteries as power source. Goal is to make sure to be able to supply a stable voltage of >5V to ensure reliable operation of the Arduino Nano. This could be easily achieved, e.g., by using a 9V block battery. However, the WS2812B LEDs on the LED ring and strip used are (as far as I understand information I found in the www) prone to destruction in case the supplied voltage is significantly higher than 5V.
Using 3 x NON-rechargeable AA batteries might be an option, but the nominal max. voltage of 4.5 V might drop during operation leading to unstable operation of the Arduino Nano. 4 x NON rechargeable AA batteries will (at least initially) provide ~6 V, leading to destruction of some of the LEDs.
3 x rechargeable AA batteries will provide a too low voltage (~3, 75 - 3.9 V) for reliable operation of the Arduino Nano. So my final choice were 4 x rechargeable (NiMH) batteries, providing 5 - 5.3 V.
Initially I made the mistake to connect the supplied power to VIn pin of the Arduino Nano. Due to the voltage drop across Arduino's internal voltage regulator the remaining voltage dropped below the limit neede for stable operation of the Arduino Nano.
Finally a few pictures...
Daytime...
...and nighttime...


Comments