


Hardware components | ||||||
 |
| × | 1 | |||
 |
| × | 1 | |||
 |
| × | 1 | |||
Software apps and online services | ||||||
 |
| |||||
Impact Recorder is designed to record impact sustained to vehicle while driving or stationary. The impacts are stored in the database in the form of readings as well as video/picture.
Upon impact remote user can be verified in real-time, and remote user can than watch the saved video or take remote access to Pi Camera and watch events accordingly.Step 1: Parts & Accessories
(1) Raspberry Pi 3 or better: computational power required
(2) Raspberry Pi Sense HAT
(3) Raspberry Pi Camera / USB camera
(4) Memory card with latest raspbian image ( Should support node red, almost every latest image does)
(5) Power supply at least 2.1 A ( I have used battery bank for standalone operation in car)
Step 2: Parts Description: Sense HATThe Sense HAT has an 8×8 RGB LED matrix, a five-button joystick and includes the following sensors:
- Gyroscope
- Accelerometer
- Magnetometer
- Temperature
- Barometric
- Pressure
- Humidity
More information on working with Sense HAT can be derived from following links: Sense_Hat
API for sense hat are hosted at : Sense_HAT_API
Code for sense-hat programming is covered in later steps. Sense HAT code can also be simulated on a simulator hosted at : Sense-hat simulator
Step 3: Assembling: Impact Recorder- Assembling is simpler as Sense HAT needs to be stacked over Pi (designated mounting bolts are provided with Sense HAT).
- USB camera or Pi Camera can be connected. In the tutorial, Pi Camera is considered and accordingly coding is carried out for the same.
- Insert the memory card and configure Python code and Node-RED (configuration & code is covered in further steps)
Picture above shows Pi Camera connected through flat ribbon cable to Pi.
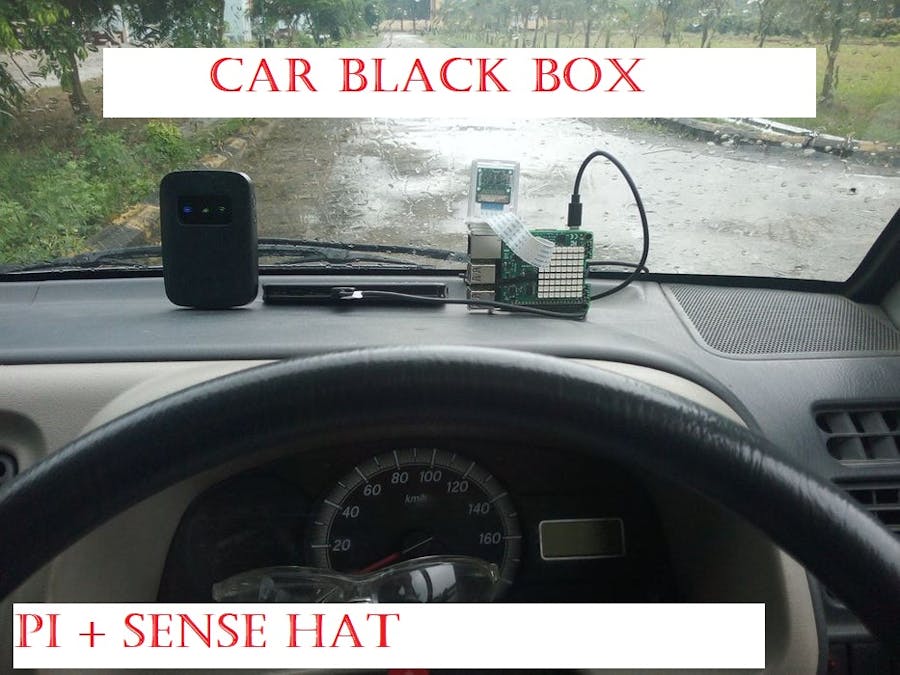
Step 4: Assembling: Impact Recorder on Dashboard of CarFor mounting the recorder, I have used double sided tape, the advantage is recorder can be easily shifted in different position, whichever suits best your car.
Further camera is mounted vertically as shown, using same double side tape,
Next in line is to connect a power source (10, 000 mAH power bank) along with a ready internet connection
Internet connection shall be required for MQTT application ( the details for MQTT are covered in further steps)
Step 5: Impact Recoder : Working & ApplicationsFrom the Sense HAT, acceleration and gyroscope are used to check whether the raw values are beyond set limit in code.
Accelerometer : The accelerometer tells the amount of gravitational force (G-force) acting on each of x, y & z axis, if any axis measures more than 1G force, than rapid motion can be detected. (please note the axis pointing downward would have 1g value and needs to be considered accordingly in python code).
Gyroscope ; The gyroscope is used to measure angular motion, i.e during sharp turn the sensor might get activated (depends upon the setting in the code), so a person sharply whirling the vehicle would get caught!!
Any activation of set limit is also displayed on the Sense HAT LED matrix as "!" in red for acceleration & green for gyroscope activation
Step 6: Software Description: Node-REDNode-RED is a flow-based programming tool, originally developed by IBM’s Emerging Technology Servicesteam and now a part of the JS Foundation.
More information on node red can be obtained through following link: Node-RED.
For our case we would be using node -red for following activities
(1) Interacting with the joysticks to start camera functions.
(2) Monitoring the impacts on vehicle and relaying the information to end user by employing MQTT and further accepting the end user commands through MQTT and starting the requisite application on Pi.
(3) Performing some basic stuffs like shutdown of Pi.
The further steps gives the detailed information for the flow diagram implemented on Node-RED.
Please note the Node-RED flow diagrams interact with the Python code, hence the latter part covers the Python code aspects.
Step 7: Node-RED BasicsCertain Basic steps are highlighted to begin Node-RED in a flash, but yes Node-RED is too simple to begin and work out applications.
- Starting Node-RED:: http://localhost:1880.
- Starting Node-RED when Pi is connected to internet: http:// ip address>:1880
The Flow _1a, monitors any changes in the CSV file and on the basis of the changes, i.e impact detected, camera video recording is set to on mode and further the user is informed over internet that an impact has occurred.
Step 9: Node-RED: Flow_1bIn the said flow, video recording can be started at any point by just pressing the joystick.
Step 10: Node-RED: Flow_2aIn the said flow, whenever any new picture or video is stored/uploaded to directory the information is relayed to the registered user over internet.
Step 11: Node-RED: Flow_2bThis flow is primarly designed for the remote user, so as to control the device in following manner:
(a) Shutdown device
(b) Take pictures
(c) Record videos
(d) Start main code (datalogger code is the main code which calculates the impact)
Step 12: Node-RED: Flow_3The flow is designed for local access, so as to start the main code or shutdown device.
Step 13: MQTTMQTT (Message Queuing Telemetry Transport) is an TCP/IP protocol, wherein publisher and subscriber interact.
In Our case Pi is publisher, whereas the application installed in our moblile/PC shall be the subscriber.
In this way on generation of any impact, information is relayed remotely to the user ( a working internet connection is must)
More information about MQTT can be accessed from following link : MQTT
To start using MQTT, we need to register first, for the tutorial I have used cloudmqtt (www.cloudmqtt.com), there is a free plan under "cute cat," thats all.
After registering create a instance say "pi" after which you would be getting following details
- Server name
- port
- username
- password
The above are required while subscribing through mobile/pc
For my application, I have used MQTT application from google play store (Android version)
Step 14: MQTT: SubscriberThe MQTT application running on mobile (Android version)
The impact detected on Pi are relayed back
Step 15: MQTT: Editing Properties in Node-REDIn Node-RED after selecting MQTT node, "server name" and "topic" to be mentioned. This should be same on subscriber end.
Step 16: The Python CodeThe code functionality is as per attached flowchart.
Step 17: The Final CodeThe Python code is attached.
In order to make our Python script run from terminal, we need to make them executable as chmod +x datalogger.py, than further the top of the code should contain the following "shebang" line #! /usr/bin/python3 (This is required so as to execute functions from Node-RED.)
#!/usr/bin/python3                                                            // shebang linefrom sense_hat import SenseHat
from datetime import datetime
from csv import writer
import RPi.GPIO as GPIO
from time import sleepsense = SenseHat()
import csvtimestamp = datetime.now()
delay = 5                                                                           // delay is defined to store data in data.csv file
red = (255,0,0)
green = (0,255,0)
yellow = (255,255,0)#GPIO.setmode(GPIO.BCM)
#GPIO.setup(17,GPIO.OUT)def get_sense_impact():
             sense_impact = []

             acc = sense.get_accelerometer_raw()
             sense_impact.append(acc["x"])
             sense_impact.append(acc["y"])
             sense_impact.append(acc["z"])             gyro = sense.get_gyroscope_raw()
             sense_impact.append(gyro["x"])
             sense_impact.append(gyro["y"])
             sense_impact.append(gyro["z"])             return sense_impactdef impact():                                                                              // function to detect impact


         #GPIO.setmode(GPIO.BCM)
         #GPIO.setup(4,GPIO.OUT)
         acceleration = sense.get_accelerometer_raw()
         x = acceleration['x']
         y = acceleration['y']
         z = acceleration['z']
         x=abs(x)
         y=abs(y)
         z=abs(z)         gyro = sense.get_gyroscope_raw()
         gyrox = gyro["x"]
         gyroy = gyro["y"]
         gyroz = gyro["z"]         gyrox = round(gyrox,2)
         gyroy = round(gyroy,2)
         gyroz = round(gyroz,2)         impact = get_sense_impact()         if x > 1.5  or y > 1.5 or z > 1.5:                                          // the values are set after iteration on actual road can be changed accordingly for different types and driving skills
                      with open('impact.csv', 'w', newline='') as f:
                            data_writer = writer(f)
                            data_writer.writerow(['acc x','acc y','acc z','gyro x','gyro y','gyro z'])
                            #GPIO.output(4,GPIO.HIGH)
                            sense.clear()

                            sense.show_letter("!" , red)

                            data_writer.writerow(impact)


                  elif gyrox > 1.5 or gyroy > 1.5 or gyroz > 1.5:                    // the values are set looking into the speed at which turns are initiated
                        with open('impact.csv', 'w', newline='') as f:
                             data_writer = writer(f)
                             data_writer.writerow(['acc x','acc y','acc z','gyro x','gyro y','gyro z'])
                             #GPIO.output(4,GPIO.HIGH)
                             sense.clear()

                             sense.show_letter("!" , green)

                             data_writer.writerow(impact)         else:
                # GPIO.output(4,GPIO.LOW)
                sense.clear()def get_sense_data():                                                        // function to record and store values from sensor
    sense_data = []

    sense_data.append(sense.get_temperature())
    sense_data.append(sense.get_pressure())
    sense_data.append(sense.get_humidity())    orientation = sense.get_orientation()
    sense_data.append(orientation["yaw"])
    sense_data.append(orientation["pitch"])
    sense_data.append(orientation["roll"])    acc = sense.get_accelerometer_raw()
    sense_data.append(acc["x"])
    sense_data.append(acc["y"])
    sense_data.append(acc["z"])

    mag = sense.get_compass_raw()
    sense_data.append(mag["x"])
    sense_data.append(mag["y"])
    sense_data.append(mag["z"])    gyro = sense.get_gyroscope_raw()
    sense_data.append(gyro["x"])
    sense_data.append(gyro["y"])
    sense_data.append(gyro["z"])
        sense_data.append(datetime.now())    return sense_datawith open('data.csv', 'w', newline='') as f:

    data_writer = writer(f)    data_writer.writerow(['temp','pres','hum','yaw','pitch','roll','acc x','acc y','acc z','mag x','mag y','mag z','gyro x','gyro y','gyro z','datetime'])    while True:

         print(get_sense_data())
         for event in sense.stick.get_events():
         # Check if the joystick was pressed
          if event.action == "pressed":

             # Check which direction
            if event.direction == "up":
               # sense.show_letter("U")      # Up arrow
                acceleration = sense.get_accelerometer_raw()
                x = acceleration['x']
                y = acceleration['y']
                z = acceleration['z']
                x=round(x, 0)
                y=round(y, 0)
                z=round(z, 0)

	 # Update the rotation of the display depending on which way up the
                if x  == -1: sense.set_rotation(90)
                elif y == 1: sense.set_rotation(270)
                elif y == -1: sense.set_rotation(180)
                else: sense.set_rotation(0)
                sense.clear()
                t = sense.get_temperature()
                t = round(t,1)
                message = "T: " + str(t)

                sense.show_message(message,text_colour = red,scroll_speed=0.09)

            elif event.direction == "down":
                acceleration = sense.get_accelerometer_raw()
                x = acceleration['x']
                y = acceleration['y']
                z = acceleration['z']
                x=round(x, 0)
                y=round(y, 0)
                z=round(z, 0)

	# Update the rotation of the display depending on which way up the
                if x  == -1: sense.set_rotation(90)
                elif y == 1: sense.set_rotation(270)
                elif y == -1: sense.set_rotation(180)
                else: sense.set_rotation(0)
                # sense.show_letter("D")      # Down arrow
                sense.clear()
                h = sense.get_humidity()
                h = round(h,1)
                message = "H: " + str(h)

                sense.show_message(message,text_colour = green,scroll_speed=0.09)
                p = sense.get_pressure()
                p = round(p,1)
                message = "P: " + str(p)
                sense.show_message(message,text_colour = yellow,scroll_speed=0.09)            #   elif event.direction == "left":
               # acceleration = sense.get_accelerometer_raw()
                # x = acceleration['x']
                #y = acceleration['y']
                #z = acceleration['z']
                #x=round(x, 0)
                #y=round(y, 0)
                #z=round(z, 0)

	                # Update the rotation of the display depending on which way up the           // Not used and controlled by node-red
                #if x  == -1: sense.set_rotation(90)
                #elif y == 1: sense.set_rotation(270)
                #elif y == -1: sense.set_rotation(180)
                #else: sense.set_rotation(0)
                #sense.show_letter("L")      # Left arrow

            # elif event.direction == "right":
              # sense.show_letter("K")      # Right arrow
            # elif event.direction == "middle":
              # sense.clear()         impact()
         data = get_sense_data()

         dt = data[-1] - timestamp
         if dt.seconds > delay:

            data_writer.writerow(data)
            timestamp = datetime.now()
Impact Recorder can also be used to monitor live video, as video can be started anytime anywhere through MQTT.
we would use VLC player to stream videos, by default in latest raspbian the VLC is pre-installed, else install vlc as under.
More information about viewing network stream can be accessed through VLC Network stream.
Thank you for reading!
There is much more the Impact Recorder can do.


Comments