

Hardware components | ||||||
_baVEVgguW1.jpg?auto=compress%2Cformat&w=48&h=48&fit=fill&bg=ffffff) |
| × | 1 | |||
| × | 1 | ||||
| × | 1 | ||||
| × | 1 | ||||
| × | 1 | ||||
| × | 1 | ||||
| × | 1 | ||||
| × | 1 | ||||
 |
| × | 1 | |||
| × | 1 | ||||
| × | 1 | ||||
| × | 1 | ||||
| × | 1 | ||||
| × | 1 | ||||
Software apps and online services | ||||||
 |
| |||||
Hand tools and fabrication machines | ||||||
 |
| |||||
| ||||||
 |
| |||||
| ||||||
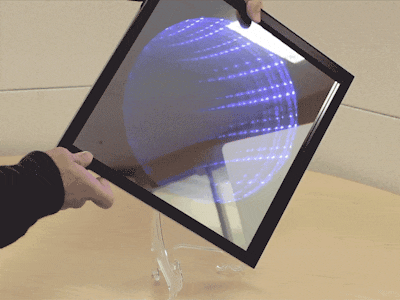
A cross between a Kaleidoscope and an Infinity Mirror! As you change the rotation of the mirror, the lights change in response. This project is built with an off-the-shelf mirror and picture frame, and a few other components. The Arduino 101 development board has a built-in positional sensing that we can use to sense the angle, and control the light display.
Note: This project uses the same electronics set-up as the Holiday Shadow Theater, basically just an Arduino101, an LED strip, and a battery pack. I use a $4 voltage regulator so that the same battery pack can power both the LEDs and the Arduino 101. Alternatively you could use a 9v battery to power the Arduino and skip the regulator.
Part One: Build the MirrorStep 1:
Using a sharp box-cutter or hobby knife, cut a 12” x 12” square of Foamcore and mark the center with a pencil. You can use the back cardboard from the picture frame as a reference.
Step 2:
Using a circle drawing tool or a string and pencil, draw a perfect circle with a radius of 5.25” centered in the 12 x 12. You can use a ruler to put a mark 0.75" from the edge of the 12x12 and use that as a starting reference point.
Step 3:
Using a box-cutter or hobby knife with a new blade, carefully cut out the circle. This cut will be visible in the final product so cut as cleanly as you can.
Step 4:
Once the hole is cut, choose the best-looking side, and place it good-side down on a clean work surface.
Step 5:
Cut a separate ½ inch strip of Foamcore, about 36" long. This can be pieced together from shorter segments with tape if needed. Use a ruler and keep the size as close to a uniform 0.5” as you can.
Step 6:
Lay the completed strip horizontally on a table, and cut even vertical scores through the top sheet of paper every 2” along the total length.
Step 7:
Flip the strip over, and using hot glue, attach the LED string along the length of the Foamcore strip.
Step 8:
Bend the completed strip into a rough circle using the scores you cut in the back of the Foamcore as bend points.
Step 9:
Lay the LED strip in a ring over the hole in your 12x12" foamcore square. The full LED strip will be too long. Size your LED circle to be just larger than the hole, and cut off the extra LEDs (about 6 LEDs.) You can still use these spare LEDs for a different project later.
Step 10:
Place the LED strip in a ring on the top surface (bad side) of your 12x12" square, and hot-glue in place just at the edge of the circle hole. Make sure the back of the LED ring is at least 0.25” in from the edge of the 12 x 12” square. (Otherwise, the black plastic spacers from the frame won't fit around it.
Step 11:
If using the semi-mirror film, take the glass out for your shadowbox frame and apply the film to the glass following the manufacturer’s instructions. I found this to be the most fiddly step. Make sure to clean the glass first and use water (or soap solution) to make the air bubbles easier to remove. Using the mirror film creates a much stronger illusion and hides the LEDs, but it is not 100% necessary (and you can added it later if desired!) If using film, place the glass back in the frame with the film side facing up/into the frame.
Step 12:
With the frame facing down and the glass clean, position the foam on top of the glass, with the good side down and the LED ring up. Add two of the spacers that came in the frame, then add your 12x12” mirror face down. The LED wires should come out the back of the frame past the mirror. If the mirror fit is too tight for the wires, you may need to carefully carve a notch for the wires in the frame edge using a box-cutter or hobby knife.
If there’s space, add the cardboard frame backer, or if not just hold the mirror in place with the frame’s tabs. That’s done! Now for the magic of electronics.
Part Two: Setting up the ElectronicsStep 1
Find the extra 6-LEDs you cut off the end earlier. Collect the harness from the end, cutting about 1 cm from the lights. Strip the wire ends.
Step 2
Break apart the bent header pins that came with your voltage regulator, and solder two of them to the ends of the green and yellow wires. This will let you easily plug them into the pins of the Arduino 101.
Step 3
Next solder the red wire to the VIN terminal on the Voltage Regulator, and solder two straight headers into the GND and VOUT pins as shown.
Step 4
Now connect the barrel jack adapters. First strip the ends of the wires coming from your battery case, then mount them in the terminals of the male barrel jack and tighten with a screwdriver. RED goes to the (+) terminal, BLACK goes to the (-) terminal.
Next connect the female barrel jack adapter onto to the loose wires coming from the beginning of the LED strip (coming from the back of your mirror.) On this strip, YELLOW goes to the (-) terminal, and RED goes to the (+).
Step 5
Now connect your harness to the Arduino 101. The GREEN wire goes to PIN 6, the YELLOW wire goes to the GND pin near #13.
With the two header pins on the voltage regulator, GND goes to GND and VOUT goes to the "Vin" pin on the Arduino 101. Don't get this wrong! Plugging in backwards leads to smells and burns. I know this.
Step 6: Connect the wire harnesses on the Arduino 101 and the LED strip together, then connect the battery-pack barrel jack to the LED strip's barrel jack and you're all wired up!
Step 7:
Now that your electronics are done, position the Arduino 101 on the back of the mirror with its orientation parallel to any side of the mirror. Attach it with Velcro, double-sided tape or hot glue. Mount the battery pack nearby and secure any loose wires with tape or glue.
Upload the sample code using a computer, a USB cable and the Arduino IDE.
Alternatively, you can access, edit and upload the example code using the Arduino web-based IDE.
Try it out!
The example code changes the colors of the LEDs based on the angle of the mirror, as read from the accelerometer on the Intel Cure Compute Module. Currently, one position turns all the lights off, and one angle creates a chasing light effect with the last color used. Feel free to dive into the code and make some crazy lighting effects! The excellent Adafruit NeoPixel Uberguide is a great place to start.
IMPORTANT! If you want to permanently install this mirror, you can use a plug-in power supply instead of the battery pack, but make sure it's outputting 3.5v - 5v! Any higher voltage (such as a 9v square battery) may overload the LED strip.


Comments