


Hardware components | ||||||
| × | 1 | ||||
| × | 1 | ||||
Software apps and online services | ||||||
 |
| |||||
| ||||||
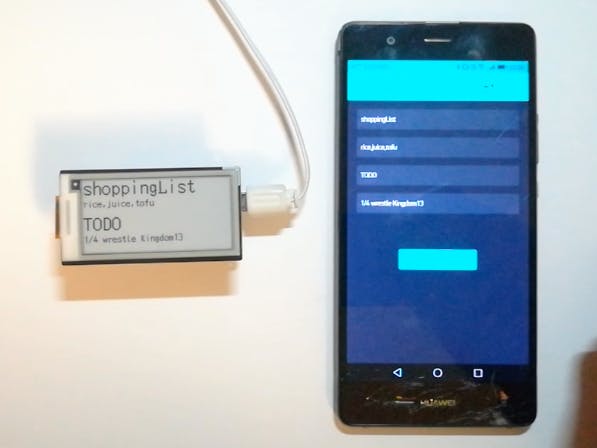
I made a remote notepad with an ePaper display and Blynk.
Place the electronic paper module on the Firebeetle ESP32, write the text on the Blynk smartphone application, and display it on the electronic paper.
Blynk SettingSmartphone and FireBeetle ESP32 IoT microcomputer board will make WiFi communication using Blynk of smartphone application. Version of Blynk application is 2.27.1.
Create a new project. HARDWRE MODEL selects ESP32 Dev Board. CONNECTION TYPE selects WiFi. AUTH TOKEN is used when generating Arduino code (it will be sent via email).
Place four text input widgets. We made output to virtual pins V1 - V4 respectively.
Also place the read button when reading the contents of the electronic paper module writing into the text input widget of the Blynk application (virtual pin V 0).
As shown above, we have four text Input widgets and one read button.
Arduino CodeFireBeetle ESP32 Arduino firmware uses version 0.0.7 of FireBeetle - ESP32 Mainboard.
I use the following as a library for electronic module. Supports Chinese and English only (December 2018).
- DFRobot_ePaper Libraryhttps://github.com/DFRobot/DFRobot_ePaper
- DFRobot_Display Libraryhttps://github.com/DFRobot/DFRobot_Display
I also use the library for Blynk. The version is 0.5.4.https://github.com/blynkkk/blynk-library
#define BLYNK_PRINT Serial
#include <WiFi.h>
#include <WiFiClient.h>
#include <BlynkSimpleEsp32.h>
#include<string.h>
#include<cstring>
#include "Arduino.h"
#include "DFRobot_IL3895_SPI.h"
DFRobot_IL3895_SPI epaper;
#define EPAPER_CS  D3
#define Font_CS  D6
#define EPAPER_DC  D8
#define EPAPER_BUSY     D7
// You should get Auth Token in the Blynk App.
char auth[] = "YourAuthToken";
// Your WiFi credentials.
// Set password to "" for open networks.
char ssid[] = "WiFi SSID";
char pass[] = "password";
String textIn1 = "none";
String textIn2 = "none";
String textIn3 = "none";
String textIn4 = "none";
int state = 0;
//Text Input Receive data
BLYNK_WRITE(V1) {
  textIn1 = param.asStr();
  Serial.println(textIn1);
  state = 1;
}
BLYNK_WRITE(V2) {
  textIn2 = param.asStr();
  Serial.println(textIn2);
  state = 1;
}
BLYNK_WRITE(V3) {
  textIn3 = param.asStr();
  Serial.println(textIn3);
  state = 1;
}
BLYNK_WRITE(V4) {
  textIn4 = param.asStr();
  Serial.println(textIn4);
  state = 1;
}
//Text content memorized by the Read button On is displayed
// on the Blynk application side
BLYNK_WRITE(V0) {
  Serial.println("Read Push!");
  Blynk.virtualWrite(V1, textIn1);
  Blynk.virtualWrite(V2, textIn2);
  Blynk.virtualWrite(V3, textIn3);
  Blynk.virtualWrite(V4, textIn4);
}
void setup() {
  Serial.begin(115200);
  //Select the corresponding pins
  epaper.begin(EPAPER_CS, Font_CS, EPAPER_DC, EPAPER_BUSY);
  //Clear the screen and display white
  epaper.fillScreen(WHITE);
  epaper.flush(FULL);
  Blynk.begin(auth, ssid, pass);
}
void loop() {
  Blynk.run();
//Text Input Widget Display contents in electronic paper module when writing
  if(state == 1){
    epaper.fillScreen(WHITE);
    char* c1 = new char [textIn1.length()+1];
    strcpy (c1, textIn1.c_str());
    char* c2 = new char [textIn2.length()+1];
    strcpy (c2, textIn2.c_str());
    char* c3 = new char [textIn3.length()+1];
    strcpy (c3, textIn3.c_str());
    char* c4 = new char [textIn4.length()+1];
    strcpy (c4, textIn4.c_str());
    epaper.disString(0, 0,2, c1, BLACK);
    epaper.disString(0,33,1, c2,BLACK);
    epaper.disString(0,61,2, c3,BLACK);
    epaper.disString(0,94,1, c4,BLACK);
    epaper.flush(FULL);
    state = 0;
  }
}
Content is displayed on the electronic paper module each time a character is input to the text input widget. Also, the contents written with the read button tap are loaded into the text input widget.


Comments