

Hardware components | ||||||
| × | 1 | ||||
| × | 1 | ||||
Software apps and online services | ||||||
 |
| |||||
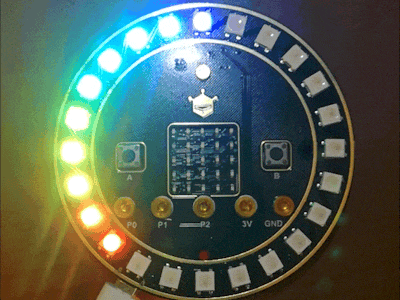
It is a cute circular board that extends micro:bit.
You can easily connect to micro: bit just by screwing.
- Connected to micro: bit with 5 points of 0, 1, 2 pins and 3 V, GND
- The expansion board itself has USB micro port for power supply and PH 2.0 pin connector (3.5 to 5.0 V).
- Buzzer is connected to 0 pin. There is ON / OFF switch, external connection is possible with PH 2.0 - 3 pin connector.
- A microphone is connected to pin 1. There is also ON / OFF switch, external connection is possible with PH 2.0 - 3 pin connector.
- 24 pcs of full color LED WS 2812 (NeoPixel) are connected to pin 2
Code examples by MakeCode are uploaded below. Just drag and drop the downloaded hex file into the "MICROBIT" driver recognized when micro: bit is connected to the PC.
Rotated Circular Light
- The Graphic Programming of Rotated Circular LightCircumferential LED turns while rainbow shines
- Yellow Rotating Circular LightCircumferential LED glows glowing yellow
Sound Control Circular Light
- The Graphical Programming of Voice Control Circular LightPick up the sound with a microphone and change the number of circumferential LED lights depending on the volume. The volume is displayed in the LED matrix of micro:bit.
Control the Circular Light via Key A, B
- Control the Annular Light via Key A, BIf you press the micro: bit A, B button, the circumferential LED will light up in each pattern.
Breathing Light
- Breathing LightThe circumference LED turns red slowly and repeats turning off.
Tomato Timer
- Tomato TimerIt is a timer. Pressing the micro:bit A button will start the program and the circumference LED will refresh the color every second. When one minute stands, the LED matrix of micro:bit lights one by one, and when it glows all 25 lights, the buzzer sounds. Press the B button to stop the buzzer and stop the program.
Below is a motion video of part of the sample code.
ReferenceCreate original programAccess MakeCode and click "New Project" to create the code.https://makecode.microbit.org/
Here I made a compass. The north direction is shown by displaying arrows on the expansion board circumferential LED and micro:bit LED matrix.
Add block for Neopixel
- Click "Advanced" -> "Extension"
- Select neopixel from extensions
- The Neopixel block is added
I got the compass heading (°) from the micro:bit, lit one of the circumferential LEDs corresponding to the compass heading (°) in red, and displayed the arrow on the micro:bit LED matrix.
The JavaScript code generated from the above block diagram is also described.
let range: neopixel.Strip = null
let Deg = 0
let LED: neopixel.Strip = null
LED = neopixel.create(DigitalPin.P2, 24, NeoPixelMode.RGB)
basic.forever(function () {
    if (input.compassHeading() > 337 || input.compassHeading() <= 22) {
        basic.showArrow(ArrowNames.North)
    } else {
        if (input.compassHeading() <= 67) {
            basic.showArrow(ArrowNames.NorthWest)
        } else {
            if (input.compassHeading() <= 112) {
                basic.showArrow(ArrowNames.West)
            } else {
                if (input.compassHeading() <= 157) {
                    basic.showArrow(ArrowNames.SouthWest)
                } else {
                    if (input.compassHeading() <= 202) {
                        basic.showArrow(ArrowNames.South)
                    } else {
                        if (input.compassHeading() <= 247) {
                            basic.showArrow(ArrowNames.SouthEast)
                        } else {
                            if (input.compassHeading() <= 292) {
                                basic.showArrow(ArrowNames.East)
                            } else {
                                if (input.compassHeading() <= 337) {
                                    basic.showArrow(ArrowNames.NorthEast)
                                }
                            }
                        }
                    }
                }
            }
        }
    }
})
basic.forever(function () {
    Deg = pins.map(
    input.compassHeading(),
    0,
    360,
    23,
    0
    )
    LED.clear()
    range = LED.range(Deg, 1)
    range.showColor(neopixel.colors(NeoPixelColors.Red))
    LED.setBrightness(40)
    LED.show()
})
It points to the direction of north.
Compass calibrationWhen MakeCode writes the code using the micro:bit compass, it becomes the calibration mode the first time it starts up and it is displayed in the LED matrix "TILT TO FILL SCREEN".
After character display, tilt to various angles until all LED matrix blinks. When filling in all, the smile mark appears and the calibration is over.


Comments