


Hardware components | ||||||
 |
| × | 1 | |||
 |
| × | 1 | |||
 |
| × | 1 | |||
This project will show you how to upload Arduino analog pin data to Mediatek Cloud Sandbox (MCS in short) cloud service. We are running Python and Node.js to ask for Arduino pin status, since DFrobot's LattePanda has an on board Arduino chip, we use it as a compact solution, or you can implement this project on a regular PC and connect an Arduino to it.
Let's startWe are going to send Arduino's analog pin status (connnect to a DFrobot ambient light sensor or common photoresistor) to MCS, and trigger a push notification to your Android phone when a certain situation is satisfied.
Mediatek Cloud SandboxMediatek Cloud Sandbox is a free and beginner-friendly cloud service launched by Mediatek Labs. MCS is open f
MediaTek Cloud SandBox(MCS)是聯發科技創意實驗室為旗下LinkIt系列開發板所提供的專屬網頁介面雲端平台,具有物聯網裝置最需要的資料儲存及裝置管理服務。MCS可以很快速地建立雲端應用程式,對於有意將裝置原型快速商品化的人來說,是一套相當便利的系統。它可以讓使用者專注在取得最重要的實體運算資料,不需要處理網路協定。而在MCS所提供的各種資料通道(Data channel)中,你可以輕易的為物聯網裝置建立一個控制面板,還能夠使用專屬的Android手機應用程式來檢視喔!
MCS howtoWe are going to how to how to create a prototype in MCS, then create data channel to receive data under a prototype. And a test device to interact with your device (Lattepanda in our case).
Please login MCS (create an account for freee if you don't have one yet), the main dash board will look like this:
- Development:
- Prototype: To add/modify/delete your prototypes.
- Test Devices: 已The list of created test devices, you can interact with your IoT boards through specific test device
- Management:
- Resources: tutorials, API references, mobile app and system log.
- Help: FAQ, forum and feedback.
- Profile: 設定使用者大頭照、系統語系 and enabled Android phone to receive pusho notifications.
There are two kinds of data channel: Controller to send commands to the board and Display to receive data from the board. This project will show data from LattePanda 's Arduino chip on an integer display channel.
Controller Data channel includes:
- ON/OFF
- Category
- Integer
- Float
- Hex
- String
- GPS
- GPIO
- PWM
- Analog
- GamePad
Display Data channel includes:
- ON/OFF
- Category
- Integer
- Float
- Hex
- String
- GPS
- GPIO
- PWM
- Image
- Display
- Video
- Stream
Now we are going to create a virtual device (with integer data type) in MCS to receive data from LattePanada.
- Log in MCS, you can create a free account it not have one.
- 入MCS之後,請點選畫面左上角的「開發」,選擇「原型」。
- Click Create prototype來 and follow below settings to finish:
- 產品原型名稱:LattePanda
- 產品原型版本:1.0
- 硬體平台:Others
- 產業:其他
- 應用程式:其他
- Upload Image:
- 進入這個原型之後,請點選建立資料頻道,先選擇顯示器。並按照以下設定完成原型設定:
Notice the identifier is channel id not channel name, but in order to simplify, we suggest that you can make channel id and channel name with the same.
- data channel name: sensor
- data channel Id:sensor
- description: optional
- data type: Integer
- Unit: other. Choose a correct unit according to t kind of sensor you used.
Now we have created a prototype with a display data channel. Return to the prototypes page, you will see the prototype just created. The two "0" here is due to there are no devices yet. Please click "..." on the top-right corner to modify/dulicate thie prototype.and 請回到原型頁面可以看到方才所建立的原型,由於在此尚未建立測試裝置與裝置,因此兩個數字都是0。請點選其右上角的「…」,可以編輯、複製、匯出以及刪除。其中匯出之後的JSON檔可以讓別人直接匯入來建立原型,這個做法在原型已經很複雜時非常好用。
05.jpg 編輯原型
- 接著是要建立測試裝置(test device)。請點選畫面右上角「創建測試裝置」,在此請輸入裝置名稱即可。
- Enter the test device page when it's created. It's quite similar with the prototype page, but you can see a DeviceId and DeviceKey gat the top-right corner, you must put modify the code with these two data.
- 測試裝置設定完成後,就能將建好的測試裝置透過DeviceId 跟 DeviceKey與別人分享,也可以自行設定觸發條件,讓MCS寄信給你。接著在原型頁面下點選「Trigger&Action」標籤,再點選「+ Add trigger & action」來加入新的觸發條件與動作。在此需要三個步驟:
- 觸發條件名稱請隨意輸入,這會成為手機推播訊息標題或是電子郵件標題。
- This will create a trigger event with existed data channel, please select our data channel: sensor, condition is "> 800".
- Last step is to set trigger action. 最後一步是選擇觸發動作。動作類型請選擇「手機推播」(另外還有電子郵件與觸發其他網路服務的Webhook選項)。Content please type:
LattePanda's A0 value exceeded: ${deviceName} / ${value}
with ${deviceName}and ${value} can bring out your device name and value when event triggered.
- 請注意如果要使用手機推播功能,先到個人檔案中(MCS畫面右上角)打開所要接收推播訊息的手機,如下圖。手機需要先安裝MCS app(目前只有Android版)。
在個人檔案頁面打開要接收推播訊息的手機
Check the 「觸發條件與動作」tag in your test device.
To view your MCS data, please install MediaTek Cloud Sandbox on
Please install Python2.7, and create a mcs.py file and paste Python code below (or download our code directly). Modify the information with your deviceId, deviceKey and channelId in previous steps. And execute this file with instruction below::
python mcs.py
1、先上傳Arduino端的程式之後,2、再執行Python或Node.js任一程式即可。Python或Node.js會透過我們在程式中所設定的序列埠號向Arduino要資料,即類比腳位A0的資料。
之所以使用這樣的架構,雖然使用了兩種程式語言,但是可以發現程式的總行數簡化很多。如果後續改用Raspberry Pi搭配Arduino或是7688 Duo的話,也可以看到這樣的混搭應用。
PythonSimply descirble this Python code as below:
import serial
import time
import requests
匯入了本程式所需的Python函式庫,其中serial是用來與序列裝置通訊,也就是Arduino。
ser = serial.Serial('COMX',9600)
指定LattePanda上的Arduino晶片所取得的COM埠號,例如「COM4」。
#07 08 則是您先前辛辛苦苦在MCS上取得的測試裝置DeviceId / Key
#10 MCS所設定的資料通道ID
#22 無窮迴圈
#23 抓到來自Arduino丟來的第一筆資料'a',這等於是標頭檔,以避免封包遺失對於通訊品質的影響。
#24 ser.read() to get serial data from Arduino.
#30 upload data to MCS
import serial
import time
import requests

ser = serial.Serial('COMX',9600)

device_id = "Your device ID"
device_key = "Your device Key"

data_channel = "sensor"
data_channel +=",,"
url = "http://api.mediatek.com/mcs/v2/devices/" + device_id
url += "/datapoints.csv"

def MCS_upload(value,length):
   data = data_channel+str(value)
   r = requests.post(url,headers = {"deviceKey" : device_key,'Content-Type':'text/csv'},data=data)

print r.textprint "Start"
while True:
   if ser.read()=='a':
      IncommingNum = ser.read()
      sensor = int(ser.read(int(IncommingNum)))
      a = 8
      a += int(IncommingNum)
      MCS_upload(sensor,a)
It's also good to implement this project with Node.js, you can choose anyone you prefer. But first you have to install Node.js.
請建立一個mcs.js檔之後貼入下列內容,修改對應資訊之後使用以下指令執行:
node mcs.py
mcs.js
var mcs = require('mcsjs');
var SerialPort = require("serialport").SerialPort
var serialPort = new SerialPort("COMX",{baudrate: 9600});
var myApp = mcs.register({
   deviceId: 'your device ID',
   deviceKey: 'your device Key',});
serialPort.on("open", function () {
receivedData ="";
serialPort.on('data',function(data)        {
receivedData =data.toString();
a = receivedData.length;
myApp.emit('sensor','', receivedData.substring(2,a));
//從字串的2號位置取長度a,即可取得資料本身
});
});
Arduino sketch is quite simple, it opens a serial connection to Lattepanda (#5 Serial1). 進入loop()函式之後,#11~#13為搭配標頭a、資料長度與資料本體結合成一個封包之後發送給LattePanda端的Python、Node.js或其他程式。
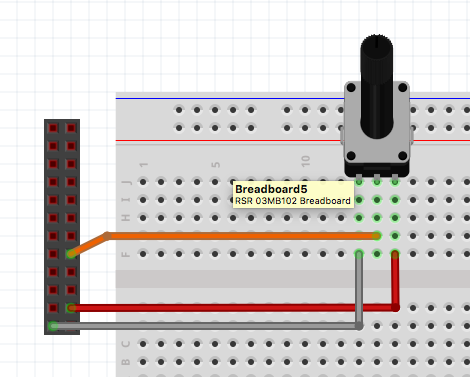
#define sensorPin A0
void setup() {
 Serial.begin(9600);    //Serial monitor
 Serial1.begin(9600);   //LattePanda對Arduino的序列通訊
}
void loop() {
 int Sensor = analogRead(sensorPin);
 Serial.println(Sensor);   //顯示A0腳位狀態
 Serial1.print('a');
 Serial1.print(String(Sensor).length());
 Serial1.print(Sensor);
 //#11~#13為搭配標頭a、資料長度與資料本體
 //結合成一個封包之後發送給LattePanda
 delay(1000);
}
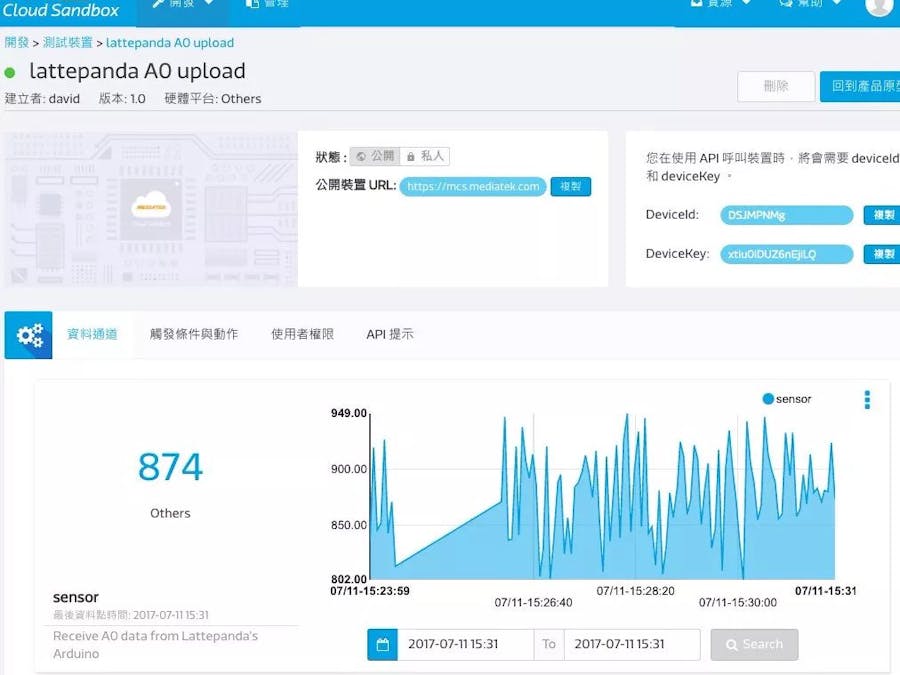
請先將Arduino端程式上傳到LattePanda的Arduino上,接著開啟Windows的命令提示字元來執行Node.js或Python(兩者任一)即可透過序列埠取得來自Arduino端的資料之後上傳到MCS雲服務,我們可以看到數值變化,並點選該資料通道的右上角即可看到歷史數值變化,如下圖。
Or view the data through MCS Android App.
當數值超過我們所設定的上限時, Android手機會收到來自MCS手機端程式的推播訊息,如下圖。


Comments