1. Before you startIn this lesson will be used an LCD and real time clock, so take care to read the lessons Arduino & LCDs and Real Time Clock (RTC) PCF8563 before you start.
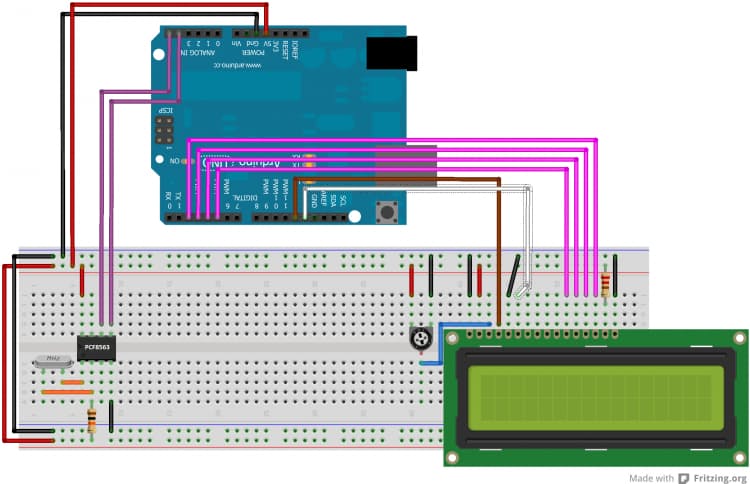
2. SchematicThe schematic is a merge of the two previous lessons so it is very simple. The PCF8563 communicate with Arduino using TWI and when the data is received the LCD is refreshed, showing the new time.
3. Set date and timeTo set Date and Time use the following sketch:
/* Demonstration of Rtc_Pcf8563 Set Time.
 * Set the clock to a time then loop over reading time and
 * output the time and date to the serial console.
 *
 * I used a RBBB with Arduino IDE, the pins are mapped a
 * bit differently. Change for your hw
 * SCK - A5, SDA - A4, INT - D3/INT1
 *
 * After loading and starting the sketch, use the serial monitor
 * to see the clock output.
 *
 * setup:  see Pcf8563 data sheet.
 *         1x 10Kohm pullup on Pin3 INT
 *         No pullups on Pin5 or Pin6 (I2C internals used)
 *         1x 0.1pf on power
 *         1x 32khz chrystal
 *
 * Joe Robertson, jmr
 * orbitalair@bellsouth.net
 */

#include <Wire.h>
#include <Rtc_Pcf8563.h>


//init the real time clock
Rtc_Pcf8563 rtc;

void setup()
{
  //clear out the registers
  rtc.initClock();
  //set a time to start with.
  //day, weekday, month, century(1=1900, 0=2000), year(0-99)
  rtc.setDate(14, 6, 3, 1, 10);
  //hr, min, sec
  rtc.setTime(1, 15, 0);
}

void loop()
{
  //both format functions call the internal getTime() so that the
  //formatted strings are at the current time/date.
  Serial.print(rtc.formatTime());
  Serial.print("\r\n");
  Serial.print(rtc.formatDate());
  Serial.print("\r\n");
  delay(1000);
}
4. The codeNow you can use your clock loading this sketch on your Arduino:
#include <Wire.h>
#include <Rtc_Pcf8563.h>


//init the real time clock
Rtc_Pcf8563 rtc;

// include the library code:
#include

// initialize the library with the numbers of the interface pins
LiquidCrystal lcd(12, 11, 5, 4, 3, 2);

void setup() {
  // set up the LCD's number of columns and rows:
  lcd.begin(16, 2);
  lcd.print(" Arduino Clock!");
  while(1500 - millis() > 0);
  pinMode(13, OUTPUT);
}

void loop() {
  lcd.setCursor(0, 0);
  lcd.print("Date: ");
  lcd.print(rtc.formatDate());

  lcd.setCursor(0, 1);
  lcd.print("Time: ");
  lcd.print(rtc.formatTime());
}


_ztBMuBhMHo.jpg?auto=compress%2Cformat&w=48&h=48&fit=fill&bg=ffffff)


Comments