


Hardware components | ||||||
| × | 1 | ||||
 |
| × | 1 | |||
_ztBMuBhMHo.jpg?auto=compress%2Cformat&w=48&h=48&fit=fill&bg=ffffff) |
| × | 1 | |||
 |
| × | 1 | |||
Software apps and online services | ||||||
| ||||||
Note: Pulse width modulation(PWM) is an important component of servo operation. Please read this article if you're unfamiliar with PWM before proceeding.
Introduction to ServosThe term servo originates from servomechanism, which refers to any system that uses negative feedback to correct its position or speed. A negative feedback system feeds its output into the input in order to provide error correction or speed limitation. The first example of a mechanical negative feedback system was an 18th-century steam engine governor, which used the engine speed as an input in a mechanical system to cap the engine speed at a safe rate. A cruise control system is a modern example of a servomechanism because the speed of the car influences the throttle position, which is adjusted to maintain the desired speed.
Servomotors are a subcategory of servomechanisms, and are usually what people are referring to when they say servo. Servomotors use digital encoders or potentiometers to determine the position of the drive shaft. They are used in a wide array of industrial and personal applications such as valve control, robotic parts, and actuators for hobby projects.
This write-up will be focused on electronic servos used in remote control applications, since these are most commonly used in hobbyist projects. R/C servo operational principles will be discussed, followed by a demonstration of how to characterize a servo using an OpenScope device.
R/C servos, like their industrial counterparts, have a feedback system that allows for precise position control. If something tries to move the DC motor from a particular position, say a rudder encountering air resistance on an R/C airplane, the servo will apply additional force to recover and maintain the position.
The error correction system is comprised of a potentiometer, which is attached to the motor's output shaft, and an error amplifier. The error amplifier has two input signals that it is comparing: the current position of the motor, provided by the potentiometer, and the desired position of the motor, provided by the controller signal. When the signals don't match, the output from the amplifier drives the motor to make the inputs match.
In order to change the position of the servo, the error amplifier needs to have a variable analog voltage applied to the controller pin. Generating a precise analog voltage requires integrated circuits that can be quite expensive, so many microcontrollers don't have this ability, and instead rely on PWM to simulate analog voltages.
As the article about PWM (linked above) discusses, a capacitor receiving a PWM signal will tend to average out the signal voltage. For example, a 50% duty cycle with a 5V peak will cause the capacitor to hold a voltage equal to approximately half the signal's max, or 2.5V. By varying the amount of time the PWM signal is high, the capacitor charge can be varied, thus creating an analog voltage. The screenshots below demonstrate this concept with a PWM signal being fed into a resistor-capacitor circuit.
Servos use a similar concept to set the position of the motor. As the charge on the capacitor varies with the amount of time it receives a high signal, the servo's error amplifier will see a difference between the potentiometer and the capacitor. The output will then cause the motor to move to a position that will match the potentiometer's voltage to the capacitor's voltage. Of course, a lot more hardware goes into making the servo operate correctly, but these are the basic concepts.
Most servos have a range of motion limited to 180°, but some are designed for a smaller or larger range, or are able to rotate continuously (in which case the speed, not the position, is controlled by the pulse width).
R/C servos vary by design, but a pulse width of 1.5ms will cause the servo to move to the neutral position, halfway through its range of motion, or stop in the case of continuously rotating units. The pulse widths needed to move the servo to the two extremes (or the maximum forward/backward speed) depend on the servo itself, but all R/C servos have the same neutral position pulse width (1.5ms).
Arduino Servo LibraryArduino comes with a library designed for operating servos. While controlling a servo directly via PWM is entirely possible, it's much easier to use the Servo library. Including "Servo.h" at the beginning of the code is all that's needed to start using the library.
It might be necessary to change the control signal pulse width limits to use the servo's full range of motion. By default, these limits are set to 544ms and 2, 400ms. The servo used in this demonstration required the limits to be set to 550ms and 2, 650ms to achieve 180° of motion.
Servo Characterization with OpenScopeOpenScope along with WaveForms Live can be used to characterize the servo and find its pulse width limits.
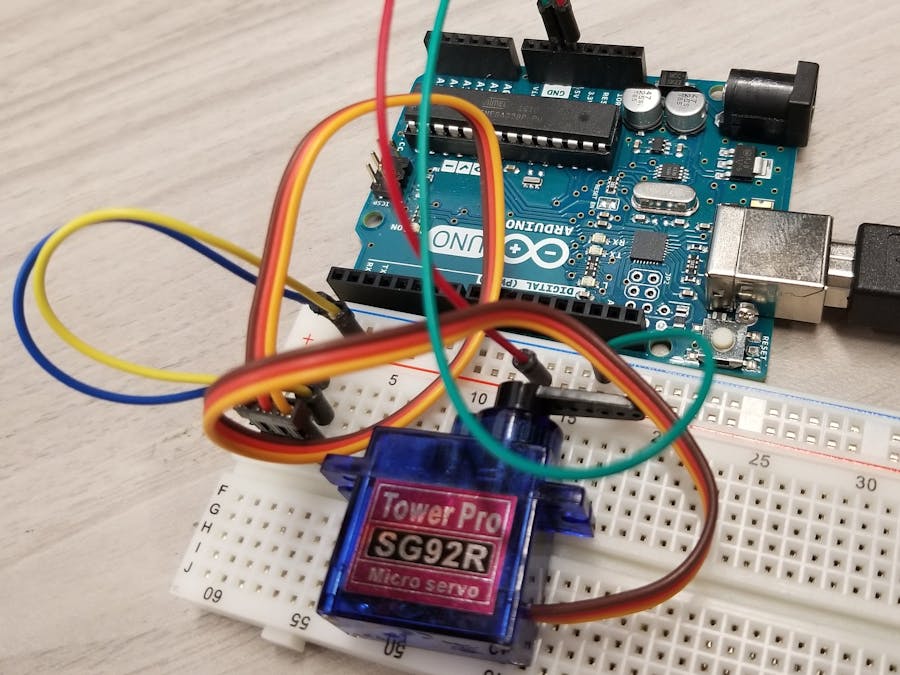
A potentiometer is used to select the servo position in this demonstration, as seen in the schematic below. Use the code attached at the end to operate the servo.
From the OpenScope, attach the orange oscilloscope cable to PWM pin 9, and the blue oscilloscope cable to the analog input pin A0. The first cable will monitor the signals being sent to the servo, and the second cable will monitor the voltage level in the potentiometer used to set the servo position. Ensure that the two oscilloscope ground cables are attached to the Arduino's ground.
Initially, move the potentiometer from one extreme to the other to see if the servo is able to achieve its full range of motion. If it isn't, the limits are too tight and need to be expanded. Even if the servo is able to achieve its full range of motion it is necessary to check that the limits are not set too far, which would cause a dead zone in the input (something that might be undesirable if the servo is being used as a gauge, for example).
Connect the OpenScope to WaveForms Live and perform the following steps to configure the display to show information relevant to the characterization:
- At the top of the screen, in the Time option type "1ms".
- Under the Trigger section click the RisingEdgeTrigger button (hover the mouse over each button to see its name). For Source select "Osc Ch 1" and leave Level at "500mV".
- Under both the OscCh1 and the OscCh2 sections, change Volts to "2V". Leave all the other settings at their defaults.
- At the bottom of the WaveForms Live screen is a button labeled CURSORS. Press it and in the dialog select the following: under Type select "Time", under Cursor1Channel select "Osc 1", and under Cursor2Channel select "Osc 2". An orange and blue cursor should appear on the display. Use the arrows at the top of the cursors to drag them around. Place the blue cursor on the left side of the green line, and leave the yellow one alone for now.
On line11 in the code, the attach() function is used to set pin 9 as the servo control pin, while the second and third values are used to set the pulse width in microseconds. The time values will need to be changed if the default ones do not allow full range of motion or are causing dead zones. For now, leave the values as they are (544 and 2400) and upload the code to the Arduino Uno.
Press the Run button in WaveForms Live, and set the potentiometer back to one of its extremes. At this point the orange line (oscilloscope Channel 1) in WaveForms Live should be showing up as a square pulse, and the blue line (Channel 2) should either be at a constant 0V or 5V, depending on which direction the potentiometer was connected. The value of Channel 2 can be seen at the bottom of the screen, after the "2:...". If the value is near zero (or a few hundred uV), set the potentiometer to the other extreme so that the value is near 5V. At this point, the WaveForms Live screen should look similar to the one below.
If the full range of motion is not available, it's likely a result of the larger pulse width value being too small. The shorter pulse width is probably within an acceptable range, as making the pulse width much shorter caused the demonstration servo to behave erratically instead of extending the rotation range. Set the third value in the attach() function to something large, like 2800, and after uploading the code, check to see if the full range is being used. Otherwise, try increasing the value again.
Once the full range of motion has been established, it's necessary to trim down the pulse width to remove any dead zone that might exist at the extreme positions of the potentiometer. To detect the dead zone, place the potentiometer in the position that causes Channel 2 to show 5V and keep WaveForms Live in Run mode. Hold the servo between two fingers, and slowly turn the knob back on the potentiometer. As soon as vibrations from the servo are felt, stop turning the knob. This is the DC motor in the servo engaging, which means it is responding to changes in the pulse width. Ensure that the servo is right on the cusp of engaging by turning the knob slightly up and down to find the exact spot (this doesn't have to be perfect, but closer is better).
Alternately, it's possible to detect servo engagement by watching the Channel 2 signal for a dip immediately following the signal pulse end on Channel 1. This is caused by the DC motor drawing current and slightly pulling down the 5V supply voltage. See the image below to see the dip.
In WaveForms Live, press Stop and drag the Channel 1 cursor so that it intersects with the orange line right at the point where the pulse drops to 0. Then look at the value at the bottom of the screen, after the "1:...". The voltage should be in the milli- or micro-volt range. The blue line should be slightly down from 5V, unless the servo responded immediately to the knob rotation, in which case the pulse width is correct. See the image below for clarification.
In the cursor measurements at the bottom of the screen, the time value expressed in milliseconds is the maximum pulse width the servo will respond to. Use this time in the attach() function as the third value. Note that the attach() function accepts pulse width values in microseconds, while the value in WaveForms Live will be in milliseconds, so the value will need to be multiplied by 1000 before placing it in the code.
To check that the pulse width is correct, upload the code with the updated value, and see if the servo responds immediately to the knob being moved. Also ensure the servo still has its full range of motion.
The servo code is now ready to be integrated into a larger project, and will allow the full range of the servo to be utilized without any dead zones.

Boris Leonov


Comments